
So, you’ve noticed your Honda mower isn’t running as smoothly as it used to, and you suspect the carburetor might be the culprit. The carburetor is a crucial component in the engine’s fuel system, and if it’s dirty or out of adjustment, it can cause performance issues.
In this discussion, we’ll walk you through the process of cleaning and adjusting the carburetor on your Honda mower, ensuring it runs as efficiently as possible.
But before we get into the nitty-gritty details, let’s start with the essential tools and materials you’ll need for this task.
Tools and Materials Needed
You will need a screwdriver, pliers, a carburetor cleaner, and a clean cloth to clean and adjust the carburetor on your Honda mower. These tools are essential for the task at hand and will help you effectively clean and adjust the carburetor to ensure your mower runs smoothly.
The screwdriver will be used to remove the screws holding the carburetor cover in place. Once the cover is off, you can access the inner components for cleaning and adjustment.
Pliers will come in handy for carefully removing any stubborn or hard-to-reach parts that may need cleaning or adjustment.
A carburetor cleaner is crucial for removing any built-up grime or debris inside the carburetor. It will help ensure that the carburetor is thoroughly cleaned, allowing for optimal performance.
Additionally, a clean cloth will be necessary for wiping down the carburetor and its components after cleaning and making adjustments.
Having these tools and materials prepared and within reach will streamline the carburetor cleaning and adjustment process, allowing you to efficiently maintain your Honda mower for peak performance.
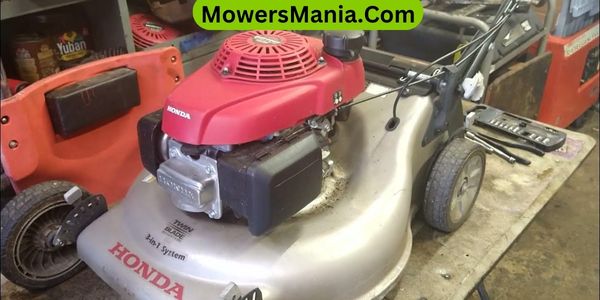
Locating the Carburetor
To locate the carburetor on your Honda mower, start by identifying the air filter housing, typically situated near the engine.
Once you’ve located the air filter housing, you can find the carburetor attached to it. The carburetor is a crucial component responsible for mixing air and fuel to ensure the engine runs smoothly.
It’s important to know the location of the carburetor so that you can easily access it for cleaning and adjustments.
| Carburetor Location |
|---|
| Step 1 |
| Locate the air filter housing near the engine. |
| Step 2 |
| The carburetor is attached to the air filter housing. |
| Step 3 |
| Once you’ve found the air filter housing, the carburetor is usually easily accessible for maintenance. |
| Step 4 |
| Knowing the location of the carburetor will help you perform regular cleaning and adjustments to keep your Honda mower running efficiently. |
| Step 5 |
| Understanding the carburetor’s location is essential for maintaining the overall performance and longevity of your mower. |
Understanding where the carburetor is located on your Honda mower is an essential step in keeping your equipment in top condition.
Maintaining and cleaning the carburetor will ensure that your mower operates at its best, allowing you to achieve a well-manicured lawn with ease.
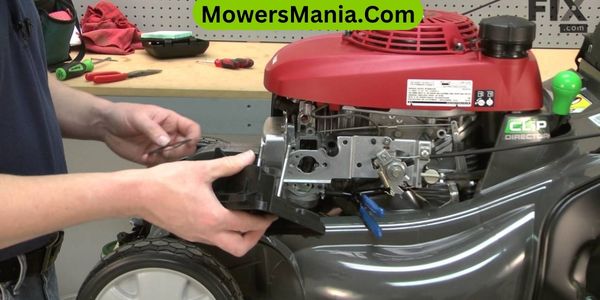
Cleaning the Carburetor

After locating the carburetor on your Honda mower, start by removing the top cover and air filter housing to access the carburetor for cleaning.
Once you have clear access to the carburetor, follow these steps to clean it effectively:
- Use a can of carburetor cleaner to spray and clean the exterior of the carburetor. Be sure to remove any dirt, grime, or debris that may have accumulated on the surface.
- Carefully disassemble the carburetor, taking note of the position of each part for reassembly. Clean each component thoroughly with carburetor cleaner to ensure all debris and residue are removed.
- Pay close attention to the small openings and passages in the carburetor, using a thin wire or a fine brush to clear any blockages or build-up.
- Once all parts are clean and dry, reassemble the carburetor, ensuring that each part is properly aligned and tightened to the manufacturer’s specifications.
Following these steps will help ensure that your Honda mower’s carburetor is clean and functioning optimally, allowing for smooth and efficient operation.
Adjusting the Carburetor
Once the carburetor on your Honda mower is cleaned and reassembled, adjusting its settings is crucial for optimal engine performance and fuel efficiency.
Start by locating the adjustment screws on the carburetor. There are usually three screws: the idle speed screw, the idle mixture screw, and the high-speed mixture screw.
To adjust the idle speed, turn the screw until the engine idles smoothly without stalling.
Next, adjust the idle mixture screw to achieve the smoothest and most consistent idle by turning it in or out until the engine runs smoothly.
Then, adjust the high-speed mixture screw to ensure the engine runs smoothly at full throttle.
It’s essential to make small adjustments and test the engine’s performance after each adjustment. Remember, the goal is to find the sweet spot where the engine runs smoothly and efficiently.
Once you’ve made these adjustments, your Honda mower should run like new, providing optimal performance and fuel economy.
Reassembling and Testing
Make sure all the components are reassembled correctly and securely before moving on to testing the Honda mower’s performance.
Once reassembled, follow these steps to test the mower:
- Check Fuel and Oil Levels: Ensure that the mower has enough fuel and oil to operate properly. Add more if necessary before testing.
- Inspect Air Filter and Spark Plug: Verify that the air filter is clean and the spark plug is in good condition. Replace or clean as needed to ensure proper airflow and ignition.
- Start the Engine: Crank the engine and allow it to run for a few minutes. Listen for any irregular noises and check for any signs of smoke or leaks.
- Test Cutting Performance: Engage the blades and test the mower’s cutting performance. Ensure that the engine runs smoothly without stalling and that the blades cut effectively.
After completing these steps, make any necessary adjustments to the carburetor to optimize the mower’s performance. If you encounter any issues during testing, refer back to the carburetor adjustment steps to troubleshoot and make the necessary corrections.
Frequently Asked Questions [FAQs]
Can I Use Any Type of Cleaning Solution to Clean the Carburetor, or Is There a Specific Type I Should Use?
You can’t use any cleaning solution on the carburetor. It’s necessary to use a specific type for cleaning. Look for a carburetor cleaner designed for small engines. Follow the manufacturer’s instructions for best results.
How Often Should I Clean the Carburetor on My Honda Mower?
You should clean the carburetor on your Honda mower at least once a year, or more frequently if you notice performance issues. Regular cleaning helps maintain optimal engine performance and prevents clogging or fuel-related problems.
Will Adjusting the Carburetor Affect the Warranty on My Honda Mower?
Adjusting the carburetor on your Honda mower won’t void the warranty as long as it’s done according to the manufacturer’s guidelines. Be sure to check the warranty terms and conditions for specific details.
What Are the Signs That Indicate the Carburetor on My Honda Mower Needs to Be Cleaned or Adjusted?
If your Honda mower struggles to start, idles roughly, or lacks power, it may indicate a dirty or misadjusted carburetor. Cleaning and adjusting it can help restore smooth operation and improve engine performance.
Can I Clean and Adjust the Carburetor on My Honda Mower Without Any Prior Mechanical Experience?
Yes, you can clean and adjust the carburetor on your Honda mower without prior mechanical experience. Follow the manufacturer’s instructions and use the appropriate tools. Take your time and be patient with the process.
Conclusion
Now that you have cleaned and adjusted the carburetor on your Honda mower, you can ensure that it’s running smoothly and efficiently.
Regular maintenance of the carburetor will help prolong the life of your mower and keep it performing at its best.
Remember to consult your mower’s manual for specific instructions and always work in a well-ventilated area when handling gasoline and engine parts.
Happy mowing!

