If you’re wondering how to clean the carburetor on your riding lawn mower, it’s a manageable maintenance task that can make a major difference in your mower’s performance.
Over time, dirt and debris can clog up the carburetor, causing engine issues.
Regular cleaning can remedy this predicament and keep your mower running smoothly.
Understanding the Carburetor’s Function
To clean the carburetor on a riding lawn mower, you should understand the carburetor’s function. The carburetor plays a crucial role in the engine’s performance by mixing air and fuel in the right proportions for combustion.
Understanding how the carburetor works will help you identify any issues that may be affecting your mower’s performance.
The carburetor works based on the principle of air pressure difference. When air flows through the narrow passage in the carburetor, it creates a low-pressure area, drawing fuel from the float bowl through the main jet.
This fuel and air mixture is then delivered to the engine for combustion. If the carburetor is dirty or clogged, it can disrupt this delicate balance, leading to poor engine performance or starting issues.
Cleaning the carburetor involves removing it from the mower, disassembling it, and carefully cleaning each component with carburetor cleaner.
Pay close attention to small openings and passages, as these are prone to clogging. Once cleaned, reassemble the carburetor and reinstall it on the mower.
Understanding the carburetor’s function is essential for maintaining a smooth-running engine and ensuring your riding lawn mower operates at its best.
Gathering the Necessary Tools and Materials
Before you begin cleaning the carburetor on your riding lawn mower, you will need to gather the necessary tools and materials for the job.
Here’s a handy table to help you ensure you have everything you need:
| Tools | Materials |
|---|---|
| Screwdriver | Carburetor cleaner |
| Socket wrench | Clean cloth |
| Wire brush | Gloves |
| Compressed air | Safety glasses |
| Small container | Replacement gaskets |
Having these tools and materials at hand will make the carburetor cleaning process much smoother and more efficient.
The screwdriver and socket wrench will help you disassemble the carburetor, while the wire brush and compressed air will aid in removing any stubborn debris.
The carburetor cleaner will help dissolve varnish and gunk, and the clean cloth will be handy for wiping down the components. Don’t forget to wear gloves and safety glasses to protect yourself from any harmful chemicals.
Lastly, having replacement gaskets on hand is wise in case you need to replace any during the cleaning process. Now that you have everything ready, you’re all set to begin cleaning your riding lawn mower’s carburetor.
Accessing and Removing the Carburetor
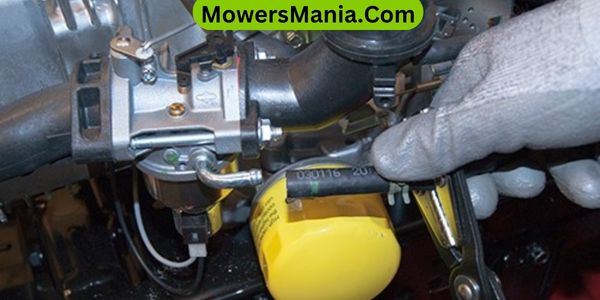
After gathering the necessary tools and materials, start by disconnecting the fuel line from the carburetor. This is important to prevent fuel from leaking and causing a hazard. Use a pair of pliers to carefully loosen the clamp that secures the fuel line to the carburetor.
Once the clamp is loose, gently twist and pull the fuel line off the carburetor. Be prepared for a small amount of fuel to spill out, so it’s a good idea to have a rag or some paper towels handy to clean up any drips.
Next, you’ll need to remove the air filter cover and air filter to access the carburetor. Depending on the model of your riding lawn mower, the air filter cover may be secured with screws or clips.
Use the appropriate tool to remove these fasteners and then lift off the cover. Once the cover is removed, take out the air filter to expose the carburetor.
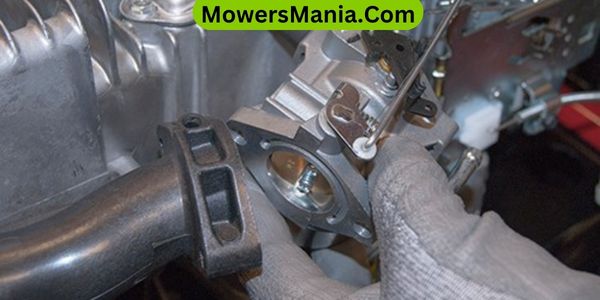
With the fuel line and air filter removed, you can now access the carburetor. Depending on your mower’s make and model, the carburetor may be secured with bolts or screws.
Use the appropriate tool to carefully remove these fasteners and then gently lift the carburetor out of its mounting. Be cautious not to damage any surrounding components as you remove the carburetor.
Cleaning the Carburetor Components
You can start by disassembling the carburetor to access its components for cleaning. Once the carburetor is disassembled, you’ll need to clean each component thoroughly.
Start by removing any visible dirt or debris from the carburetor components using a soft brush or compressed air. Pay special attention to small crevices and passages where dirt and grime can build up.
Next, soak the components in a carburetor cleaner solution to dissolve any stubborn deposits. Use a small brush to gently scrub the components and ensure that all the openings are clear.
After soaking, rinse the components with clean water and allow them to air dry completely. Inspect each part carefully to make sure there’s no remaining debris.
Once dry, reassemble the carburetor and reinstall it on the riding lawn mower. It’s important to follow the manufacturer’s guidelines for reassembly to ensure that each component is properly installed.
After cleaning and reassembling the carburetor, your riding lawn mower should run more smoothly and efficiently. Regular maintenance and cleaning of the carburetor components will help keep your mower in top condition.
Reassembling and Testing the Carburetor
To ensure the correct reassembly and successful testing of the carburetor, start by carefully placing each component back into its original position within the assembly.
Begin by reattaching the float and needle valve, ensuring that the float moves freely and the needle valve is properly seated.
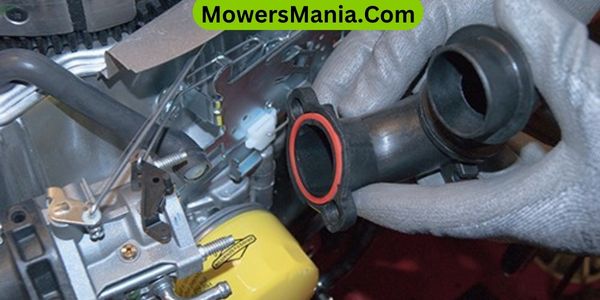
Next, reinstall the main jet, ensuring it’s snug but not overtightened. Then, carefully place the bowl gasket and bowl back onto the carburetor, making sure everything is aligned correctly. Once all components are in place, reattach the fuel line and any other connections that were removed.
After reassembly, it’s crucial to test the carburetor to ensure it functions properly. Start the engine and let it run for a few minutes to allow the carburetor to adjust.
Then, test the throttle response to ensure smooth acceleration and deceleration. Check for any fuel leaks around the carburetor and tighten connections if necessary.
Finally, perform a visual inspection to confirm that all components are in place and that there are no signs of leakage or irregularities. If everything checks out, your riding lawn mower should be ready to go.
Frequently Asked Questions [FAQs]
How Often Should I Clean My Riding Lawn Mower’s Carburetor?
You should clean your riding lawn mower’s carburetor at least once a year to ensure optimal performance. Neglecting this maintenance can lead to clogs and poor engine function. Regular cleaning will help prevent these issues.
Can I Use a Different Type of Cleaner for the Carburetor Components?
Yes, you can. Using a different type of cleaner for the carburetor components can be effective. However, make sure the cleaner is specifically designed for carburetors to avoid damaging the parts. Always follow manufacturer recommendations.
What Are the Signs That My Riding Lawn Mower’s Carburetor Needs Cleaning?
If your riding lawn mower is showing signs of poor performance such as rough idling, hard starting, or decreased power, it may be time to clean the carburetor. Regular cleaning can help maintain optimal performance.
Is It Necessary to Adjust the Carburetor Settings After Cleaning?
After cleaning the carburetor on your riding lawn mower, it’s important to check and adjust the settings if necessary. Cleaning may affect the carburetor’s performance, so adjusting it ensures proper fuel-air mixture and optimal engine operation.
Are There Any Special Precautions I Should Take When Handling the Carburetor Components?
When handling carburetor components, wear gloves to protect yourself from fuel and chemicals. Avoid using excessive force when disassembling or reassembling the carburetor to prevent damaging the delicate parts. Clean with caution.
Conclusion
Now that you’ve cleaned the carburetor on your riding lawn mower, make sure to test it out to ensure it’s working properly.
Regular maintenance of your lawn mower’s carburetor will keep it running smoothly and efficiently, allowing you to keep your lawn looking its best.
Remember to consult your owner’s manual for specific instructions and always prioritize safety when working on machinery.

