So, you’ve found yourself with a flat tire on your riding lawn mower. Don’t worry, it’s not as daunting as it seems. In just a few simple steps, you’ll have your mower up and running again in no time.
Grab your tools, secure the mower, and let’s get to work. We’ll guide you through the process of removing, patching or replacing, and re-installing the tire.
Before you know it, you’ll be back to mowing your lawn with ease.
Gather Necessary Tools
To fix a flat tire on your riding lawn mower, you’ll need to gather up the necessary tools.
- First, you’ll need a jack to lift the mower off the ground. A hydraulic jack works best for this task.
- Next, grab a lug wrench to loosen the lug nuts on the tire. Make sure the lug wrench fits the size of the lug nuts on your mower.
- It’s also a good idea to have a tire pressure gauge to check the air pressure of the spare tire. This will ensure that it’s properly inflated before installing it.
- Additionally, you’ll need a spare tire that’s compatible with your riding lawn mower. Make sure it has the correct size and tread pattern.
- Lastly, don’t forget about safety goggles and work gloves to protect your eyes and hands during the tire repair process.
Once you have gathered all these tools, you’ll be ready to fix the flat tire on your riding lawn mower.
Lift and Secure the Riding Lawn Mower
Now, with all the necessary tools gathered, it’s time for you to lift and secure your riding lawn mower.
Follow these steps to ensure a safe and efficient process:
- Find a flat and stable surface: Look for a solid surface that can support the weight of your mower without sinking or tipping. A concrete driveway or garage floor is ideal.
- Engage the parking brake: Activate the parking brake to prevent the mower from rolling while you work. This will keep you safe and ensure that the mower remains in place.
- Place wheel chocks: Position wheel chocks on the opposite side of the flat tire. These small wedges will prevent the mower from moving unexpectedly and provide added stability during the repair.
- Use a jack or lift: Carefully position a hydraulic jack or lift under the frame of the mower, near the flat tire. Slowly pump the jack until the tire is elevated off the ground. Ensure that the mower is stable and secure before proceeding.
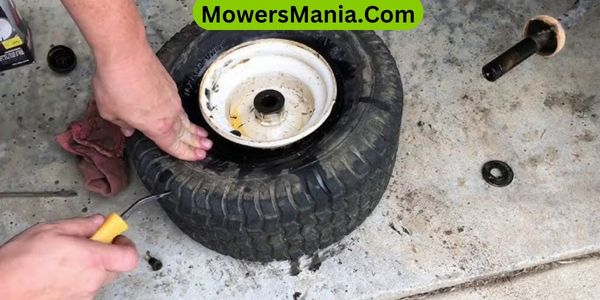
Remove the Flat Tire
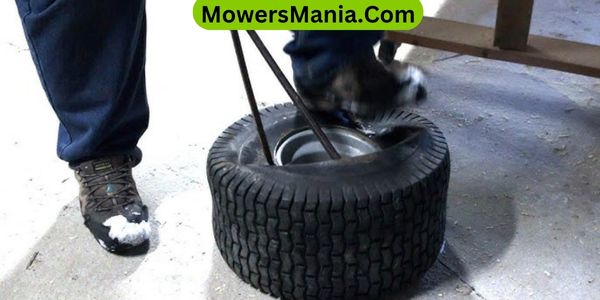
To remove the flat tire on your riding lawn mower, follow these steps:
- Deflate the tire completely using a valve stem removal tool.
- Locate the valve stem on the flat tire, usually near the center of the wheel.
- Insert the valve stem removal tool onto the valve stem.
- Turn the tool counterclockwise to release the air.
- Hold the tool securely to prevent injury.
- Continue turning until all the air is released and the tire is deflated.
Once the tire is deflated, you need to loosen the lug nuts before lifting the mower:
- Use a lug wrench to loosen the lug nuts by turning them counterclockwise.
- Loosen them enough so they’re no longer tight but don’t remove them completely.
With the lug nuts loosened, you can now proceed to lift the riding lawn mower:
- Refer to the previous section of this article for instructions on how to properly lift and secure the mower.
- Lift and secure the mower according to the instructions provided.
Once the mower is safely lifted and secured, you can now remove the flat tire:
- Remove the flat tire by pulling it straight off the axle.
- Be careful not to damage the axle or any other parts.
Congratulations! You have successfully removed the flat tire from your riding lawn mower. In the next section, we’ll discuss how to install a new tire.
Patch or Replace the Tire
First, determine whether the tire can be patched or if it needs to be replaced. This decision will depend on the severity of the damage and the condition of the tire.
Here are four factors to consider when deciding whether to patch or replace the tire:
- Safety: Your safety should always be a top priority. If the damage to the tire is extensive or if it has already been patched multiple times, it may be safer to replace the tire. A patch may not provide adequate stability and could lead to a potential accident.
- Cost: Patching a tire is generally a more cost-effective solution compared to replacing it. However, if the tire is heavily worn or damaged, it may be more cost-efficient in the long run to invest in a new tire rather than continuously patching it.
- Time: Patching a tire can be a quick and easy fix, while replacing a tire may require more time and effort. Consider your schedule and the urgency of getting your lawnmower back in working order.
- Tire condition: Assess the overall condition of the tire. If the tire is old, worn, or showing signs of deterioration, it may be better to replace it entirely to ensure optimal performance and longevity.
Reinstall and Inflate the Tire
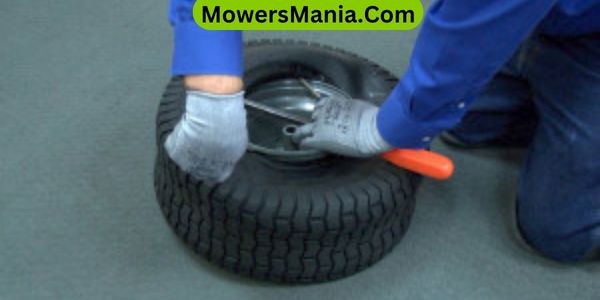
Once you have patched or replaced the tire on your riding lawn mower, it’s time to reinstall and inflate it. Follow these simple steps to get your mower back up and running in no time.
First, position the tire back onto the axle, aligning the holes in the rim with the axle’s studs. Once in place, secure the tire by tightening the lug nuts with a wrench in a star pattern. This ensures even pressure distribution and prevents the tire from coming loose while in use.
Next, it’s time to inflate the tire. Check the recommended tire pressure for your specific mower model, as it may vary. Using a tire pressure gauge, measure the current pressure in the tire.
If it’s below the recommended level, attach an air compressor or use a hand pump to add air until it reaches the appropriate pressure. Be careful not to overinflate the tire, as this can lead to uneven wear and potential blowouts.
To help you keep track of the recommended tire pressure for your riding lawn mower, refer to the table below:
| Mower Model | Front Tire Pressure (psi) | Rear Tire Pressure (psi) |
|---|---|---|
| Model A | 14 | 16 |
| Model B | 12 | 14 |
| Model C | 16 | 18 |
Frequently Asked Questions [FAQs]
How Frequently Should I Check the Tire Pressure on My Riding Lawn Mower?
You should regularly check the tire pressure on your riding lawn mower. It’s important to maintain proper inflation to prevent flats and ensure optimal performance. A quick check before each use is recommended.
Can I Use a Regular Car Tire Patch Kit to Fix a Flat Tire on My Riding Lawn Mower?
Yes, you can use a regular car tire patch kit to fix a flat tire on your riding lawn mower. It’s a simple and cost-effective solution that can get you back to mowing in no time.
What Is the Recommended Tire Pressure for a Riding Lawn Mower?
The recommended tire pressure for a riding lawn mower is typically between 10-14 psi. It is important to check your mower’s manual or the tire sidewall for the specific recommended pressure.
How Often Should I Replace the Tires on My Riding Lawn Mower?
You should replace the tires on your riding lawn mower when they become worn down or damaged. Regularly inspect the tires for signs of wear and tear and replace them as needed to ensure optimal performance.
Is It Necessary to Remove the Entire Wheel From the Riding Lawn Mower to Fix a Flat Tire?
No, you don’t need to remove the entire wheel from your riding lawn mower to fix a flat tire. There are ways to fix it without taking off the wheel completely.
Conclusion
In conclusion, fixing a flat tire on a riding lawn mower is a relatively straightforward process that can be done with some basic tools and a little bit of patience. By following the outlined steps, you can easily remove, patch or replace, and reinstall the tire.
Remember to always prioritize safety and secure the mower properly before attempting any repairs. With these steps, you’ll have your riding lawn mower back up and running smoothly in no time.

