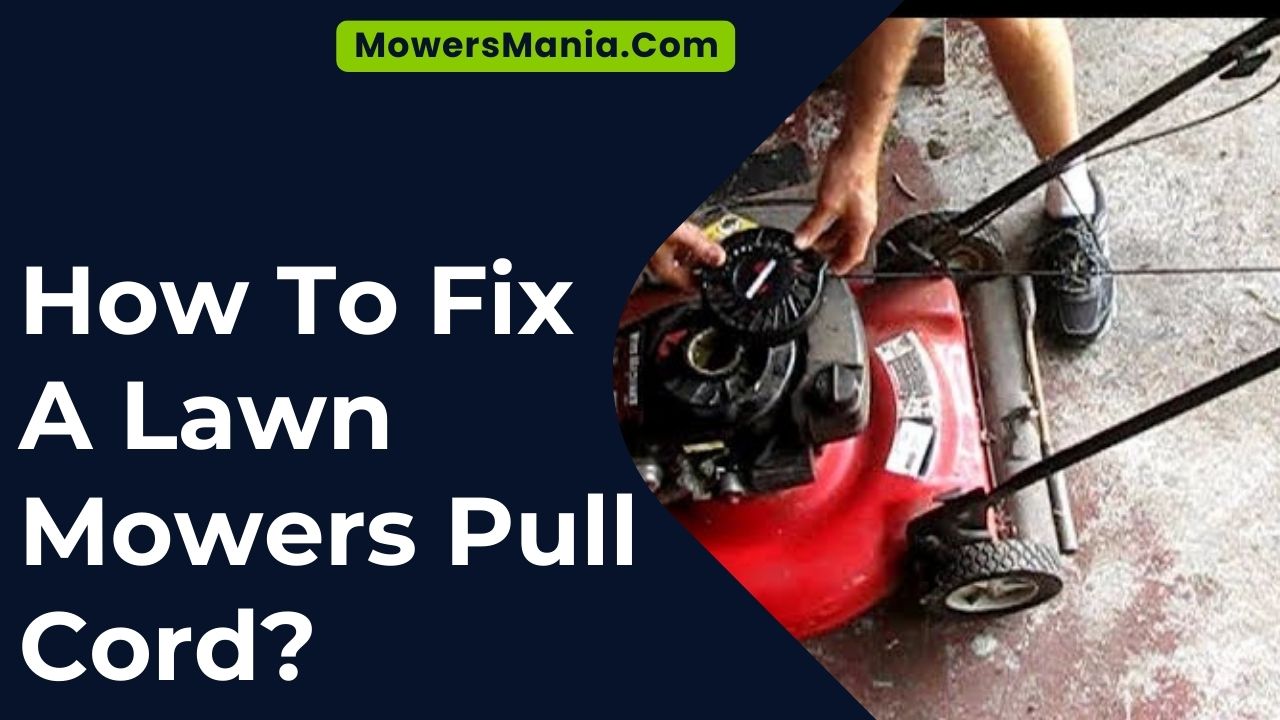
If your lawn mower’s pull cord is stuck or not retracting, you might not know that fixing it is easier than you think.
You can save yourself time and money by learning how to fix a lawn mower’s pull cord on your own.
It’s a common issue, but with a few simple steps, you can have it working like new in no time.
Assessing the Pull Cord Issue
When you experience difficulty starting your lawn mower due to a stuck or broken pull cord, it’s important to assess the issue thoroughly before proceeding with any repairs.
Begin by visually inspecting the pull cord to determine if it’s frayed, broken, or simply jammed. If the cord is frayed or broken, it will need to be replaced.
Next, check the recoil starter assembly to ensure that it isn’t the source of the problem. Sometimes, the recoil starter can become jammed or damaged, preventing the pull cord from functioning properly.
Additionally, inspect the pulley and spring inside the recoil starter to ensure that they’re in good condition.
If everything appears to be in working order, the issue may be related to the engine itself. Check the spark plug, fuel filter, and carburetor to rule out any potential problems in these areas.
Gathering the Necessary Tools
To complete the repair of your lawn mower’s pull cord, gather the necessary tools for the job. First, you’ll need a set of basic hand tools, including a screwdriver set with various sizes and types of heads, as well as a pair of pliers for gripping and pulling.
Additionally, you should have a socket wrench set with both metric and standard sizes to ensure you have the right tool for any bolts or nuts you encounter.
Once you have your hand tools in order, it’s time to gather the specific items needed for the pull cord repair. This will include a replacement pull cord, which you can find at most hardware or home improvement stores.
You’ll also need a new pull cord handle and any other components that may be worn or damaged, such as the recoil spring or starter assembly.
Make sure to have a clean work area and some rags on hand to wipe down any dirty or greasy parts. With these tools and materials at the ready, you’ll be well-equipped to tackle the repair of your lawn mower’s pull cord.
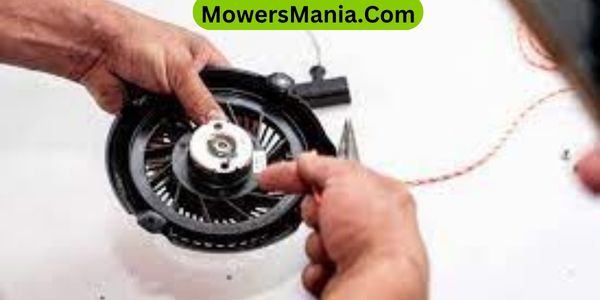
Disassembling the Pull Cord Assembly

Once you have gathered the necessary tools and materials, carefully remove the screws and bolts securing the pull cord assembly cover using your screwdriver set and socket wrench.
Lay the screws and bolts aside in a safe place to ensure they are not lost. Once the cover is removed, gently pull out the old, frayed cord from the pulley and discard it.
Be sure to take note of how the cord is threaded through the assembly as this will be crucial when installing the new cord.
To give you an overview of the disassembly process, here is a table outlining the steps involved:
| Step | Action |
|---|---|
| 1. | Gather necessary tools and materials |
| 2. | Remove screws and bolts securing the cover |
| 3. | Carefully take off the pull cord assembly cover |
| 4. | Remove the old cord from the pulley |
Taking these steps will allow you to access and replace the pull cord effectively, ensuring that your lawn mower is back in working order in no time.
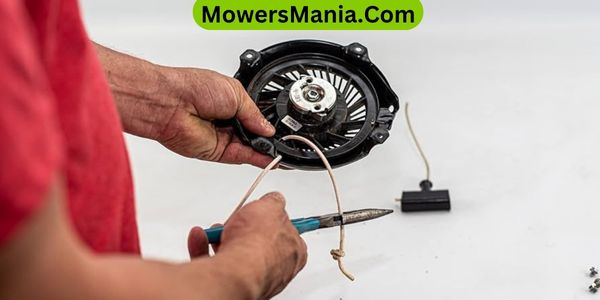
Repairing or Replacing the Pull Cord
After disassembling the pull cord assembly, you’ll now proceed with repairing or replacing the pull cord.
To do this, follow these steps:
- Repairing the Pull Cord
- Untangle any knots or snags in the cord, ensuring it can smoothly retract into the housing.
- If the cord is frayed or worn, trim the damaged section and carefully melt the end to prevent further unraveling.
- Replacing the Pull Cord
- Purchase a replacement cord of the same length and thickness as the original.
- Thread the new cord through the housing and handle, tie a secure knot, and wind it onto the pulley, ensuring proper tension.
Remember to handle the pull cord carefully to avoid any further damage.
Once the repair or replacement is complete, reassemble the pull cord assembly following the previous steps.
With the pull cord in good condition, your lawn mower will be ready to start reliably.
Reassembling and Testing the Pull Cord
Reassemble the pull cord by carefully winding it onto the pulley and securing it with proper tension. Begin by aligning the pulley with the recoil housing and threading the pull cord through the hole.
Then, wind the cord onto the pulley in the direction of the arrow, making sure the cord lays flat and even.
Once wound, secure the cord with a knot or by engaging the built-in locking mechanism on the pulley. Be sure to leave enough slack to allow for smooth retraction of the cord when pulled.
After reassembly, test the pull cord by giving it a few gentle tugs to ensure it retracts properly. If the cord retracts smoothly, you can proceed to reattach the recoil assembly to the lawn mower.
If the cord doesn’t retract, disassemble and reassemble it, ensuring it’s wound evenly and with the correct tension. Once the pull cord retracts smoothly and the recoil assembly is reattached, your lawn mower is ready for use.
Frequently Asked Questions [FAQs]
How Often Should the Pull Cord on a Lawn Mower Be Replaced?
You should replace the pull cord on a lawn mower every 1-2 years to ensure it functions properly. Over time, wear and tear can cause the cord to fray or break, so regular replacement helps prevent unexpected issues.
Can I Use Any Type of Replacement Pull Cord, or Does It Need to Be Specific to My Lawn Mower Model?
You should use a replacement pull cord specific to your lawn mower model. Using the wrong type may cause compatibility issues or even damage. It’s important to ensure the replacement is suitable for your mower.
Are There Any Specific Safety Precautions I Need to Take When Repairing the Pull Cord Assembly?
When repairing the pull cord assembly, be sure to disconnect the spark plug wire and wear gloves to protect your hands. Avoid any sudden movements during the repair, and always follow the manufacturer’s safety guidelines.
What Should I Do if the Pull Cord Keeps Getting Stuck or Jammed After I Repair It?
If the pull cord keeps getting stuck or jammed after you repair it, check for any obstructions or tangles in the cord or the pulley. Make sure the cord is wound properly and the spring is working smoothly.
Is There a Way to Prevent the Pull Cord From Becoming Frayed or Damaged in the Future?
To prevent the pull cord from fraying or getting damaged in the future, you should regularly inspect it for wear and tear, keep it clean, and handle it gently when starting the lawn mower. Proper maintenance helps extend its lifespan.
Conclusion
So there you have it! With just a few simple steps, you can easily fix a lawn mower’s pull cord issue.
By assessing the problem, gathering the necessary tools, disassembling the assembly, and repairing or replacing the pull cord, you can get your lawn mower up and running in no time.
Just be sure to reassemble and test the pull cord to ensure it’s working properly before you start mowing again.
Happy mowing!

