Are you tired of dealing with a lawn mower tire that’s come off the rim? Don’t worry, we’ve got you covered.
In this article, we’ll show you how to fix it in just a few simple steps. You’ll learn how to:
- Assess the damage
- Gather the necessary tools
- Remove the tire from the rim
- Inspect and repair the rim
- Reinstall the tire onto the rim
- Test and adjust the tire pressure.
Let’s get started!
Assess the Damage
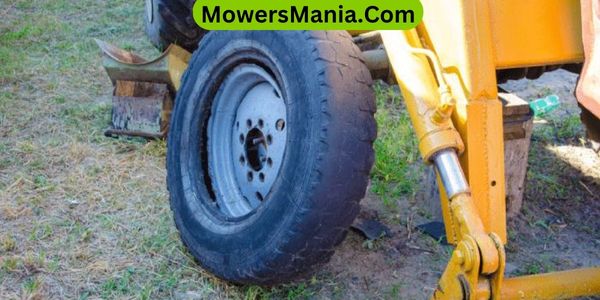
To assess the damage to your lawn mower tire that’s off the rim, start by closely inspecting the tire for any visible signs of wear or punctures. Carefully examine the entire surface of the tire, looking for any cuts, tears, or bulges.
Check for any objects lodged in the tread, such as nails or screws, that may have caused the tire to come off the rim. Take note of any areas where the rubber appears worn down or uneven. These could indicate a problem with the tire’s alignment or balance.
Next, check the sidewalls of the tire for any cracks or damage. Inspect the valve stem for any signs of leakage, such as a hissing sound or visible air bubbles. Additionally, make sure the valve cap is securely in place to prevent any air loss.
If you suspect a puncture, you can apply a soapy water solution to the tire and look for bubbles forming, which would indicate a leak.
Once you have assessed the damage, you can determine the best course of action to fix the tire. Whether it requires a simple patch or a complete replacement, addressing the damage promptly will ensure your lawn mower is ready to tackle the next mowing session.
Gather the Necessary Tools
Now that you have assessed the damage to your lawn mower tire, it’s time to gather the necessary tools to fix it.
Here are the items you’ll need:
- Wrench: To remove the bolts holding the tire in place, you’ll need a wrench. Make sure it’s the right size to fit the bolts on your specific lawn mower model.
- Tire levers: These handy tools will help you remove the damaged tire from the rim. Tire levers come in various sizes, so choose ones that are suitable for your tire.
- Pliers: Pliers will be useful for gripping and pulling out any debris that may be lodged in the tire. They can also help with removing and tightening the valve stem, if necessary.
Remember, having the right tools will make the task of fixing your lawn mower tire much easier. Before you begin, double-check that you have all the items listed above. It’s frustrating to start a repair only to realize you’re missing a crucial tool.
With these tools in hand, you’ll be well-prepared to tackle the next step in fixing your lawn mower tire.
Remove the Tire From the Rim
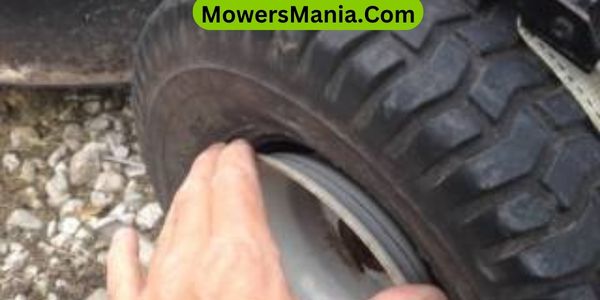
To remove the tire from the rim, you’ll need to use specific techniques and tools.
There are various ways to remove a tire from a rim, such as using tire levers or a tire bead breaker tool.
These tools will help you easily separate the tire from the rim, making it easier to fix or replace.
Tire Removal Techniques
You can remove the tire from the rim by following these steps.
- Step 1: Start by deflating the tire completely. This will make it easier to work with and remove from the rim.
- Step 2: Use a pry bar or a tire iron to carefully pry the tire away from the rim. Start at one side and work your way around, applying consistent pressure to loosen the tire.
- Step 3: Once the tire is loosened, you can use your hands to carefully pull it off the rim. Be cautious of any sharp edges on the rim that could cause injury.
Tools for Removing Tires
To remove the tire from the rim, you’ll need a few essential tools.
The first tool you’ll need is a tire lever or a set of tire spoons. These tools are specifically designed to help you pry the tire off the rim without causing any damage.
A rubber mallet or a hammer with a rubber head will also come in handy to gently tap the tire off the rim.
Additionally, you’ll need a valve core remover tool to remove the valve core before attempting to remove the tire. This tool will release any air pressure in the tire, making it easier to work with.
Finally, a pair of pliers or adjustable wrench will be needed to loosen and remove the nuts or bolts that hold the rim in place.
With these essential tools, you’ll be well-equipped to successfully remove the tire from the rim.
Inspect and Repair the Rim

Examine the rim for any signs of damage or wear. The rim is an essential component of your lawn mower’s tire, so it’s important to ensure that it’s in good condition.
Here are some steps to inspect and repair the rim:
- Clean the rim: Remove any debris or dirt from the rim using a brush or a cloth. This will help you get a clear view of its condition.
- Check for cracks or dents: Carefully inspect the rim for any cracks or dents. These can weaken the structure and affect the tire’s performance.
- Repair or replace: If you notice any damage, you have a few options. Small cracks or dents can often be repaired using a rim repair kit. However, if the damage is extensive or the rim is severely bent, it may be best to replace it entirely.
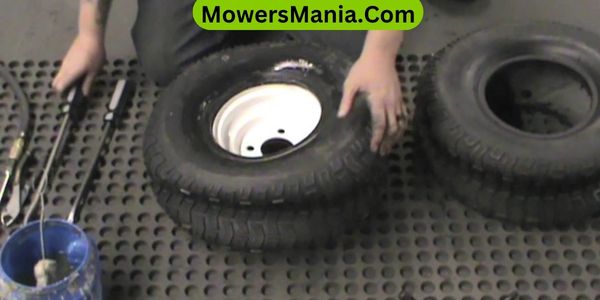
Reinstall the Tire Onto the Rim
Now that you’ve inspected and repaired the rim, it’s time to reinstall the tire onto the rim.
There are various tire mounting techniques you can use to ensure a secure fit.
In this section, we’ll discuss these techniques and how to properly secure the tire onto the rim.
Tire Mounting Techniques
Reinstall the tire onto the rim by carefully aligning the bead with the rim edge. This step is crucial to ensure proper mounting and prevent any future issues.
Here are some tire mounting techniques to help you successfully reinstall the tire onto the rim:
- Use a tire mounting lubricant: Apply a generous amount of lubricant to the bead of the tire and the rim edge. This will make it easier to slide the tire onto the rim.
- Use a tire spoon or mounting tool: Use a tire spoon or a specialized tire mounting tool to lever the tire onto the rim. Start at one side and work your way around, gradually pushing the tire onto the rim.
- Use a rubber mallet: If needed, gently tap the sidewall of the tire with a rubber mallet to help seat the bead onto the rim.
Securing the Tire
To secure the tire onto the rim, align the bead with the rim edge and ensure proper mounting to avoid any future issues.
Start by placing the tire onto the rim, making sure that the bead of the tire is aligned with the edge of the rim.
Use your hands to push the tire onto the rim, starting from one side and working your way around. If needed, you can also use a rubber mallet to gently tap the tire into place.
As you go around the rim, make sure that the tire is evenly seated and that there are no gaps between the bead and the rim.
Once the tire is securely mounted, check for any signs of misalignment or unevenness.
This will ensure that your lawn mower operates smoothly and efficiently without any tire issues.
Test and Adjust the Tire Pressure
To test and adjust the tire pressure on your lawn mower, grab a tire pressure gauge and follow these simple steps.
- Step 1: Remove the valve cap from the tire valve stem.
- Step 2: Press the tire pressure gauge onto the valve stem and hold it firmly in place.
- Step 3: Read the pressure displayed on the gauge.
Once you have determined the current tire pressure, you can proceed to adjust it if necessary. If the pressure is too low, you’ll need to add air. On the other hand, if the pressure is too high, you’ll need to release some air.
To add air, simply attach an air compressor or a manual pump to the valve stem and inflate the tire until you reach the desired pressure. To release air, use a small tool like a valve core remover or a screwdriver to depress the center pin inside the valve stem.
Remember to check the manufacturer’s recommended tire pressure for your lawn mower and adjust accordingly. Maintaining the proper tire pressure will ensure optimal performance and prolong the life of your lawn mower.
Frequently Asked Questions [FAQs]
How Do I Determine if My Lawn Mower Tire Is off the Rim?
To determine if your lawn mower tire is off the rim, check for any visible gaps or unevenness between the tire and rim. Also, listen for any unusual noises or vibrations while mowing.
Can I Fix a Lawn Mower Tire off the Rim Without Removing It?
No, you can’t fix a lawn mower tire off the rim without removing it. To fix it, you’ll need to remove the tire from the rim, repair any damage, and then reattach it properly.
What Tools Do I Need to Fix a Lawn Mower Tire off the Rim?
To fix a lawn mower tire off the rim, you’ll need a few tools. First, a tire iron to remove the tire from the rim. Then, a patch kit and an air compressor to repair and inflate the tire.
How Do I Know if the Rim of My Lawn Mower Tire Is Damaged?
To know if the rim of your lawn mower tire is damaged, visually inspect it for cracks, dents, or bending. Additionally, check for air leaks or uneven tire wear. If you notice any of these signs, the rim may need repair or replacement.
What Should I Do if My Repaired Tire Keeps Going Flat After Reinstalling It Onto the Rim?
If your repaired tire keeps going flat after reinstalling it onto the rim, check for any leaks or damage. Inflate the tire properly and make sure it is seated correctly on the rim. If the problem persists, consult a professional for further assistance.
Conclusion
Fixing a lawn mower tire that has come off the rim may seem like a daunting task, but with the right tools and a little bit of know-how, it can be done.
By assessing the damage, gathering the necessary tools, removing the tire from the rim, inspecting and repairing the rim, reinstalling the tire onto the rim, and finally testing and adjusting the tire pressure, you can get your lawn mower back up and running smoothly in no time.

