If you’re struggling with a self propelled lawn mower cable that’s not working properly, don’t worry! We’ve got you covered with some simple solutions.
In this article, we’ll show you how to identify the problem, the tools you’ll need, and a step-by-step inspection process.
We’ll also guide you through repairing a broken cable and adjusting the tension. Get ready to get your lawn mower back in action with these easy fixes!
Identifying the Problem
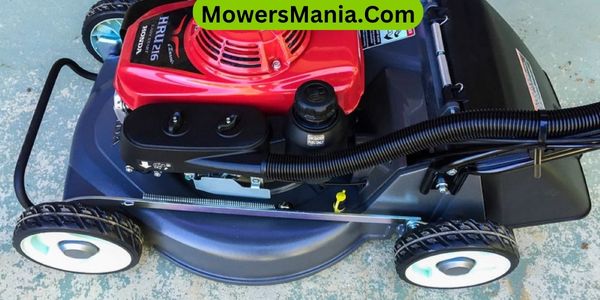
To identify the problem with your self-propelled lawn mower cable, start by examining the cable for any visible signs of damage or disconnection.
Begin by checking the cable from end to end, looking for any frayed or broken wires, loose connections, or signs of wear and tear.
Pay close attention to areas where the cable is exposed or where it connects to other parts of the mower. If you notice any cuts, breaks, or signs of corrosion, these could be indications of a problem with the cable.
Next, check the cable tension by pulling on it gently. The cable should have some resistance when pulled, but it shouldn’t be too loose or too tight. If the cable is loose, it may need to be adjusted or replaced.
On the other hand, if the cable is too tight, it could be causing the self-propelled mechanism to engage constantly, even when not desired.
Additionally, examine the cable for any obstructions or debris that may be preventing it from functioning properly. Grass clippings, dirt, or other foreign objects can get caught in the cable and impede its movement. Clear away any debris and ensure that the cable is able to move freely.
Tools You’ll Need
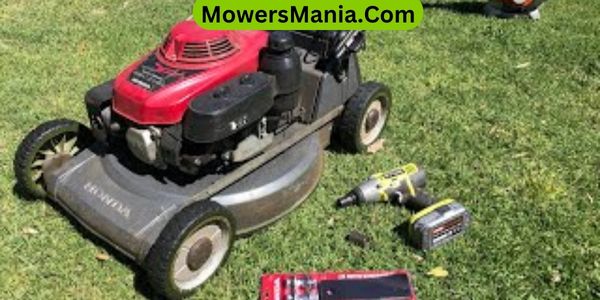
To fix the problem with your self-propelled lawn mower cable, you’ll need a few tools. These tools are essential to ensure a successful repair and get your lawn mower up and running again.
The first tool you’ll need is a pair of pliers. Pliers will help you loosen and tighten nuts and bolts during the repair process. They’re also useful for gripping and manipulating small parts.
Additionally, you’ll need a set of screwdrivers. Different sizes and types of screwdrivers may be required depending on the specific model of your lawn mower. Screwdrivers are necessary to remove screws and access different parts of the mower.
Another important tool is a socket wrench. This tool will be used to remove and replace nuts and bolts that hold the cable in place.
Finally, you’ll need a replacement cable. Make sure to purchase the correct cable for your lawn mower model.
With these tools in hand, you’ll be well-equipped to fix the problem with your self-propelled lawn mower cable.
Step-by-Step Cable Inspection
First, carefully inspect the cable of your self-propelled lawn mower using the following step-by-step process.
| Step | Inspection Process |
|---|---|
| 1 | Check for any visible signs of damage such as fraying, cuts, or breaks in the cable. |
| 2 | Ensure that the cable is securely connected to both the handle and the engine of the lawn mower. |
| 3 | Test the tension of the cable by pulling on it gently. It should have some resistance but not be too loose or too tight. |
| 4 | Examine the cable housing for any signs of wear or deterioration. Pay close attention to areas near moving parts. |
Inspecting the cable of your self-propelled lawn mower is crucial to identify any potential issues that may affect its performance.
By following these steps, you can ensure that your cable is in good condition and functioning properly.
Start by visually examining the cable for any visible signs of damage such as fraying, cuts, or breaks.
Next, check that the cable is securely connected to both the handle and the engine. Testing the tension of the cable is important as well. It should have some resistance when pulled, but not be too loose or too tight.
Lastly, inspect the cable housing for any signs of wear or deterioration, especially in areas near moving parts. Taking the time to thoroughly inspect your self-propelled lawn mower cable can help prevent potential problems and ensure smooth operation.
Repairing a Broken Cable
Now let’s move on to repairing a broken cable on your self-propelled lawn mower. If you’ve noticed that your mower’s cable is damaged or broken, don’t worry. With a few simple steps, you can fix it yourself and get your mower running smoothly again.
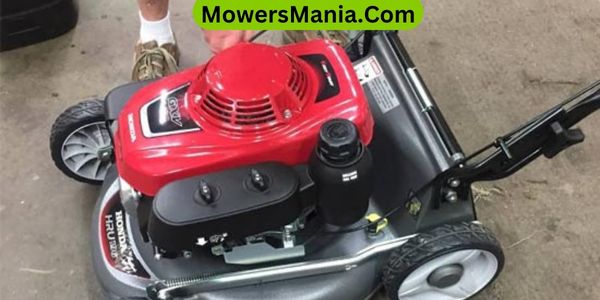
First, start by locating the broken section of the cable. This is usually near the handle or the engine. Carefully inspect the cable to determine how severe the damage is. If it’s a minor break, you may be able to fix it by simply reconnecting the two ends. However, if the cable is completely severed or severely damaged, you’ll need to replace it entirely.
To repair a minor break, use a pair of pliers to strip the insulation off the cable ends. Then, twist the exposed wires together and secure them with electrical tape. Make sure the connection is tight and secure. If necessary, you can also use a wire nut for added stability.
If the cable needs to be replaced, you can purchase a new one from a local hardware store or online. Follow the manufacturer’s instructions to remove the old cable and install the new one. Be sure to adjust the tension properly to ensure smooth operation.
Adjusting the Cable Tension
To ensure proper operation, regularly adjust the tension of the cable on your self-propelled lawn mower using an appropriate tool. Adjusting the cable tension is an important maintenance task that helps to optimize the performance of your mower.
When the cable tension is too loose, the self-propel feature may not engage properly, making it difficult to maneuver the mower. On the other hand, if the cable tension is too tight, it can cause excessive wear and tear on the cable, leading to premature failure.
To adjust the cable tension, follow these simple steps:
- Locate the cable tension adjustment mechanism on your lawn mower. It’s usually located near the handle or the engine.
- Use the appropriate tool, such as a wrench or pliers, to loosen or tighten the adjustment nut or screw.
- Refer to your lawn mower’s manual or manufacturer’s instructions to determine the correct tension for your specific model.
Remember to test the self-propel feature after making any adjustments to ensure that the tension is set correctly.
Regularly checking and adjusting the cable tension will help you maintain a smooth and efficient self-propelled lawn mower, ensuring a neat and well-groomed lawn.
Frequently Asked Questions [FAQs]
Can I Use Any Type of Cable to Replace a Broken Cable in My Self Propelled Lawn Mower?
No, you cannot use any type of cable to replace a broken cable in your self propelled lawn mower. It is important to use the specific cable recommended by the manufacturer for proper functioning.
How Often Should I Inspect and Replace the Cables in My Self Propelled Lawn Mower?
You should inspect and replace the cables in your self propelled lawn mower regularly. Over time, cables can wear out or become damaged, affecting the mower’s performance. It’s important to keep them in good condition for optimal operation.
What Should I Do if I Notice That the Cable Tension Is Too Loose or Too Tight?
If you notice the cable tension on your self-propelled lawn mower is too loose or too tight, you should adjust it accordingly. Loosen the tension by loosening the adjustment nut or tighten it by tightening the nut.
Can I Adjust the Cable Tension Without Having to Replace the Entire Cable?
Yes, you can adjust the cable tension without replacing the entire cable. First, locate the adjustment nut or screw on the mower. Then, use a wrench or screwdriver to tighten or loosen the cable as needed.
Are There Any Safety Precautions I Should Take When Repairing or Adjusting the Cable on My Self Propelled Lawn Mower?
When repairing or adjusting the cable on your self propelled lawn mower, it’s important to take safety precautions. Make sure to disconnect the spark plug wire, wear protective gloves, and use caution when working with sharp tools.
Conclusion
In conclusion, fixing a self-propelled lawn mower cable is a relatively simple task that can be done with basic tools and a step-by-step inspection.
By identifying the problem, repairing or replacing the broken cable, and adjusting the cable tension, you can ensure that your lawn mower functions properly and efficiently.
With these solutions, you can easily maintain your lawn without any hassle.

