If your lawn mower isn’t moving like it used to, it might be time to replace the drive cable. In this article, you’ll learn the steps to assess, remove, and install a new drive cable for your mower.
With a few basic tools and some know-how, you’ll have your mower back in action in no time. Keep reading to find out how to get your lawn mower running smoothly again.
Assessing the Drive Cable Condition
When you suspect a problem with your lawn mower’s drive cable, begin by carefully inspecting the cable for any signs of wear or damage.
Start by locating the drive cable, which is usually connected to the drive control lever on the lawn mower handle.
Check the entire length of the cable for any fraying, kinks, or cuts. Pay close attention to the areas where the cable bends or moves around pulleys, as these are common spots for wear and tear.
If you notice any damage, such as frayed wires or broken casing, it’s essential to replace the drive cable to ensure proper functioning of your lawn mower.
Next, test the functionality of the drive cable by engaging the drive control lever while observing the cable.
Look for any excessive slack or looseness in the cable when the drive control lever is engaged. If the cable feels loose or doesn’t move smoothly, it may be a sign of internal damage or stretching.
This can lead to decreased performance or complete failure of the drive system. By carefully assessing the condition of the drive cable, you can determine whether it needs to be replaced to keep your lawn mower operating effectively.
Gathering the Necessary Tools
You’ll need a few essential tools for the replacement, so gather a pair of pliers, a wrench, and a screwdriver.
These will ensure you have everything necessary for a smooth operation. Having the right tools on hand will make the process much easier and efficient.
Essential Tools for Replacement
To efficiently gather the necessary tools for replacing a lawn mower drive cable, assess the abstract noun of functionality to ensure you have the right equipment.
The following table lists the essential tools required for this task:
| Essential Tools | Description |
|---|---|
| Socket Wrench | Used for loosening and tightening nuts and bolts. |
| Pliers | Helpful for gripping, twisting, and cutting wires. |
| Screwdriver | Necessary for removing and installing screws. |
| Replacement Drive Cable | Ensure it is compatible with your lawn mower model. |
Having these tools readily available will streamline the process of replacing the lawn mower drive cable. It is important to have all the necessary tools before beginning the replacement to avoid unnecessary delays.
Tools for Smooth Operation
Gather the essential tools listed in the previous section to ensure smooth operation when replacing a lawn mower drive cable.
You’ll need:
- A socket wrench set with both metric and standard sizes
- Pliers
- A screwdriver
- Safety gloves
- A replacement drive cable specific to your lawn mower model
Additionally, a workbench or a flat, stable surface to place the mower on will make the task more manageable.
Having a rag or paper towels on hand for cleaning any dirt or grease from the area will help prevent any issues during the replacement process.
It’s also a good idea to have a mobile device or pen and paper to take notes or reference any online guides.
With these tools, you’ll be well-prepared to smoothly replace your lawn mower drive cable.
Removing the Old Drive Cable
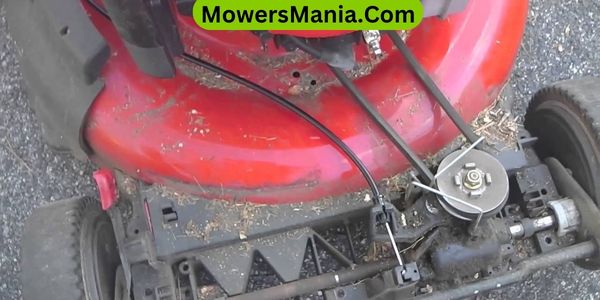
To start removing the old drive cable, first disconnect it from the handle control. Then, remove the cable from the mower by releasing any securing clips or bolts.
This will prepare the mower for the installation of the new drive cable.
Disconnecting Old Drive Cable
When removing the old drive cable from your lawn mower, how do you ensure that the engine is turned off and the spark plug wire is disconnected?
First, make sure the engine is completely turned off. This means stopping the engine and removing the key to prevent accidental starts.
Next, locate the spark plug wire and disconnect it to prevent any chance of the engine starting. This step is crucial for your safety and preventing any accidents while working on the drive cable.
Once the engine is off and the spark plug wire is disconnected, you can proceed with removing the old drive cable from your lawn mower.
Always prioritize safety when working on your lawn mower to avoid any potential injuries.
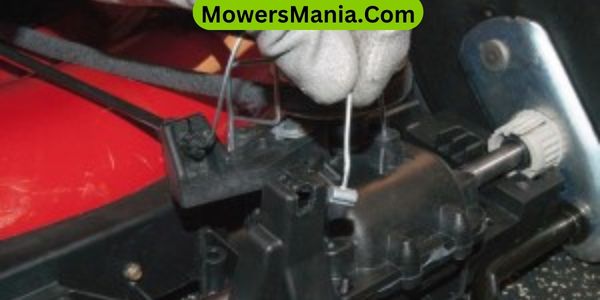
Removing Cable From Mower
Make sure to locate the cable’s attachment point on the mower’s drive system. This can usually be found near the handle or control lever.
Once you have found the attachment point, follow these steps to remove the old drive cable:
- Loosen the cable clamp or retaining clip that secures the cable to the drive system.
- Carefully disconnect the cable from the drive system, ensuring not to damage any surrounding components.
- Trace the cable back to the handle or control lever, and detach it from there as well.
- Remove the old drive cable from the mower, making sure to note its routing and any specific points where it’s secured along the way.
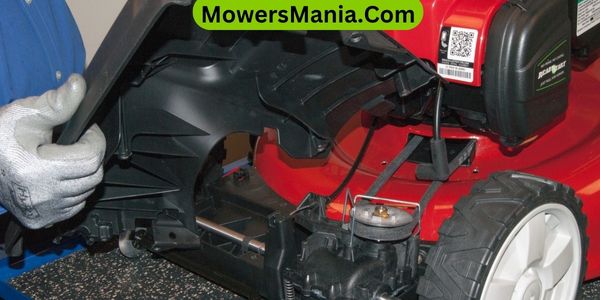
Installing the New Drive Cable
Start by positioning the new drive cable into the designated slot on the lawn mower. Ensure that the cable is correctly aligned with the drive control lever and the transmission.
Be careful not to bend or kink the cable during installation, as this could affect its functionality. Once the cable is in place, reattach any securing clips or fasteners to hold it firmly in position.
Next, thread the opposite end of the drive cable through the cable housing, making sure it follows the same path as the old cable. Ensure that the cable moves freely within the housing and that there are no obstructions or kinks that could impede its movement.
After threading the cable through the housing, reattach it to the drive control lever, ensuring a secure connection. Test the tension of the cable by engaging the drive control lever. Adjust the cable as necessary to achieve the correct tension for smooth and responsive operation.
Adjusting the Tension and Testing
To ensure proper functionality, you should adjust the tension of the drive cable by engaging the drive control lever and make any necessary adjustments for smooth and responsive operation.
Here are the steps to adjust the tension and test the lawn mower drive cable:
- Engage the drive control lever: Start by engaging the drive control lever to ensure that the drive cable is properly tensioned.
- Adjust the tension: If the drive control lever feels too loose or too tight, you may need to adjust the tension of the drive cable. Follow the manufacturer’s guidelines for adjusting the tension to the recommended specifications.
- Test for smooth operation: After adjusting the tension, test the drive control lever to ensure that it moves smoothly and responds effectively when engaged.
- Test on the lawn: Take the lawn mower for a test run on your lawn to ensure that the drive cable is functioning as expected. Pay attention to how the mower responds to changes in speed and direction.
Maintenance Tips for Longevity
After adjusting the tension and testing the drive cable, regularly lubricate the moving parts to maintain smooth operation and extend the longevity of your lawn mower. Proper lubrication reduces friction, preventing premature wear and tear on vital components.
Here are some essential maintenance tips to ensure the longevity of your lawn mower:
| Maintenance Task | Frequency |
|---|---|
| Lubricate moving parts | Every 25 hours |
| Replace air filter | Annually |
| Change oil | Every 50 hours |
| Sharpen blades | Bi-annually |
| Clean undercarriage | Every use |
Frequently Asked Questions [FAQs]
Can I Use a Universal Drive Cable for My Specific Lawn Mower Model?
Yes, you can use a universal drive cable for your specific lawn mower model. It’s important to ensure the cable matches the length and specifications of your original cable to ensure proper function.
How Often Should I Replace the Drive Cable on My Lawn Mower?
You should replace the drive cable on your lawn mower every 1-2 years, depending on usage and wear. Regular inspection can help you identify signs of fraying or damage, indicating it’s time for a replacement.
Are There Any Common Mistakes to Avoid When Installing a New Drive Cable?
When installing a new drive cable for your lawn mower, avoid common mistakes like over-tightening or misaligning the cable. Ensure the cable is properly routed and tensioned according to the manufacturer’s guidelines to prevent future issues.
Can I Lubricate the Drive Cable to Improve Its Longevity?
Yes, you can lubricate the drive cable to improve its longevity. Regularly applying a silicone-based lubricant to the cable can help reduce friction and wear, extending its lifespan and ensuring smooth operation of the lawn mower.
What Should I Do if the Drive Cable Keeps Slipping or Becoming Loose After Installation?
If the drive cable keeps slipping or becoming loose after installation, make sure it’s properly tensioned and securely attached. Check for any worn or damaged parts and replace them as needed. Adjust and tighten as necessary.
Conclusion
Now that you’ve replaced your lawn mower drive cable, your mower should be back in action.
Remember to regularly check and maintain the drive cable to keep your lawn mower running smoothly.
With the right tools and a little know-how, you can easily replace the drive cable whenever necessary.
Happy mowing!

