
Ever wondered if a clogged fuel filter could be the reason your lawn mower is acting up? Well, it’s time to find out!
Swapping out your lawn mower’s fuel filter is a simple task that can make a big difference in your mower’s performance.
In just a few steps, you can learn how to locate, remove, and replace the fuel filter, ensuring that your mower runs smoothly and efficiently.
No need to worry – with the right tools and a little know-how, you’ll have your lawn mower back in action in no time.
Understanding the Importance of a Fuel Filter
You need to understand the importance of a fuel filter in your lawn mower. The fuel filter plays a crucial role in ensuring that your engine runs smoothly and efficiently.
As you mow your lawn, the fuel filter keeps dirt, debris, and other impurities from reaching the engine. Without a properly functioning fuel filter, these contaminants could clog the carburetor or injectors, leading to poor engine performance and potential damage.
A clean fuel filter also prevents particles from entering the combustion chamber, which could cause premature wear and tear on the engine components. By maintaining a clean fuel filter, you can extend the life of your lawn mower and ensure consistent, reliable performance.
Furthermore, a clogged fuel filter can restrict the flow of fuel to the engine, resulting in power loss and stalling. This can be frustrating and disruptive to your lawn mowing tasks. Regularly replacing the fuel filter is essential for maintaining optimal engine performance and preventing potential issues.
Understanding the vital role of the fuel filter will help you appreciate its significance in keeping your lawn mower running smoothly.
Tools and Materials Needed
To properly swap out your lawn mower’s fuel filter, you will need a few essential tools and materials. Here’s a list of what you’ll need:
| Tools | Materials |
|---|---|
| Socket wrench | New fuel filter |
| Screwdriver | Clean cloth |
| Pliers | Safety goggles |
| Drain pan | Fuel line clamps |
The socket wrench will help you loosen the hose clamps, while the screwdriver and pliers will assist in removing any screws or clamps holding the fuel filter in place.
The drain pan is necessary to catch any fuel that may spill during the replacement process. Additionally, safety goggles are crucial to protect your eyes from any fuel splashes.
Lastly, you’ll need a new fuel filter to replace the old one, and a clean cloth to wipe down any spills or residue. With these tools and materials in hand, you’ll be well-equipped to successfully swap out your lawn mower’s fuel filter.
Locating the Fuel Filter
After gathering the necessary tools and materials, locate the fuel filter on your lawn mower by consulting the owner’s manual or visually inspecting the fuel line.
The fuel filter is a crucial component that helps prevent dirt and debris from entering the engine, ensuring smooth operation of your lawn mower.
Here’s how to find it:
- Consult the owner’s manual: The easiest way to locate the fuel filter is by referring to the owner’s manual that came with your lawn mower. The manual typically contains detailed diagrams and instructions on the location of the fuel filter.
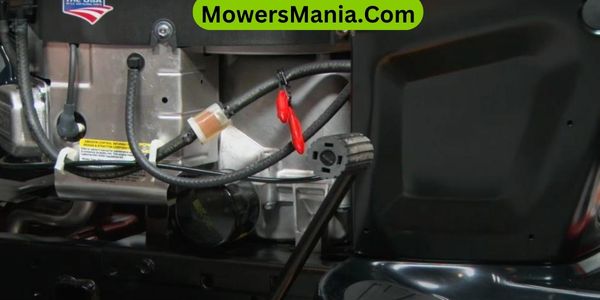
- Visually inspect the fuel line: If you can’t find the information in the manual, visually inspect the fuel line from the gas tank to the carburetor. The fuel filter is usually situated somewhere along this line, and it’s often a small cylindrical or rectangular component.
- Check near the carburetor or engine: In some lawn mowers, the fuel filter may be located near the carburetor or the engine. Look for a small component that resembles a filter attached to the fuel line in this area.
- Look for a colored component: Fuel filters are often colored, which can make them easier to spot. They may be red, yellow, or another bright color that contrasts with the surrounding parts of the lawn mower.
Removing and Replacing the Fuel Filter
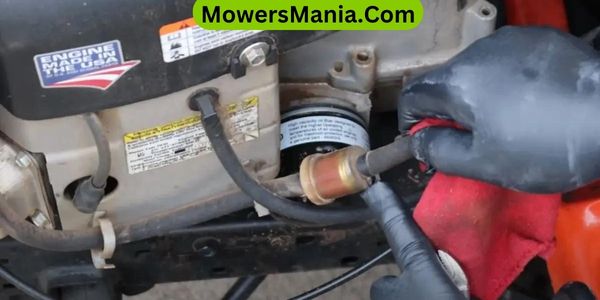
Begin by disconnecting the fuel line from the old filter using a pair of pliers or a wrench. Once the fuel line is disconnected, you can proceed with removing the old filter.
Most lawn mower fuel filters are either located in-line along the fuel line or inside the fuel tank. If the filter is in-line, you can simply remove it by loosening the hose clamps with a screwdriver and sliding the filter out. If the filter is inside the fuel tank, you will need to use a piece of bent wire with a hook to retrieve it.
| Steps to Remove and Replace the Fuel Filter |
|---|
| 1. Disconnect the fuel line from the old filter using pliers or a wrench |
| 2. Remove the old filter by loosening hose clamps or using a piece of bent wire with a hook if it’s inside the fuel tank |
| 3. Install the new filter by reversing the removal process |
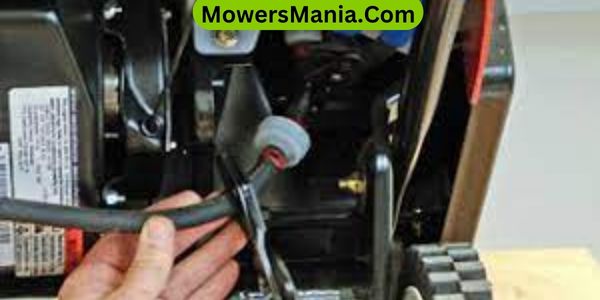
Once the old filter is removed, you can install the new one by reversing the removal process. Make sure the new filter is installed in the correct direction and that all connections are secure.
After replacing the filter, reconnect the fuel line, and ensure there are no leaks before starting your lawn mower.
Testing the Mower After Replacement
Testing the mower after replacing the fuel filter involves starting the engine and observing its performance to ensure proper fuel flow and combustion.
Follow these steps to effectively test your mower after replacing the fuel filter:
Start the Engine:
- Prime the engine by following the manufacturer’s instructions.
- Once primed, start the engine and let it run for a few minutes to allow the new fuel filter to fill with gasoline.
Check for Leaks:
- Inspect the area around the fuel filter for any signs of leakage.
- If there are any leaks, turn off the engine immediately and address the issue before proceeding.
Observe Engine Performance:
- Pay attention to how the engine runs.
- It should start smoothly and operate without any hiccups.
- If the engine sputters or stalls, it could be a sign of improper fuel flow or combustion.
Test Under Load:
- Engage the mower blades or drive the mower around to test its performance under load.
- The engine should respond well without any signs of fuel starvation or power loss.
Frequently Asked Questions [FAQs]
Can I Clean the Fuel Filter Instead of Replacing It?
You can’t clean the fuel filter; it’s designed to capture and trap debris. Cleaning it won’t restore its full effectiveness. It’s best to replace the fuel filter regularly to ensure your lawn mower runs smoothly.
How Often Should I Replace the Fuel Filter in My Lawn Mower?
You should replace the fuel filter in your lawn mower every season or after 100 hours of use. This helps ensure optimal engine performance and prevents clogs that can hinder fuel flow. Regular replacement keeps your mower running smoothly.
What Are the Signs That Indicate a Clogged Fuel Filter in a Lawn Mower?
If you notice your lawn mower having trouble starting, sputtering, or losing power, these are signs of a clogged fuel filter. It’s essential to replace it regularly to ensure proper fuel flow and maintain your mower’s performance.
Can I Use a Different Type of Fuel Filter in My Lawn Mower?
Yes, you can use a different type of fuel filter in your lawn mower. Just make sure the new filter matches the specifications of your mower and fits securely. It’s important for proper fuel flow.
Is It Necessary to Bleed the Fuel System After Replacing the Fuel Filter?
Yes, it’s necessary to bleed the fuel system after replacing the fuel filter. This helps remove air from the system and ensures proper fuel flow. Be sure to follow the manufacturer’s instructions for bleeding the fuel system.
Conclusion
Now that you’ve swapped out your lawn mower’s fuel filter, your mower should be running smoothly and efficiently.
Regular maintenance like this can help extend the life of your mower and ensure it continues to operate at its best.
Remember to always follow the manufacturer’s instructions and safety guidelines when working on your equipment.
Happy mowing!

