Is your lawn mower feeling a bit under the weather? Just like a doctor diagnosing a patient, troubleshooting electrical issues in your lawn mower can help bring it back to life.
From checking the battery to inspecting the spark plug, understanding and fixing electrical problems can be easier than you think.
Let’s dive into some simple steps to troubleshoot and solve common electrical issues, so you can get your lawn mower back in action in no time.
Understanding Common Electrical Issues
To troubleshoot lawn mower electrical issues effectively, start by recognizing common electrical problems.
- The most common issue is a dead battery. If your lawn mower doesn’t start or struggles to turn over, the battery may be the culprit.
- Another common problem is a faulty ignition switch. This can cause the mower to not start at all, even if the battery is fully charged.
- Additionally, a loose or corroded connection in the wiring can lead to electrical problems. If you notice intermittent power loss or erratic behavior from the mower, it’s worth checking the wiring connections.
- Furthermore, a damaged or worn-out spark plug can also cause electrical issues in your lawn mower. When the spark plug is faulty, the engine may misfire or fail to start altogether.
Understanding these common electrical issues will help you diagnose and troubleshoot problems with your lawn mower more effectively. By being aware of these potential issues, you can save time and effort in getting your mower back up and running smoothly.
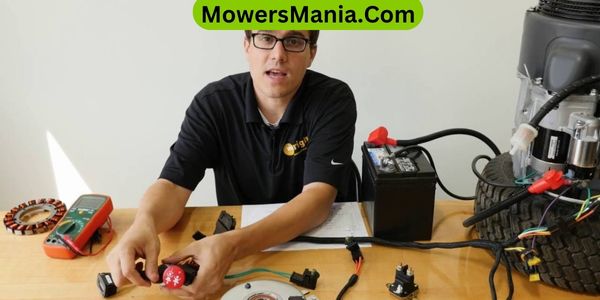
Checking the Battery and Charging System
Check the battery and charging system to identify potential electrical issues with your lawn mower. A faulty battery or charging system can lead to starting problems and overall poor performance.
Here are three key steps to help you troubleshoot these components:
- Inspect the battery connections: Loose or corroded connections can prevent the battery from supplying power to the mower’s electrical system. Ensure that the battery terminals are clean and tightly secured to the cables. If corrosion is present, use a wire brush to clean the terminals and apply a protective coating to prevent future corrosion.
- Test the battery voltage: Use a multimeter to measure the voltage of the battery. A fully charged 12-volt battery should read around 12.6 to 12.8 volts. If the voltage is significantly lower, it may indicate a weak or defective battery that needs to be replaced.
- Check the charging system: Start the engine and use the multimeter to test the voltage across the battery terminals while the engine is running. A properly functioning charging system should produce a voltage reading higher than the battery’s resting voltage, typically around 13 to 14 volts.
Inspecting the Spark Plug
When inspecting the spark plug, start by checking its condition for any signs of wear or damage. Look for fouling, such as carbon buildup or oil deposits, which can indicate potential issues with the engine.
Use a gap measurement tool to ensure the spark plug has the proper gap for efficient ignition.
Spark Plug Condition
First, inspect the spark plug for signs of wear or damage. Look for any black, oily deposits on the spark plug, which could indicate a rich fuel mixture.
Additionally, check for any white, blistered insulator or eroded electrodes, as these could be signs of overheating.
Lastly, ensure that the spark plug gap is within the manufacturer’s specifications, as a gap that’s too wide or too narrow can cause ignition problems.
It’s important to regularly inspect and replace the spark plug as needed to maintain optimal engine performance and prevent starting issues.
Checking for Fouling
Inspect the spark plug for fouling by examining the electrode and insulator for any signs of deposits or damage. Start by removing the spark plug using a socket wrench.
Check the electrode for a buildup of carbon or oil deposits, which can indicate a rich fuel mixture or oil leakage. A wet, oily appearance suggests that the engine may be burning oil. A white, blistered insulator may indicate overheating, while a black, sooty insulator suggests a rich fuel mixture.
If the spark plug shows signs of fouling, clean it using a wire brush and adjust the engine to address the underlying issue.
Reinstall the spark plug and test the lawn mower to see if the fouling issue has been resolved.
Proper Gap Measurement
To ensure proper gap measurement when inspecting the spark plug, use a feeler gauge to determine the distance between the center electrode and the ground electrode.
Incorrect gap measurement can lead to issues such as hard starting, poor fuel economy, and overall reduced engine performance.
Follow these steps to properly measure the gap and ensure optimal lawn mower performance:
- Careful Examination: Inspect the spark plug for any signs of physical damage or wear, such as cracks or erosion, which can affect its performance and longevity.
- Correct Adjustment: Use the feeler gauge to adjust the gap to the manufacturer’s specifications, ensuring efficient ignition and combustion within the engine.
- Regular Maintenance: Make gap measurement a routine part of your lawn mower maintenance schedule to prevent potential electrical issues and maintain peak performance.
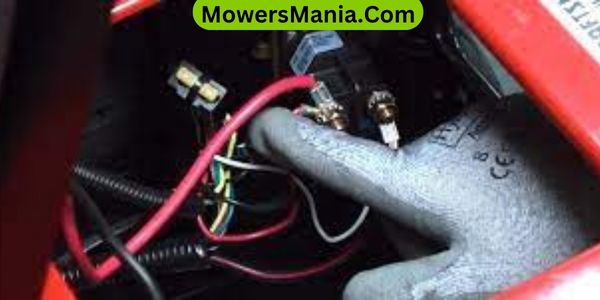
Testing the Wiring and Connections
Now it’s time to check the wiring continuity, inspect for corrosion, and test the voltage output.
Start by examining the wiring for any breaks or fraying, ensuring that the connections are secure.
Then, look for signs of corrosion and clean any affected areas to ensure a good electrical connection.
Check Wiring Continuity
First, ensure that all wiring and connections on your lawn mower are secure and free from any signs of damage. Once you’ve checked the physical condition of the wiring, it’s time to test the wiring continuity to ensure that electricity flows without interruption.
Here’s what you need to do:
- Use a multimeter to check for continuity in the wiring and connections. The multimeter will indicate whether there’s a complete path for the electrical current to flow through.
- Pay close attention to the areas where the wiring is prone to bending or rubbing against other components, as these are common spots for breaks or damage.
- Look out for any signs of corrosion or rust on the connections, as these can impede the flow of electricity.
Inspect for Corrosion
Ensure you carefully inspect the wiring and connections for any signs of corrosion, as it can impede the flow of electricity in your lawn mower. Start by visually examining the wiring and connectors for any greenish or whitish buildup, which are typical signs of corrosion.
If you spot any corrosion, gently clean the affected areas using a wire brush or sandpaper to remove the buildup. After cleaning, make sure to apply a thin layer of dielectric grease to the connections to prevent future corrosion.
Also, check for any loose or damaged wires, as these can also cause electrical issues. Tighten any loose connections and replace any damaged wires to ensure a secure and uninterrupted flow of electricity within your lawn mower.
Test Voltage Output
Inspecting for corrosion provides a solid foundation for testing the voltage output of your lawn mower’s wiring and connections.
To ensure a thorough evaluation, follow these steps:
- Use a multimeter to measure the voltage output at various points along the wiring system. This will help identify any areas of concern and pinpoint where the voltage may be dropping.
- Check the wiring and connections for any signs of wear, fraying, or damage. Address any issues found to ensure a secure and reliable electrical connection.
- Clean and tighten all connections to eliminate any potential voltage loss due to poor contact. This simple maintenance step can significantly improve the electrical performance of your lawn mower.
Troubleshooting Safety Switches and Controls
When troubleshooting safety switches and controls on your lawn mower, start by checking the connections for any corrosion or damage. Corroded or damaged connections can prevent the safety switches from functioning properly. Ensure that all connections are tight and secure.
Next, inspect the safety switches themselves. These switches are designed to stop the engine from starting or to shut it off if certain conditions aren’t met, such as the seat not being occupied or the blades being engaged. Check the wiring leading to these switches for any signs of wear or breakage.
Additionally, examine the control panel for any signs of damage or malfunction. The control panel houses the key switch, throttle controls, and other essential components. Ensure that all controls are functioning as they should and that the key switch is operating properly.
If you find any issues with the safety switches or controls, consult your lawn mower’s manual for guidance on how to troubleshoot or replace these components. Always follow proper safety procedures when working with electrical components.
Addressing Starter Motor Problems
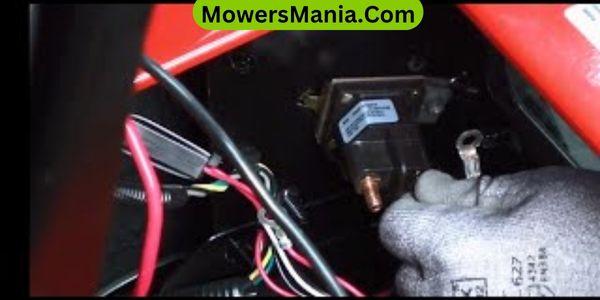
To address starter motor problems on your lawn mower, begin by checking the battery connections for any looseness or corrosion. Loose or corroded connections can prevent the starter motor from receiving enough power to start the engine.
Once you’ve confirmed the battery connections are secure and clean, you can move on to other potential issues with the starter motor.
Here are three common starter motor problems to watch out for:
- Worn Out Brushes: Over time, the brushes inside the starter motor can wear down, leading to poor electrical contact and difficulty starting the engine. This can be resolved by replacing the worn-out brushes with new ones.
- Faulty Solenoid: The solenoid is responsible for engaging the starter motor when you turn the ignition key. If the solenoid is faulty, it may not transmit the electrical current properly, resulting in a non-responsive starter motor. Replacing the solenoid can often resolve this issue.
- Mechanical Binding: Sometimes, the starter motor can become mechanically bound due to dirt, debris, or lack of lubrication. This can cause the motor to struggle or fail to turn the engine over. Cleaning and lubricating the starter motor can help alleviate this problem.
Frequently Asked Questions [FAQs]
Can I Use a Regular Car Battery in My Lawn Mower?
Yes, you can use a regular car battery in your lawn mower. It needs to have the correct voltage and be securely mounted. Make sure the terminals match and the battery fits in the mower’s battery compartment.
How Do I Know if My Lawn Mower’s Electrical Issues Are Caused by a Faulty Ignition Switch?
To determine if your mower’s electrical issues stem from a faulty ignition switch, inspect for loose connections or damaged wires. Test the switch with a multimeter for continuity. If it fails, replacing it may resolve the problem.
What Should I Do if My Lawn Mower’s Headlights Are Not Working?
If your lawn mower’s headlights are not working, start by checking the wiring connections and the condition of the bulbs. Sometimes loose connections or burnt-out bulbs can be the cause. If those are fine, consult a professional for further troubleshooting.
Is It Normal for My Lawn Mower’s Battery to Lose Charge Quickly?
Yes, it’s not normal for your lawn mower’s battery to lose charge quickly. It could be due to a faulty battery, corroded connections, or a problem with the charging system. You should troubleshoot these issues to resolve the battery problem.
How Can I Tell if My Lawn Mower’s Solenoid Is Malfunctioning?
If your lawn mower’s solenoid is malfunctioning, you may notice clicking sounds when trying to start the engine. Check the connections and wiring first. If everything looks good, it’s likely time to replace the solenoid.
Conclusion
So there you have it – troubleshooting your lawn mower’s electrical issues doesn’t have to be a daunting task. By understanding common problems, checking key components like the battery, spark plug, and wiring, and addressing safety switches and starter motor problems, you can keep your lawn mower running smoothly.
With a little bit of know-how and some simple tools, you can save time and money by fixing electrical issues on your own.

