Are you tired of constantly buying new lawn mower blades? Creating your own blades at home can be a cost-effective and rewarding solution.
By following a few simple steps, you can craft custom blades that suit your specific needs and save money in the long run.
Whether you’re looking to improve cutting performance or simply enjoy the satisfaction of a DIY project, making your own lawn mower blades is a practical and achievable endeavor.
With the right materials and a little know-how, you can ensure that your lawn mower is always equipped with sharp and reliable blades, ready to tackle any yard work that comes your way.
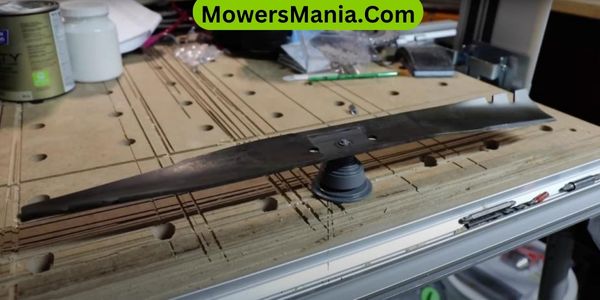
Assessing Blade Condition
Before starting any maintenance on your lawn mower blades, you should carefully assess their condition for damage or wear. Start by disconnecting the spark plug wire to ensure the mower doesn’t accidentally start.
Then, using a sturdy pair of gloves, carefully examine the blades for any visible signs of damage such as chips, cracks, or excessive wear. If you notice any of these issues, it’s crucial to address them before using the mower again.
Additionally, check for bent or warped blades, as these can affect the mower’s performance and cause uneven cutting. It’s also essential to inspect the blade’s sharpness. Dull blades can tear the grass instead of cleanly cutting it, leading to a ragged appearance and potentially leaving the grass more susceptible to diseases.
If your blades are dull, consider sharpening them or replacing them if they’re beyond repair. By thoroughly assessing your lawn mower blades for damage, wear, and sharpness, you can ensure that your mower operates efficiently and helps maintain a healthy-looking lawn.
Selecting the Right Materials
To make your own lawn mower blades at home, you’ll need to gather the appropriate materials for the job. When selecting the right materials, it’s crucial to prioritize durability and strength.
Look for high-quality steel that can withstand the rigors of mowing and resist wear and tear. Consider materials such as hardened steel or high-carbon steel, which are commonly used in commercial mower blades for their resilience.
In addition to the steel itself, you’ll also need to consider the thickness of the material. Thicker steel will generally provide more durability and longevity, making it a suitable choice for crafting durable mower blades.
When sourcing the materials, you may want to consult with local hardware stores or metal suppliers to find the best options available.
Some suppliers may even offer custom cutting services to provide you with steel in the specific dimensions required for your mower blades.
Ultimately, selecting the right materials is fundamental to ensuring that your homemade lawn mower blades are capable of withstanding the demands of mowing while delivering effective cutting performance.
Designing Your Custom Blade Template
When designing your custom blade template, consider the following points:
- Blade shape and size
- Material and thickness
- Placement of mounting holes
These factors will determine the cutting efficiency, durability, and ease of installation of your homemade lawn mower blades.
Ensuring the right specifications for your custom template is essential for achieving optimal performance from your DIY blades.
Blade Shape and Size
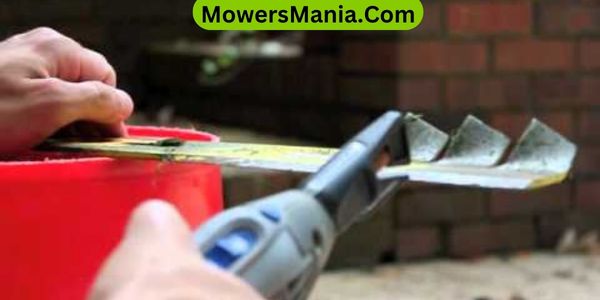
To design your custom lawn mower blade template, gather the necessary tools and materials before sketching the desired shape and size.
Start by selecting a durable metal sheet that matches the dimensions of your original blade. Use a marker to outline the shape of the blade on the metal sheet, ensuring it matches the original blade’s size and curvature.
Then, use a cutting tool such as a grinder or hacksaw to carefully cut along the marked lines. After cutting the basic shape, refine the edges and tips with a metal file for a clean finish.
Finally, drill any necessary holes for mounting the blade onto your mower.
Always prioritize safety when handling sharp tools and wear appropriate protective gear.
Material and Thickness
Select a durable metal sheet that matches the dimensions of your original blade to ensure the proper material and thickness for your custom lawn mower blade template.
The most common materials for lawn mower blades are steel and aluminum. Steel is sturdy and can withstand the rigors of mowing, while aluminum is lightweight and resistant to corrosion.
When choosing the thickness of the metal sheet, keep in mind that thicker blades are more durable but may require more power from your mower.
Thinner blades, on the other hand, are lighter and require less power but may not last as long. Consider the type of grass you’ll be mowing and the terrain of your lawn when deciding on the appropriate thickness.
Once you’ve selected the material and thickness, you can proceed to design your custom blade template.
Mounting Hole Placement
First, measure and mark the precise placement of the mounting holes on your metal sheet according to the dimensions of your original blade. Ensure accuracy in your measurements to guarantee a proper fit.
Here are some key points to consider when designing your custom blade template:
- Use a center punch to mark the hole locations before drilling to prevent the drill bit from wandering.
- Double-check the hole placement before drilling to avoid any errors.
- Consider the balance of the blade and ensure that the mounting holes are symmetrically placed.
- Take into account the size and type of bolts or fasteners that will be used to mount the blade onto the lawn mower.
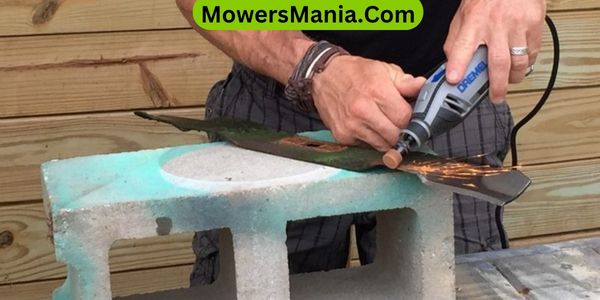
Shaping and Cutting the Blade
Once you have selected the appropriate metal, you can begin shaping and cutting the blade to the desired dimensions using a metal grinder and a cutting tool.
Before you start, ensure you have the necessary safety equipment such as goggles, gloves, and a face mask to protect yourself from metal shards.
Use the metal grinder to shape the metal piece according to the dimensions specified for your lawn mower blade. Once the rough shape is achieved, use a cutting tool to refine the edges and create the necessary bevels for cutting grass effectively.
To help you understand the dimensions and angles required for shaping and cutting the blade, refer to the following table:
| Measurement | Dimension |
|---|---|
| Length | 20 inches |
| Width | 2.5 inches |
| Thickness | 0.1875 inches |
| Bevel Angle | 30 degrees |
| Cutting Edge Angle | 45 degrees |
Take your time to ensure precision and accuracy in shaping and cutting the blade, as these factors significantly impact the performance of your lawn mower.
Tempering and Hardening Process
To achieve the desired strength and durability, you’ll need to temper and harden the newly shaped lawn mower blade using a heat treatment process. This process involves heating the blade to a specific temperature and then cooling it rapidly to increase its hardness.
Here’s how you can go about the tempering and hardening process:
- Heat the Blade: Place the newly shaped blade in a heat treatment oven or kiln and heat it to a critical temperature based on the type of steel used.
- Quenching: Once the blade reaches the critical temperature, quickly quench it in oil or water to rapidly cool it down. This rapid cooling will increase the blade’s hardness.
- Tempering: After quenching, the blade will be extremely hard but also brittle. To reduce brittleness and improve toughness, temper the blade by reheating it to a lower temperature and allowing it to cool slowly.
- Testing: Finally, test the hardness of the blade using a file or hardness tester to ensure it meets the required specifications for cutting grass effectively.
Following these steps will ensure that the homemade lawn mower blade is properly tempered and hardened for optimal performance.
Installing and Testing the Custom Blade
Before installing and testing the custom blade, gather the necessary tools and equipment. You’ll need a socket wrench, work gloves, safety goggles, and a blade balancing tool.
Start by disconnecting the spark plug to ensure the mower doesn’t accidentally start. Then, turn the mower on its side so that the blade is easily accessible. Use the socket wrench to remove the bolt holding the old blade in place.
Carefully lift off the old blade and place the custom-made blade onto the mower, making sure it aligns with the blade adapter. Tighten the bolt securely with the socket wrench.
Once the custom blade is installed, it’s time to test it. Make sure the blade spins freely without hitting anything.
Reconnect the spark plug and start the mower. Listen and observe the blade in action. If you notice any vibrations or unusual noises, turn off the mower immediately and double-check the installation.
Additionally, use the blade balancing tool to ensure the custom blade is properly balanced.
With the blade securely installed and successfully tested, your custom lawn mower blade is ready for action.
Frequently Asked Questions [FAQs]
Can I Use Any Type of Metal to Make My Own Lawn Mower Blades, or Are There Specific Types That Work Best?
You should use specific types of metal for homemade lawn mower blades to ensure durability and effectiveness. High-carbon steel or hardened steel are recommended for their strength and ability to hold a sharp edge.
What Safety Precautions Should I Take When Shaping and Cutting the Custom Blade at Home?
When shaping and cutting the custom blade at home, make sure to wear safety goggles, gloves, and a dust mask to protect yourself from flying metal shards and debris. Keep your work area well-ventilated and secure.
How Can I Ensure That the Custom Blade Is Properly Balanced and Won’t Cause Damage to My Lawn Mower?
To ensure the custom blade is properly balanced and won’t damage your lawn mower, use a specialized blade balancer. Check for even weight distribution and make adjustments as needed. This will help maintain the mower’s performance and protect your equipment.
Are There Any Specific Maintenance Tips for Custom-Made Lawn Mower Blades That I Should Be Aware Of?
To maintain custom-made lawn mower blades, regularly check for wear and tear, sharpen them as needed, and ensure they are properly balanced. Clean the blades after each use, and inspect for any signs of damage.
Can I Use the Same Process to Make Custom Blades for Different Types of Lawn Mowers, or Does It Vary Depending on the Model?
Yes, you can use the same process to make custom blades for different types of lawn mowers. However, it’s important to consider the specific requirements and measurements for each model to ensure proper fit and functionality.
Conclusion
Now that you know how to make your own lawn mower blades at home, you can save money and customize your cutting experience.
With the right materials and tools, you can assess, design, shape, temper, and install your custom blade for a better mowing performance.
Take pride in your DIY project and enjoy a well-maintained lawn with your homemade blades.

