If your lawn tractor battery refuses to charge, you can learn how to diagnose and fix the issue.
Understanding battery basics, diagnosing the charging problem, and performing regular cleaning and maintenance can help restore your battery’s functionality.
By testing the charging system and replacing any faulty components, you’ll be able to get your lawn tractor up and running again in no time.
Understanding Battery Basics
To understand your lawn tractor battery’s charging issues, it’s important to grasp the basics of its operation and maintenance. The battery is a crucial component of your lawn tractor, providing the electrical energy needed to start the engine and power the various electrical systems.
It operates on the principle of chemical reactions that produce and store electrical energy. When the engine is running, the alternator recharges the battery, ensuring it has enough power for the next start. However, if the battery isn’t holding a charge, there could be several reasons for this issue.
First, it’s important to check the battery terminals for corrosion, as this can impede the flow of electricity. Cleaning the terminals with a wire brush can often resolve this issue.
Additionally, the battery’s electrolyte levels should be inspected and topped up if necessary. It’s also important to ensure that the battery is securely mounted and that the connections are tight and free from corrosion.
Regular maintenance, such as cleaning and inspection, can go a long way in preventing charging issues and extending the life of your lawn tractor battery.
Diagnosing the Charging Issue
Once you have checked the battery terminals for corrosion and verified the electrolyte levels, you can proceed with diagnosing the charging issue of your lawn tractor battery.
To effectively diagnose the problem, you need to perform a series of tests to pinpoint the exact cause of the charging issue.
Below is a table outlining the steps you should take to diagnose the charging problem:
| Diagnostic Step | Description |
|---|---|
| Test the Charging System | Use a multimeter to check the voltage output of the alternator while the engine is running. |
| Inspect the Wiring | Examine all wiring connections for signs of damage, corrosion, or loose connections. |
| Check the Voltage Regulator | Test the voltage regulator to ensure it is controlling the output voltage effectively. |
Cleaning and Maintenance
Inspect the lawn tractor battery for any debris, dirt, or corrosion that may be hindering its performance. Over time, the battery terminals can accumulate dirt and corrosion, which can interfere with the charging process. To ensure that your lawn tractor battery continues to function optimally, it’s important to perform regular cleaning and maintenance.
Here are some key steps to follow:
-
Clean the terminals: Use a mixture of baking soda and water to gently scrub the battery terminals and remove any corrosion. This will help improve the connection between the battery and the charging system.
-
Check the electrolyte levels: If your lawn tractor battery isn’t a maintenance-free type, it’s essential to regularly check and maintain the electrolyte levels. Ensure that the electrolyte covers the lead plates and add distilled water if necessary.
-
Inspect the battery case: Look for any cracks or damage on the battery case. If you notice any issues, it may be time to replace the battery to prevent further damage or safety hazards.
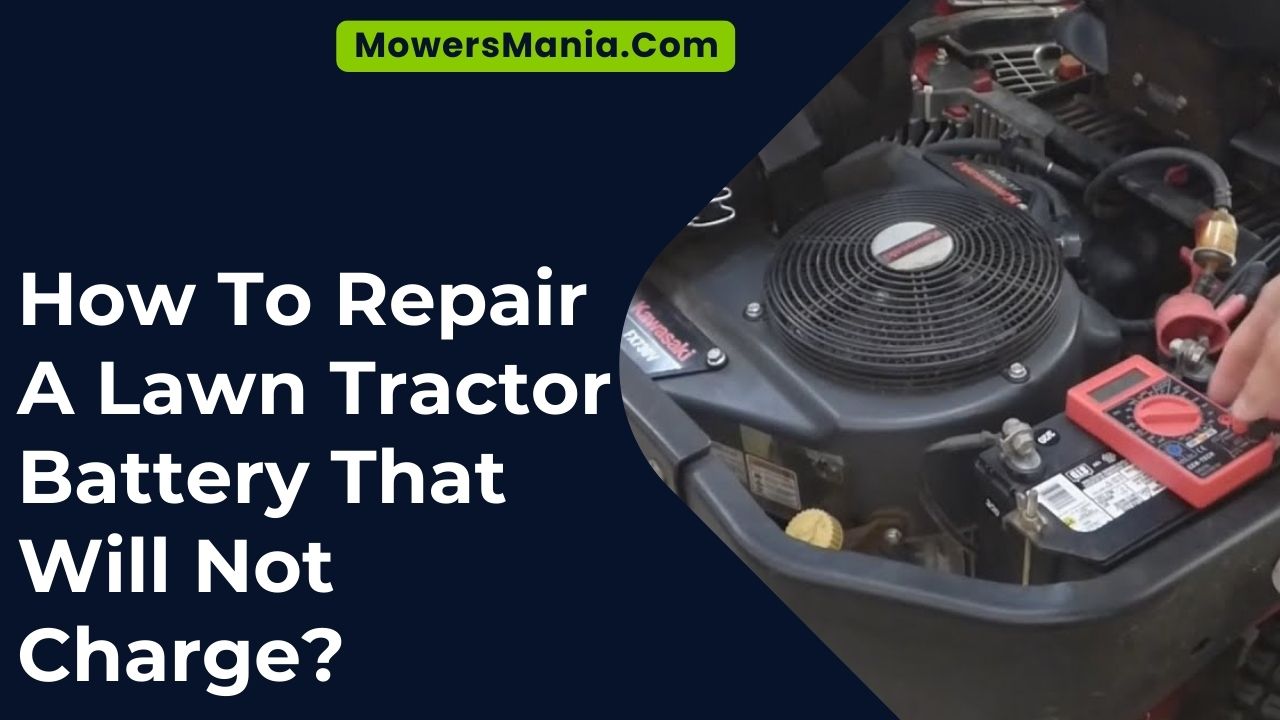
Testing the Charging System
Have your multimeter ready to measure the voltage output of the lawn tractor’s charging system. Start by connecting the multimeter to the battery terminals.
With the engine off, a fully charged battery should read around 12.6 volts. Next, start the engine and let it run at a moderate speed.
The voltage should now increase to around 13.5 to 14.5 volts, indicating that the charging system is functioning properly. If the voltage remains around 12.6 volts or does not increase when the engine is running, there may be an issue with the charging system.
Check the wiring and connections for any signs of damage or corrosion. Additionally, inspect the voltage regulator and the alternator for any faults.
If all these components check out, the issue may lie with the stator or rotor, and further testing will be required. Refer to the table below for a quick summary of the testing process.
| Testing Step | Expected Result | Possible Issue |
|---|---|---|
| Battery voltage with engine off | Around 12.6 volts | Low battery charge |
| Battery voltage with engine running | 13.5 to 14.5 volts | Proper charging system operation |
| No increase in voltage with engine running | Voltage remains around 12.6 volts | Issue with charging system components |
Replacing Battery Components
You will need to gather all the necessary replacement battery components before beginning the repair process.
Here are the items you’ll need to ensure a successful repair:
-
New battery cells: Replacing old or damaged battery cells is essential for restoring the charging capacity of your lawn tractor battery. Having new, high-quality battery cells will ensure improved performance and longevity.
-
Battery electrolyte solution: The right electrolyte solution is crucial for the proper functioning of the battery cells. It’s important to select a solution that matches the specifications of your battery to ensure optimal performance.
-
Safety gloves and goggles: When handling battery components, safety should be a top priority. Safety gloves and goggles will protect your hands and eyes from any potential exposure to battery acid or other harmful substances.
Gathering these replacement components will set you on the right path to successfully repairing your lawn tractor battery. It’s important to ensure that you have all the necessary items before starting the repair process to avoid any delays or complications.
Frequently Asked Questions
Can I Use a Regular Car Battery Charger to Charge My Lawn Tractor Battery?
Yes, you can use a regular car battery charger to charge your lawn tractor battery. Make sure to use a charger with an appropriate voltage setting and connect the positive and negative terminals correctly.
What Are Some Common Signs That My Lawn Tractor Battery Needs to Be Replaced?
If your lawn tractor battery frequently needs recharging, has a slow start, or doesn’t hold a charge, it may need replacement. Look for signs like corrosion or a swollen battery case. Regular maintenance helps prevent these issues.
How Do I Properly Dispose of an Old Lawn Tractor Battery?
When disposing of an old lawn tractor battery, take it to a recycling center or return it to the retailer for proper disposal. Do not throw it in the trash or abandon it. Follow local regulations for safe disposal.
Is It Possible to Overcharge a Lawn Tractor Battery?
Yes, it is possible to overcharge a lawn tractor battery. Overcharging can lead to the battery’s electrolyte boiling, which can cause damage and reduce its lifespan. It’s important to monitor the charging process carefully.
Are There Any Alternative Methods for Charging a Lawn Tractor Battery if I Don’t Have Access to a Charger?
If you don’t have access to a charger, you can try jump-starting your lawn tractor battery using a car battery. Connect the positive terminals first, then the negative ones. Let the tractor run to charge the battery.
Conclusion
So there you have it – with some basic understanding of battery basics, a thorough diagnosis of the charging issue, regular cleaning and maintenance, and testing the charging system, you can easily repair a lawn tractor battery that won’t charge.
And if necessary, don’t be afraid to replace any faulty battery components.
With these steps, you’ll have your lawn tractor up and running in no time!

