Did you know that a faulty ignition switch is one of the most common issues that riding mower owners encounter?
If you’re finding yourself in the same predicament, you may be wondering how to go about replacing it.
Well, fear not, because in this discussion, we’ll guide you through the process of replacing the ignition switch on your riding mower.
So, if you’re ready to get your mower up and running again, let’s dive in and get started on this essential maintenance task.
Identifying the Ignition Switch on Your Mower
To identify the ignition switch on your mower, simply locate the key slot near the steering wheel.
This key slot is usually positioned on the right-hand side of the steering column, within easy reach. It’s a small, cylindrical slot where you insert the key to start the mower.
The key slot is a crucial component, as it enables you to activate the ignition system and start the engine. When looking for the ignition switch, you’ll also notice that it’s connected to a set of wires that run underneath the mower’s dashboard.
These wires are essential for transmitting the electrical signal from the ignition switch to the engine, initiating the starting process.
In addition to the key slot, some mowers may have additional safety features incorporated into the ignition switch. These safety features could include a brake interlock system, which requires you to engage the brake pedal before starting the engine.
Understanding these safety features is important for proper operation of the ignition switch and ensuring that your mower starts safely and effectively.
Gathering the Necessary Tools and Materials
You’ll need a set of basic hand tools and a replacement ignition switch to complete this task.
The following table outlines the tools and materials required for replacing the ignition switch on your riding mower:
| Tools | Materials |
|---|---|
| Socket wrench set | Replacement ignition switch |
| Screwdriver set | Wire connectors |
| Pliers | Electrical tape |
| Wire strippers |
Having a socket wrench set will allow you to remove any bolts or nuts holding the ignition switch in place.
A screwdriver set is essential for disconnecting any electrical connectors and removing the old switch. Pliers will come in handy for holding small components and wire connectors for securing the electrical connections.
Additionally, wire strippers are necessary for preparing the wires for the new ignition switch. Once you have gathered these tools and materials, you will be ready to proceed with replacing the ignition switch on your riding mower.
Removing the Old Ignition Switch
Start by disconnecting the battery to ensure safety as you begin removing the old ignition switch. This is a critical step to avoid any electrical mishaps during the process.
Once the battery is disconnected, locate the ignition switch on your riding mower. It’s usually positioned near the steering column or on the dashboard.
Use a screwdriver or a wrench to remove any panels or covers that may be concealing the ignition switch.
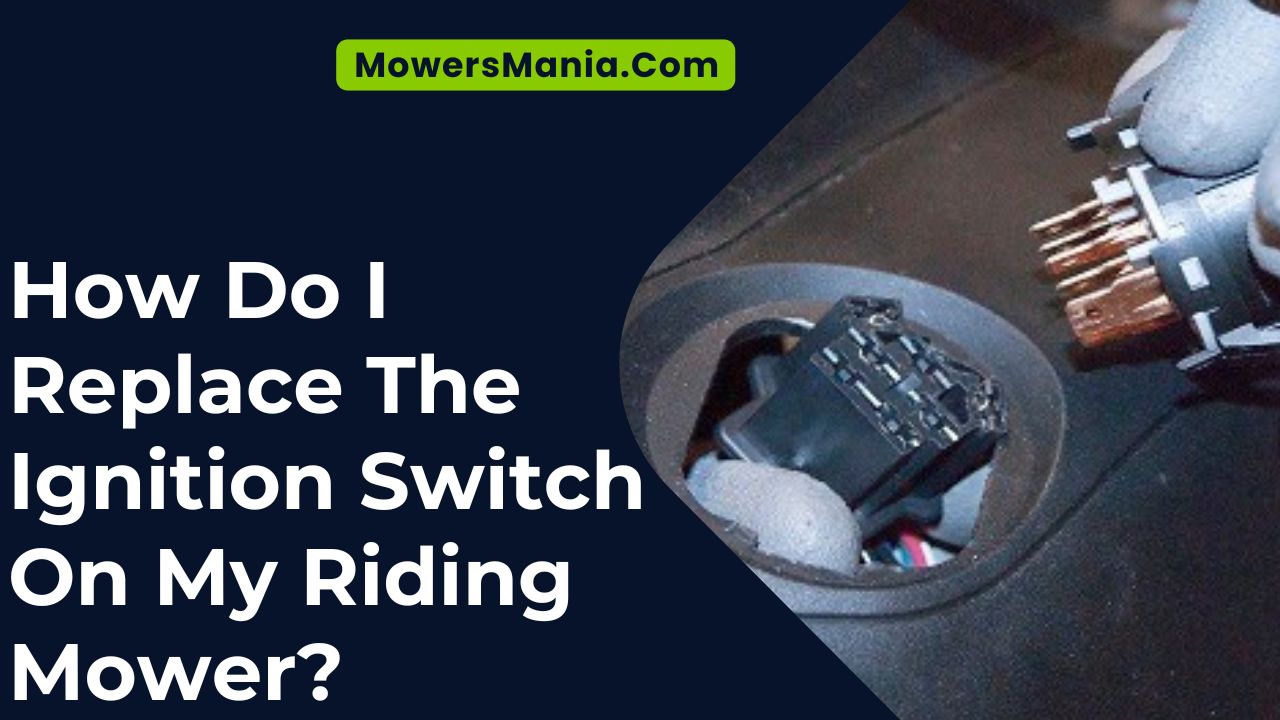
Next, carefully disconnect the wiring harness connected to the back of the ignition switch. The wiring harness is typically secured with a clip or screws.
Gently remove the harness by pressing the clip or unscrewing it, being cautious not to damage the wires or connectors.
After the wiring harness is detached, use the appropriate tool to loosen and remove the nut holding the ignition switch in place. Once the nut is removed, the ignition switch should come out easily.
With the old ignition switch removed, you’re now ready to proceed with installing the new ignition switch in the next step.
Installing the New Ignition Switch
After removing the old ignition switch, you can now proceed to install the new ignition switch on your riding mower.
Begin by carefully placing the new ignition switch into the slot from which you removed the old one. Ensure that it fits securely and aligns with the mounting holes.
Once in place, use the retaining nut or screws that came with the new ignition switch to fasten it securely to the mower’s dashboard or console.
Next, reconnect the wiring harness to the new ignition switch. Match the wire connections to the labeled terminals on the back of the switch. Push the connectors firmly onto the terminals until they’re snug and secure.
Double-check that all connections are tight to prevent any electrical issues once the mower is in operation.
After the wiring is connected, carefully tuck any excess wiring back into the dashboard or console.
This will prevent the wires from getting tangled or interfering with the mower’s controls. Once the new ignition switch is securely in place and all the wiring is connected, test the switch by turning the key to ensure it starts the mower properly.
If everything functions as expected, you have successfully installed the new ignition switch on your riding mower.
Testing the Replacement Ignition Switch
To ensure the proper functioning of the replacement ignition switch, test it by turning the key and starting the riding mower.
After installing the new ignition switch, it’s crucial to verify that it operates correctly before relying on it for regular use.
Follow these steps to test the replacement ignition switch:
| Step | Action | Result |
|---|---|---|
| 1 | Insert the key into the ignition switch. | The key should fit snugly and turn smoothly. |
| 2 | Turn the key to the “ON” position. | The dashboard lights and indicators should activate. |
| 3 | Engage the mower blades or attachments. | The mower blades or attachments should engage properly. |
| 4 | Turn the key to the “START” position. | The engine should start smoothly. |
| 5 | Turn the key to the “OFF” position. | The engine should shut off without any issues. |
Frequently Asked Questions
Can I Use a Universal Ignition Switch as a Replacement for My Riding Mower?
Yes, you can use a universal ignition switch as a replacement for your riding mower. It’s an affordable and accessible option that can be easily installed. Make sure to check compatibility and follow the manufacturer’s instructions for a smooth replacement process.
What Should I Do if My Ignition Switch Is Stuck in the “On” Position?
If your ignition switch is stuck in the ‘on’ position, start by disconnecting the mower’s battery to prevent any accidental starts. Then, carefully inspect the switch for any debris or damage, and consider replacing it if necessary.
Is It Possible to Bypass the Ignition Switch on My Riding Mower?
Yes, it’s possible to bypass the ignition switch on your riding mower. However, this may void the warranty and isn’t recommended for safety reasons. Consider consulting a professional for installation or repair.
How Can I Prevent the Ignition Switch From Getting Damaged in the Future?
To prevent ignition switch damage on your riding mower, regularly check for loose connections and ensure the switch is securely mounted. Avoid forcing the key and use dielectric grease for maintenance. Consider replacing if signs of wear appear.
Are There Any Safety Precautions I Should Take When Working on the Ignition Switch of My Riding Mower?
When working on the ignition switch of your riding mower, always disconnect the battery to avoid accidental starts. Use caution and wear protective gloves to prevent injury from sharp edges or electrical shocks.
Conclusion
Now that you have replaced the ignition switch on your riding mower, you can enjoy smooth and reliable starts every time you use it.
With the right tools and materials, the process is simple and can be completed in no time.
Remember to test the new ignition switch to ensure it’s working properly before using your mower.
Enjoy the improved performance of your riding mower with the new ignition switch in place.

