If your riding lawn mower’s drive belt is worn or broken, you’ll need to replace it to get your mower up and running again.
In this article, we’ll show you how to tackle this task step by step.
By following our instructions, you’ll be able to save time and money by doing the repair yourself.
So let’s get started and get your riding lawn mower back in top shape!
Safety Precautions
Before you begin, always carefully inspect and remove any debris from the mower and its components to ensure safe working conditions. This includes checking for any loose belts, sharp objects, or other potential hazards that could cause injury.
Make sure the mower is turned off and the key is removed before performing any maintenance or repairs. It’s also important to wear appropriate protective gear, such as gloves and safety goggles, to prevent any accidents.
When working underneath the mower, use a sturdy jack or lift to secure the machine and prevent it from falling.
Additionally, familiarize yourself with the mower’s manual and follow the manufacturer’s guidelines for safe operation and maintenance.
Keep bystanders, especially children and pets, at a safe distance while working on the mower.
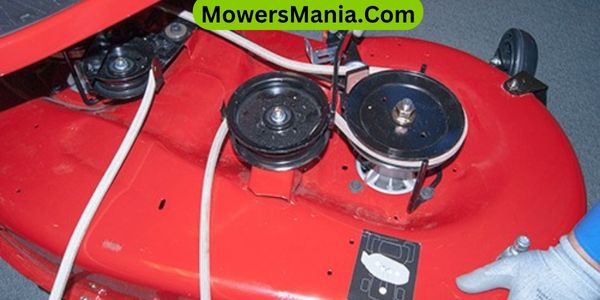
Accessing the Drive Belt
Inspect the riding lawn mower thoroughly to locate the drive belt, ensuring there are no potential hazards present before proceeding with the belt replacement.
Start by raising the mower hood to access the engine and drive system. Look for the belt-routing diagram, which is usually located on the mower deck or in the owner’s manual. This diagram will guide you on the correct placement of the new belt.
Next, remove any guards, covers, or components obstructing access to the drive belt. This may involve using a socket wrench or screwdriver to loosen bolts or screws.
Once the drive belt is visible, take note of how it’s routed around the pulleys. This will be crucial when installing the new belt.
Carefully detach the old belt from the pulleys, making sure to remember the routing. Take this opportunity to clean any debris or grass clippings from the pulleys and surrounding areas.
With the old belt removed, you’re now ready to install the new drive belt and proceed with the next steps in the replacement process.
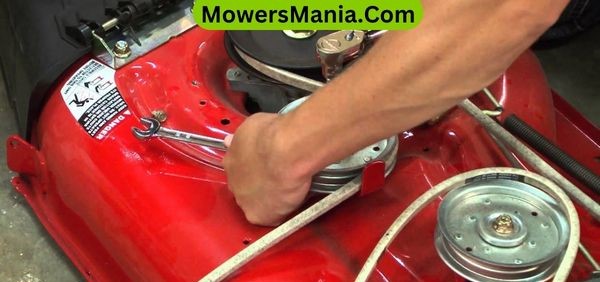
Removing the Old Belt
To begin removing the old belt, carefully loosen the tension from the belt by using a suitable tool like a wrench or socket. Locate the belt tensioner pulley and use the wrench or socket to rotate the pulley, releasing the tension on the belt.
As the tension is released, slide the old belt off the pulley, ensuring to note the belt’s routing for installing the new one.
It’s essential to take note of how the old belt is routed around the various pulleys and components to ensure the new belt is installed correctly.
After removing the belt from the tensioner pulley, carefully slide it off the other pulleys, making sure to avoid damaging any other components. Take your time and pay attention to how the belt is routed, as this will be crucial when installing the new belt.
Once the old belt is completely removed from all the pulleys, inspect it for any signs of damage or wear. If the belt shows signs of excessive wear, cracking, or fraying, it’s important to replace it with a new belt.
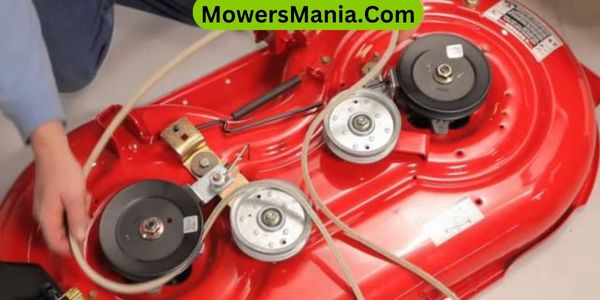
Installing the New Belt
Carefully positioning the new belt around the pulleys, be sure to follow the routing noted during the old belt’s removal. This will ensure that the belt is correctly installed and will function smoothly.
Here are the steps to guide you through the installation process:
- Check Pulley Alignment: Before fully securing the new belt, double-check that it sits correctly in the pulley grooves and is aligned with the pulleys. This will prevent premature wear and potential damage to the belt.
- Ensure Proper Tension: Once the belt is in place, make sure it has the right amount of tension. A belt that’s too loose can slip, while one that’s too tight can strain the mower’s engine and other components.
- Test Operation: After the new belt is installed, start the mower and engage the blades to ensure that the belt operates smoothly. Listen for any unusual noises and visually inspect the belt to confirm it’s running smoothly around the pulleys.
Following these steps will help ensure that the new drive belt is installed correctly and will function effectively, extending the life of your riding lawn mower.
Adjusting Belt Tension
Once the new belt is installed, you need to ensure that it has the proper tension to prevent slipping or straining the mower’s engine.
Start by locating the belt tension adjustment mechanism, which is typically a bolt or pulley system near the engine. Use a wrench or socket to loosen the adjustment mechanism, allowing the belt to be properly tensioned.
Then, either move the pulley or tighten the bolt to adjust the tension until it’s within the manufacturer’s recommended specifications. Make sure the belt has a bit of give, but not too loose, and check for proper alignment on all pulleys.
Once you’ve achieved the correct tension, tighten the adjustment mechanism back up to secure the belt in place. Take the mower for a test run to ensure the belt is functioning properly and isn’t slipping during operation.
Periodically check the tension of the belt and readjust as needed to maintain optimal performance and prevent premature wear and tear.
Testing the Mower
Now it’s time to test the mower to ensure the drive belt replacement was successful.
- First, check the belt tension to make sure it’s properly adjusted.
- Then, start up the engine and observe the belt in action.
- Lastly, evaluate the mower’s speed and performance to confirm that everything is functioning as it should.
Belt Tension Check
To check the tension of the belt, position yourself under the riding lawn mower and inspect the belt for any slack or signs of wear.
Here’s how to perform a belt tension check:
- Visual Inspection:
- Look for any visible signs of wear, such as fraying or cracking.
- Check for any looseness or sagging of the belt.
- Ensure that the belt is properly aligned and seated on all pulleys.
- Tension Measurement:
- Apply pressure to the belt at its midpoint.
- The belt should deflect slightly, typically around 1/4 to 1/2 inch.
- If the deflection is excessive or too tight, the belt tension may need adjusting.
- Belt Replacement:
- If the belt shows significant wear or the tension can’t be adjusted properly, it may be time to replace the belt.
Engine Start-Up Test
Inspecting the belt tension, start the engine and engage the mower to observe its performance and ensure the belt operates smoothly without slipping or unusual noises. Listen for any abnormal sounds or vibrations.
Test the mower in forward and reverse gears, checking for proper operation in both directions. Also, engage the mower blades to confirm that the belt is correctly installed and functions without any issues.
Observe the belt closely as the blades engage to ensure it remains properly seated on all pulleys without slipping. If you notice any slipping, grinding, or other unusual behavior, immediately shut off the engine and recheck the belt installation.
Make any necessary adjustments or corrections before further use to prevent potential damage to the mower or belt.
Mower Speed Evaluation
Start the engine and engage the mower to evaluate its speed and performance, ensuring the belt operates smoothly without slipping or unusual noises.
To effectively test the mower, follow these steps:
- Conduct a visual inspection of the drive belt while the mower is engaged to confirm it isn’t slipping or showing signs of wear.
- Observe the mower’s speed and performance while in use to ensure it operates at the appropriate speed for the selected gear.
- Listen for any unusual noises, such as grinding or squealing, which may indicate issues with the drive belt or other components.
These steps will help you assess the effectiveness of the new drive belt and ensure the mower is operating at optimal performance.
Frequently Asked Questions [FAQs]
Can I Use Any Type of Belt for My Riding Lawn Mower, or Does It Need to Be a Specific Type or Size?
You need to use a specific type and size of belt for your riding lawn mower. Using the wrong one can cause damage and affect performance. Check your mower’s manual or consult a professional for the correct belt.
How Often Should I Replace the Drive Belt on My Riding Lawn Mower?
You should replace the drive belt on your riding lawn mower every 1-2 years. Regular maintenance ensures optimal performance and prevents unexpected breakdowns. Keep an eye out for signs of wear and tear to avoid potential issues.
What Are the Signs That Indicate the Drive Belt on My Riding Lawn Mower Needs to Be Replaced?
If your riding lawn mower’s drive belt is showing signs of wear such as fraying, cracking, or slipping, it’s time for a replacement. Listen for unusual noises or difficulty in engaging the blades.
Is There a Specific Way to Store or Maintain the Drive Belt When It’s Not in Use?
When the drive belt on your riding lawn mower is not in use, store it in a cool, dry place away from direct sunlight and moisture. Avoid bending or twisting it to prevent any damage.
Are There Any Special Tools or Equipment Needed to Replace the Drive Belt on a Riding Lawn Mower?
You’ll need basic hand tools like a socket set, wrenches, and pliers to replace the drive belt on a riding lawn mower. Ensure you have the correct size tools for the job.
Conclusion
Now that you’ve replaced the drive belt on your riding lawn mower, you can enjoy a smoother and more efficient mowing experience.
Remember to always follow safety precautions and consult your mower’s manual for specific instructions.
With the new belt in place and properly tensioned, your mower should be ready to tackle the lawn with ease.
Happy mowing!

