
If your mower isn’t running smoothly, chances are your carburetor is clogged.
Learn the best way to clean it with simple steps and minimal tools. You’ll have your mower running like new in no time.
Understanding the Carburetor’s Function
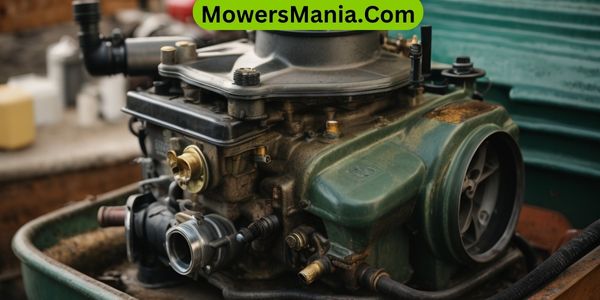
Do you know how the carburetor functions in your mower? It’s a crucial component that mixes air and fuel in the right proportion for combustion.
When you start the mower, the engine creates a vacuum that pulls air into the carburetor. At the same time, a valve called the throttle opens to allow the right amount of air to enter.
The carburetor then uses this airflow to draw fuel from the fuel tank, creating a mixture that’s ready for combustion. This mixture is then sent to the engine’s cylinders, where it’s ignited to power the mower.
Understanding the carburetor’s function is essential for maintaining your mower’s performance. If the carburetor gets clogged or damaged, it can disrupt the air-fuel mixture, leading to poor engine performance or even preventing the mower from starting.
Regular cleaning and maintenance of the carburetor can help ensure that it continues to function properly, keeping your mower running smoothly.
By understanding how the carburetor works, you can better appreciate its role in your mower’s operation and take the necessary steps to keep it in good working condition.
Identifying Symptoms of a Clogged Carburetor
To identify symptoms of a clogged carburetor, first, observe any difficulties in starting the mower or maintaining a consistent engine speed.
These are common signs that indicate a potential issue with the carburetor. Additionally, if you notice black smoke coming from the exhaust or the engine stalling frequently, these could also be indicators of a clogged carburetor.
Here are some key symptoms to watch out for:
- Difficulty starting the mower
- Inconsistent engine speed
- Black smoke from the exhaust
- Frequent engine stalling
If you experience any of these symptoms, it’s essential to address the issue promptly to prevent further damage to the mower’s engine.
Ignoring these signs could lead to more severe problems down the line. By being attentive to these symptoms, you can quickly diagnose a clogged carburetor and take the necessary steps to clean or repair it, ensuring that your mower continues to operate smoothly.
Gathering the Necessary Tools and Materials
You’ll need a few essential tools and supplies to get started. It’s important to have proper protective gear to ensure your safety while working on the mower.
Organizing your work space will make the process much smoother and more efficient.
Essential Tools and Supplies
To properly clean a clogged mower carburetor, you’ll need to gather up the essential tools and supplies.
Here’s what you’ll need:
- Screwdriver: You’ll require a screwdriver set to help you disassemble the carburetor and access hard-to-reach areas.
- Carburetor cleaner: This is a crucial component for effectively removing built-up gunk and debris from the carburetor.
- Compressed air: A can of compressed air will help you blow out any remaining particles and ensure a thorough cleaning.
- Safety goggles and gloves: It’s important to protect your eyes and hands from any splashing cleaner or debris while working on the carburetor.
With these tools and supplies at hand, you’ll be well-equipped to tackle the task of cleaning your clogged mower carburetor effectively.
Proper Protective Gear
Make sure you have the necessary safety goggles and gloves before starting the task of gathering the tools and materials to clean a clogged mower carburetor. Safety goggles are essential to protect your eyes from any debris or chemical splashes during the cleaning process.
Additionally, wearing gloves will shield your hands from coming into direct contact with any potentially harmful substances.
Once you have your protective gear in place, gather the tools and materials required for cleaning the carburetor. You’ll need a carburetor cleaner, a screwdriver, compressed air, a wire brush, and a clean cloth.
Having these items ready will ensure that you can efficiently and safely tackle the task of cleaning the clogged mower carburetor without risking any harm to yourself.
Organizing Work Space
Ensure you have all the necessary tools and materials ready before starting to clean a clogged mower carburetor.
Gather the following items to organize your workspace effectively:
- Safety goggles: Protect your eyes from any debris or splashing cleaning solutions.
- Gloves: Keep your hands clean and protected from any sharp edges or chemicals.
- Screwdriver set: You may need different types and sizes of screwdrivers to disassemble the carburetor.
- Clean rags: Have plenty of clean rags on hand to wipe away dirt, grease, and cleaning solutions.
Having these items ready will make the carburetor cleaning process smoother and safer.
Disassembling the Carburetor

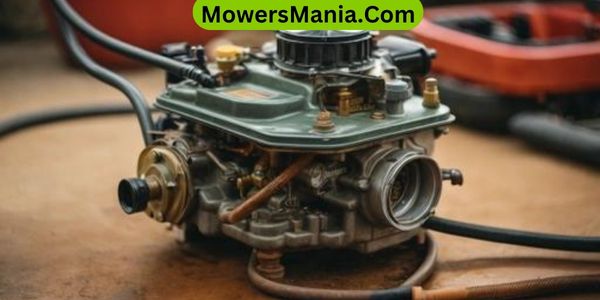
First, carefully remove the screws holding the carburetor cover in place using a screwdriver. Keep the screws in a safe place to avoid misplacing them. Once the cover is off, take note of the position of the gasket and diaphragm as they’ll need to be placed back in the same position during reassembly.
Next, carefully remove the pin holding the float in place. Gently lift out the float and the needle valve. Be sure to inspect the needle valve for any signs of wear or damage.
Then, remove the main jet and idle jet using a jet screwdriver. Take note of how many turns it takes to remove them, as this will be helpful during reassembly.
After that, carefully remove the throttle linkage and choke linkage. Be cautious not to bend or damage these linkages.
Lastly, inspect all the removed parts for any signs of dirt, debris, or damage, and clean them thoroughly using a carburetor cleaner and compressed air.
Cleaning and Reassembling the Carburetor
Now that you’ve disassembled the carburetor, it’s time to clean and reassemble it. First, we’ll cover the best techniques for cleaning the various components of the carburetor.
Then, we’ll provide tips and tricks for reassembling the carburetor to ensure it functions properly.
Carburetor Cleaning Techniques
You can effectively clean and reassemble the carburetor by following these simple steps:
- Start by carefully disassembling the carburetor, making sure to keep track of all the parts and gaskets.
- Use a carburetor cleaner to thoroughly spray and clean all the components, paying special attention to the small passages and jets.
- Inspect the gaskets and O-rings for any signs of wear or damage, and replace them if necessary to ensure a proper seal.
- Reassemble the carburetor by carefully putting all the components back together in the correct order, and then reinstall it onto the mower.
Reassembly Tips and Tricks
To ensure proper reassembly of the carburetor, carefully align all the components in the correct order before reinstalling it onto the mower. After cleaning the carburetor, follow these reassembly tips and tricks to ensure optimal performance.
- First, refer to the manufacturer’s manual for the correct order of parts and gaskets.
- Next, use a three-column table to organize the components for reassembly, ensuring that each part is placed in the correct order and orientation.
- Lastly, use a fuel-resistant sealant on gaskets to prevent any air leaks.
Once the carburetor is reassembled, double-check that all the components are properly aligned and secured. Following these reassembly tips will help ensure that your mower’s carburetor functions effectively.
| Column 1 | Column 2 | Column 3 |
|---|---|---|
| Part Name 1 | Part Name 2 | Part Name 3 |
| Part Name 4 | Part Name 5 | Part Name 6 |
| Part Name 7 | Part Name 8 | Part Name 9 |
| Part Name 10 | Part Name 11 | Part Name 12 |
| Part Name 13 | Part Name 14 | Part Name 15 |
Testing and Reinstalling the Carburetor
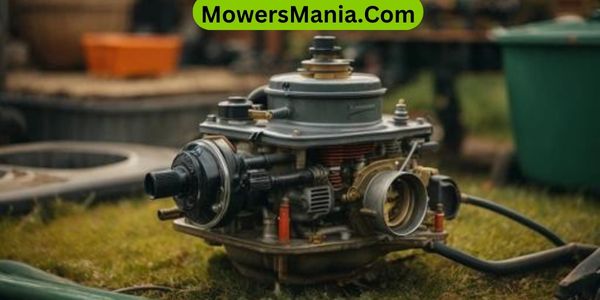
After you have cleaned the carburetor, it’s important to test and reinstall it properly to ensure optimal mower performance.
Here’s a checklist to guide you through the process:
- Test for Proper Functionality: Before reinstalling the carburetor, it’s crucial to check for proper functionality. This involves ensuring that the fuel and air passages are clear, the float operates smoothly, and the throttle and choke mechanisms function correctly.
- Inspect Gaskets and Seals: Carefully examine the gaskets and seals for any signs of wear or damage. Replace them if necessary to prevent any potential fuel leaks or air intake issues.
- Reinstall with Precision: When reinstalling the carburetor, ensure that all connections are secure and that the carburetor is properly seated. Pay close attention to the linkage and throttle cables to ensure they’re correctly reattached.
- Final Adjustment: After reinstalling the carburetor, make any necessary adjustments to the idle speed and mixture settings. This will help optimize the engine’s performance and fuel efficiency.
Frequently Asked Questions [FAQs]
Can I Use a Different Type of Cleaner to Clean My Clogged Mower Carburetor, or Is a Specific Type Necessary?
You can use a different type of cleaner to clean your clogged mower carburetor, but it’s best to use a specific type recommended by your mower’s manufacturer to ensure effective and safe cleaning.
How Often Should I Clean My Mower Carburetor to Prevent Clogs From Occurring?
You should clean your mower carburetor at least once a year to prevent clogs. Regular maintenance is key to keeping it running smoothly. Follow your manufacturer’s guidelines for the best results.
Is It Possible to Prevent Clogs in the Carburetor by Using a Fuel Additive or Cleaner Regularly?
Yes, it’s possible to prevent clogs in the carburetor by using a fuel additive or cleaner regularly. These products can help dissolve residue and deposits, keeping the carburetor clean and preventing clogs from occurring.
What Are Some Common Mistakes People Make When Cleaning a Clogged Mower Carburetor, and How Can I Avoid Them?
When cleaning a clogged mower carburetor, avoid common mistakes like using the wrong cleaning solution or neglecting to clean all the tiny passages thoroughly. Double-checking your work and following the manufacturer’s guidelines can help you avoid these errors.
Are There Any Specific Adjustments or Fine-Tuning That Need to Be Done to the Carburetor After It Has Been Cleaned and Reinstalled?
After cleaning and reinstalling the carburetor, make specific adjustments and fine-tuning to ensure proper functioning. Check the idle speed and mixture adjustments, as well as the throttle linkage. A clean and well-adjusted carburetor improves mower performance.
Conclusion
Now that you’ve cleaned your clogged mower carburetor, your lawn mower should be up and running smoothly again.
Remember to regularly maintain and clean your carburetor to prevent future clogs and ensure optimal performance.
Happy mowing!

