
If you want to keep your riding mower in top shape, you’ll need to change the blades regularly.
But did you know you can do it without removing the deck?
In this article, we’ll show you the tools and steps needed to replace the blades efficiently.

Save time and effort with this simple maintenance task.
Tools and Materials Needed
You’ll need the riding mower’s owner’s manual and a set of wrenches to change the blades without removing the deck.
The owner’s manual is essential for identifying the specific blade removal and installation process for your riding mower model. It provides step-by-step instructions, including safety precautions and the correct blade specifications.
Having a set of wrenches, including the appropriate socket wrench, will allow you to effectively loosen and tighten the blade bolts.
Additionally, a pair of gloves and safety goggles are crucial to protect your hands and eyes from any sharp edges or debris during the process.
In addition to the manual and wrenches, having a blade removal tool can make the task more manageable.
This tool helps to hold the blade in place while you loosen the bolt, preventing it from spinning freely. It provides stability and ensures that you can safely remove and install the blades without risking injury.
Lastly, a sturdy jack or ramp can be useful for raising the mower to a comfortable working height, allowing easier access to the blades. With these tools and materials on hand, you’re prepared to change the blades without the hassle of removing the deck.
Preparation Steps
Using a sturdy jack or ramp, raise the mower to a comfortable working height to access the blades more easily. This will make the blade changing process safer and more convenient for you.
Once the mower is raised, follow these preparation steps:
- Disconnect the Spark Plug: Prevent any accidental starts by disconnecting the spark plug wire. This will ensure that the engine doesn’t start while you’re working on the blades.
- Secure the Blades: Use a block of wood to prevent the blades from rotating while loosening the bolt. This will keep the blades in place and make it easier to remove and install the new ones.
- Gather Necessary Tools: Ensure you have all the tools and replacement parts needed for the blade change, such as a wrench, gloves, and new blades. Having everything within reach will streamline the process and reduce the risk of missing tools during the blade change.
Accessing the Blades
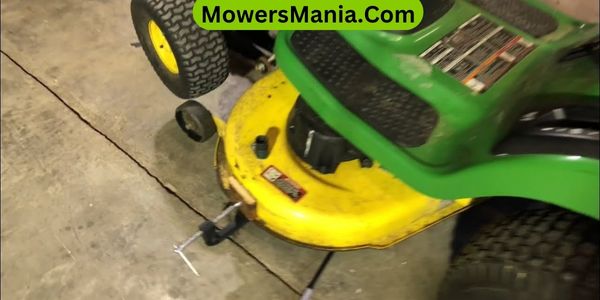
Once raised to a comfortable working height, accessing the blades of the riding mower is made easier for maintenance tasks. With the mower deck lifted, you can easily reach the blades for inspection, sharpening, or replacement.
Begin by ensuring the engine is off and the spark plug wire is disconnected to prevent any accidental starts. Next, slide under the mower and locate the blade mounting bolts. Use a wrench to loosen and remove the bolts, taking care to note the orientation of the blades for reinstallation.
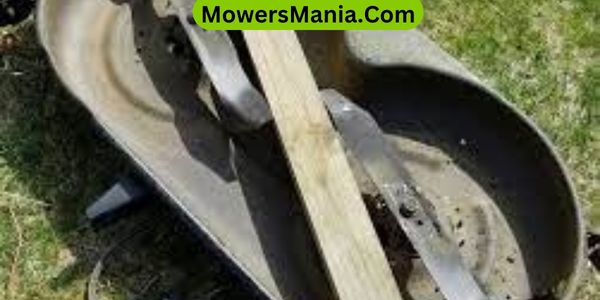
Once the bolts are removed, carefully pull the blades out from the mandrels. Inspect the blades for any signs of damage or wear, and if necessary, sharpen or replace them accordingly.
When reattaching the blades, ensure they’re positioned correctly and securely fastened with the mounting bolts. Take the time to double-check the tightness of the bolts to prevent any issues during operation.
Once the blades are accessed, inspected, and maintained, you can lower the mower deck and reconnect the spark plug wire before resuming regular operation.
Removing and Replacing the Blades
To remove and replace the blades on a riding mower without removing the deck, carefully pull the blades out from the mandrels after loosening and removing the blade mounting bolts.
Here are the steps to guide you through the process:
- Secure the Mower: Before starting, ensure the mower is turned off and parked on a flat, level surface. Engage the parking brake and remove the ignition key to prevent accidental start-up.
- Loosen the Blade Mounting Bolts: Using a wrench, loosen and remove the blade mounting bolts that secure the blades to the mandrels. Keep track of the orientation of the blades during removal to ensure proper reinstallation.
- Install the New Blades: Once the old blades are removed, carefully install the new blades onto the mandrels in the correct orientation. Tighten the blade mounting bolts securely and ensure that the blades are properly aligned and balanced.
Final Checks and Testing
After you have installed the new blades and tightened the blade mounting bolts, carefully lower the mower deck to its operating position and engage the blades to conduct a test run, ensuring the blades are functioning smoothly and efficiently.
Once the blades are engaged, listen for any unusual noises that could indicate a problem. Look underneath the deck to ensure that the blades are spinning freely without any wobbling or unusual vibrations.
If everything appears to be in order, take the mower for a short test drive to further assess the blade performance. Pay close attention to the quality of the cut and the overall performance of the mower.
If you notice any issues during the test run, stop the mower immediately and investigate the problem. It’s essential to address any issues before resuming regular use to prevent potential damage to the mower or unsafe operating conditions.
With the final checks and testing complete, you can confidently use your riding mower knowing that the blades have been successfully replaced and are functioning as intended.
Frequently Asked Questions [FAQs]
Can I Change the Blades on My Riding Mower Without Any Prior Mechanical Experience?
Yes, you can change the blades on your riding mower without prior mechanical experience. Follow the manufacturer’s instructions, use the right tools, and prioritize safety. Watch tutorial videos and take your time.
What Are Some Common Mistakes to Avoid When Changing the Blades on a Riding Mower?
When changing the blades on a riding mower, avoid not wearing gloves for protection, not checking for debris around the blades, and not properly securing the blade before removal. These mistakes can lead to accidents.
How Often Should I Sharpen or Replace the Blades on My Riding Mower?
You should sharpen or replace the blades on your riding mower at least once a year, depending on usage. It’s important to keep them sharp for optimal performance and to prevent damage to your lawn.
Are There Any Safety Precautions I Should Take When Changing the Blades on a Riding Mower?
When changing the blades on a riding mower, always prioritize safety. Wear gloves and eye protection, disconnect the spark plug, and follow the manufacturer’s instructions. Stay cautious and focused to avoid accidents while working on your mower.
Can I Use the Same Process to Change the Blades on Different Brands or Models of Riding Mowers?
Yes, you can use the same process to change the blades on different brands or models of riding mowers. It’s a universal procedure, but always consult the specific manual for safety and compatibility guidelines.
Conclusion
Now that you know how to change the blades on your riding mower without removing the deck, you can keep your lawn looking its best with minimal hassle.
With the right tools and a few simple steps, you can quickly and easily replace the blades and ensure your mower is cutting efficiently.
Remember to always follow safety precautions and consult your mower’s manual for specific instructions.
Happy mowing!

