When it comes to maintaining your riding lawn mower, changing the oil filter is an essential but often overlooked task. You might not be aware that neglecting to change the oil filter can lead to clogs and reduced engine performance.
However, knowing the proper steps to change the oil filter can ensure your lawn mower runs smoothly and efficiently.
So, if you want to keep your machine in top condition and avoid costly repairs down the line, it’s crucial to understand the process of changing the oil filter on a riding lawn mower.
Gather Necessary Tools and Supplies
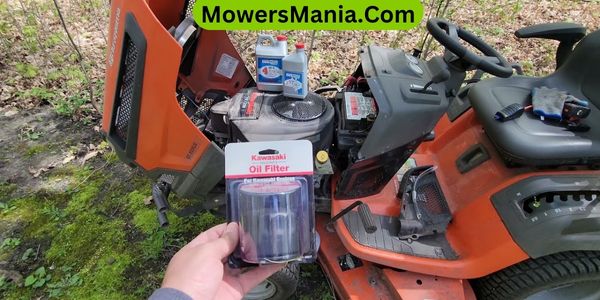
To begin changing the oil filter on your riding lawn mower, gather the necessary tools and supplies. First, make sure you have a wrench that fits the oil filter, an oil pan to catch any oil that may spill, and a new oil filter. It’s also helpful to have some rags or paper towels on hand to clean up any messes.
Before you start, let the engine cool down to avoid burning yourself on hot metal and to ensure that the oil has had a chance to settle, making it easier to drain.
After gathering all the necessary items, locate the oil filter on your riding lawn mower. It’s typically located near the engine.
Once you’ve found it, use the wrench to carefully loosen and remove the old oil filter. Be prepared for some oil to spill out, so make sure the oil pan is positioned to catch it.
Once the old filter is removed, wipe off any excess oil from the area. Now you’re ready to install the new oil filter and continue with the rest of the oil change process.
Locate the Oil Filter
The oil filter on your riding lawn mower can usually be found near the engine. It’s typically a cylindrical or rectangular metal component with a textured surface for easy gripping.
The filter is connected to the engine block by a threaded bolt and is easily accessible for maintenance.
To locate the oil filter, start by identifying the engine on your riding lawn mower. The oil filter is commonly positioned on the side of the engine, often close to the oil pan.
It may be enclosed within a protective casing to shield it from debris and damage during mowing operations. If you’re having trouble locating the oil filter, consult your mower’s manual for specific instructions.
Additionally, some riding lawn mowers have oil filters that are easily visible and can be accessed without the need for tools.
However, others may require the use of a wrench or socket to remove the filter. Once you have located the oil filter, you can proceed with the necessary steps to remove and replace it as part of your regular maintenance routine.
Drain the Oil
Once you’ve located the oil filter on your riding lawn mower, the next step is to drain the oil from the engine.
Follow these steps to drain the oil:
Remember to dispose of the old oil properly, and once the oil has drained completely, you can proceed with replacing the oil filter and adding fresh oil to your riding lawn mower’s engine.
Remove the Old Oil Filter
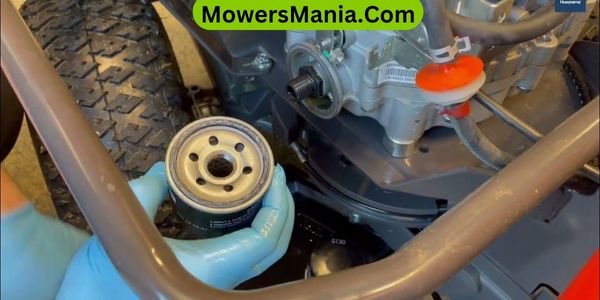
With the engine turned off, locate the old oil filter on your riding lawn mower. The oil filter is usually found near the engine, and it may be cylindrical or have a rounded shape, depending on the model of your mower.
Before removing the old oil filter, place a drain pan underneath it to catch any residual oil. Using an oil filter wrench or a specialized oil filter removal tool, carefully loosen the old oil filter by turning it counterclockwise. Be cautious not to spill any remaining oil while removing the filter.
Once the old oil filter is loosened, carefully twist it off by hand and place it in the drain pan. Take care to properly dispose of the old oil filter in accordance with local regulations.
After removing the old oil filter, use a clean rag to wipe the filter mounting surface on the engine to ensure it’s free from any debris or old gasket material.
With the old oil filter removed, you can now proceed to install the new oil filter.
Install the New Oil Filter

With the old oil filter removed, carefully inspect the filter mounting surface on the engine to ensure it’s clean and free from any debris or old gasket material before installing the new oil filter.
Once the mounting surface is clean, follow these steps to install the new oil filter:
- Apply a thin, even coat of clean engine oil to the rubber gasket of the new oil filter. This will help create a proper seal and make it easier to remove the filter during the next oil change.
- Carefully thread the new oil filter onto the engine by hand. Once the filter gasket contacts the mounting surface, tighten it an additional three-quarters to one full turn. Avoid over-tightening, as this can damage the filter or the engine.
- Double-check the tightness of the oil filter by giving it a gentle tug. It should be snug and secure. If it feels loose, give it a slight turn to ensure it’s properly seated.
Frequently Asked Questions [FAQs]
How Often Should the Oil Filter Be Changed on a Riding Lawn Mower?
You should change the oil filter on a riding lawn mower every 25 hours of use or annually, whichever comes first. Regular maintenance will ensure optimal performance and extend the life of your mower.
Can I Use the Same Oil Filter for Multiple Oil Changes, or Should I Always Install a New One?
You should always install a new oil filter with each oil change on your riding lawn mower. Reusing the same filter can lead to clogs and poor engine performance. It’s a crucial part of maintaining your mower’s engine.
What Are the Signs That Indicate the Oil Filter Needs to Be Replaced?
If your oil pressure light comes on, there’s a drop in oil pressure, or you hear unusual engine noises, it’s time to replace the oil filter. Don’t ignore these signs, as a clogged filter can damage your engine.
Are There Any Specific Maintenance Tips for Prolonging the Life of the Oil Filter?
To prolong the life of the oil filter, you should regularly check for leaks, clean the surrounding area, and ensure it’s properly secured. Additionally, following the manufacturer’s recommended oil change schedule can help maintain the filter’s functionality.
Is It Necessary to Use a Specific Type or Brand of Oil Filter for My Riding Lawn Mower?
You should use the specific type or brand of oil filter recommended by the manufacturer for your riding lawn mower. Using the correct oil filter ensures proper filtration and helps maintain the performance of your mower.
Conclusion
Now that you have installed the new oil filter on your riding lawn mower, you can enjoy improved engine performance and longevity.
Regularly changing the oil filter will help keep your mower running smoothly and efficiently.
Remember to properly dispose of the old oil filter and recycle the used oil.
With these simple steps, you can easily maintain your riding lawn mower and keep your yard looking great.

