
Are you tired of leaves and clippings cluttering your lawn after mowing? Learn how to attach a grass catcher to your lawn mower and keep your yard looking pristine.
In this article, we will guide you through the simple steps to:
- Gather the necessary tools.
- Prepare your mower.
- Install the mounting brackets or frame.
- Attach the grass catcher bag or container.
- Secure it to the mower.
- Test for optimal performance.
Say goodbye to messy lawns and hello to a neat and tidy yard!
Gather the Necessary Tools and Materials
To begin attaching the grass catcher to your lawn mower, gather the required tools and materials. It’s important to have everything you need at hand before you start the installation process.
First, locate a screwdriver that’s suitable for the type of screws on your lawn mower. This will ensure that you can tighten them securely. Additionally, find a pair of pliers that will help you with any adjustments that may be needed.
Next, you’ll need the grass catcher itself. Make sure it’s clean and free of any debris or obstructions. If necessary, give it a quick rinse to remove any dirt or grass clippings.
Finally, check if any additional hardware or accessories are required for your specific lawn mower model. This could include brackets, clips, or straps. Have these items ready so that you can proceed smoothly with the attachment process.
Taking the time to gather the necessary tools and materials beforehand will save you from any unnecessary delays or frustrations.
Prepare Your Lawn Mower for Attachment
Before attaching the grass catcher to your lawn mower, there are a few important points to consider.
First, make sure you follow the proper attachment technique to ensure a secure fit.
Additionally, gather all the necessary tools and equipment, such as screws or brackets, to successfully attach the grass catcher.
Proper Attachment Technique
Start by gathering all the necessary tools and materials for attaching the grass catcher to your lawn mower.
To ensure a proper attachment technique, here are some key steps to follow:
- Clean the mower: Remove any debris or clippings from the mower deck to create a clean surface for attachment.
- Position the catcher: Place the grass catcher on the rear of the mower, aligning it with the attachment points.
- Secure the catcher: Use the provided hardware or fasteners to secure the catcher firmly to the mower deck.
By following these steps, you’ll be able to attach the grass catcher to your lawn mower securely and efficiently. Remember to consult your mower’s manual for any specific instructions or precautions.
Now, you’re ready to tackle your lawn maintenance with a properly attached grass catcher.
Necessary Tools and Equipment
Gather the tools and equipment needed to prepare your lawn mower for attachment of the grass catcher. To ensure a smooth and efficient process, it’s essential to have the following items at hand:
| Tools | Equipment | Protective Gear |
|---|---|---|
| Wrench | Grass catcher | Safety goggles |
| Screwdriver | Screws or bolts | Gloves |
| Pliers | Washer | Ear protection |
| Socket set | Nut | Dust mask |
Using a wrench, screwdriver, pliers, and socket set, you’ll be able to securely attach the grass catcher to your lawn mower. The screws or bolts, washers, and nuts will help to keep the grass catcher in place while you mow your lawn.
Don’t forget to wear safety goggles, gloves, ear protection, and a dust mask to protect yourself from any potential hazards. By having all the necessary tools and equipment ready, you’ll be well-prepared to successfully prepare your lawn mower for the attachment of the grass catcher.
Install the Mounting Brackets or Frame
To install the mounting brackets or frame for your grass catcher, start by positioning and aligning the brackets according to the instructions provided. Make sure they’re securely attached to the mower’s deck to prevent any movement during operation.
Additionally, ensure that the mounting frame is compatible with your specific lawn mower model to ensure a proper fit.
Bracket Positioning and Alignment
Attach the mounting brackets or frame to your lawn mower using the provided hardware. This step is crucial in ensuring a secure and stable attachment of the grass catcher.
To make the process easier, follow these simple guidelines:
- Choose the right position: Locate the designated mounting points on your lawn mower. Ensure that the brackets or frame are aligned properly with these points for a proper fit.
- Secure the brackets: Use the provided bolts, nuts, or screws to fasten the brackets or frame securely to the mower. Tighten them firmly, but be careful not to overtighten and damage the mower’s body.
- Check for alignment: After attaching the brackets or frame, double-check their alignment. They should be level and parallel to the ground, ensuring that the grass catcher will hang correctly.
Securing the Mounting Frame
Once you have aligned the mounting brackets or frame with the designated points on your lawn mower, securely fasten them using the provided hardware. This step is crucial to ensure that the grass catcher stays in place while you mow.
Start by inserting the screws or bolts through the pre-drilled holes on the mounting brackets or frame. Then, use a screwdriver or wrench to tighten them until they’re snug. Be careful not to overtighten, as this could damage the mounting brackets or frame.
Make sure to check that all screws or bolts are securely fastened before moving on to the next step.
Once the mounting frame is securely attached, you can proceed with attaching the grass catcher bag or container.
Compatibility With Different Mowers
After aligning the mounting brackets or frame with the designated points on your lawn mower, secure them using the provided hardware.
It’s important to note that not all grass catchers are compatible with every type of lawn mower. To ensure a proper fit, follow these steps:
- Check the compatibility of the grass catcher with your specific lawn mower model.
- Look for mounting points on the rear of your mower where the brackets or frame can be attached.
- Make sure the mounting brackets or frame align properly with these points.
- Use the provided hardware, such as screws or bolts, to securely fasten the brackets or frame to the mower.
- Double-check that the attachment is tight and secure before using the grass catcher.
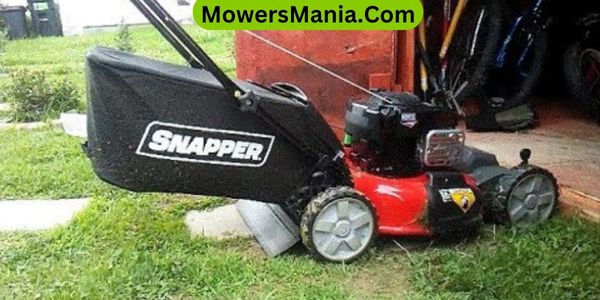
Attach the Grass Catcher Bag or Container
To secure the grass catcher bag or container, simply slide it onto the designated mounting bracket on the back of your lawn mower.
The mounting bracket is usually located near the rear of the mower deck. Look for a metal or plastic frame with hooks or clips that can securely hold the grass catcher in place.
Position the bag or container in a way that the opening aligns with the bracket. Then, slide it onto the bracket until it clicks or locks into position. Make sure it fits snugly and doesn’t wobble or move around during mowing.
If your lawn mower has a grass catcher container instead of a bag, ensure that the container is clean and free of any debris or clippings. It’s important to empty the container regularly to prevent clogging and maintain optimal grass collection.
Once the grass catcher is securely attached, you can start mowing your lawn. As you mow, the grass clippings will be directed into the grass catcher, keeping your lawn clean and tidy.
When the bag or container becomes full, simply remove it from the mounting bracket, empty the clippings, and reattach it to continue mowing.
Remember to follow the manufacturer’s instructions for attaching and detaching the grass catcher, as the process may vary slightly depending on the specific lawn mower model.
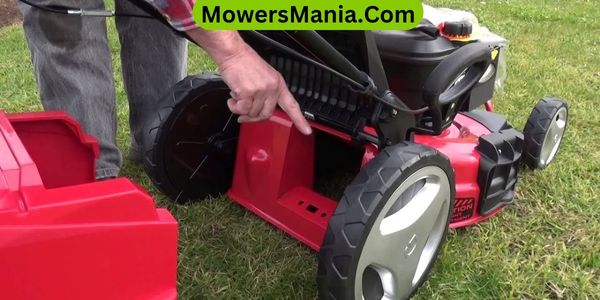
Secure the Grass Catcher to the Lawn Mower
To secure the grass catcher to your lawn mower, slide it onto the designated mounting bracket on the back of the mower deck. This ensures that the grass catcher stays in place while you mow your lawn, preventing any unwanted spills or messes.
Here are some important steps to follow when securing the grass catcher:
- Make sure the mounting bracket is clean and free from any debris or grass clippings. This will ensure a secure attachment.
- Align the grass catcher with the mounting bracket, making sure that the holes on the catcher align with the tabs on the bracket.
- Push the grass catcher onto the bracket until you hear a click or feel a secure connection. This indicates that the grass catcher is properly attached.
- Give the grass catcher a gentle tug to ensure it’s securely fastened. If it feels loose or wobbly, double-check the alignment and try again.
Test and Adjust the Grass Catcher for Optimal Performance

Once you have securely attached the grass catcher to your lawn mower, it’s time to test and adjust it for optimal performance. Testing and adjusting the grass catcher ensures that it functions efficiently and effectively in collecting the grass clippings while you mow your lawn.
Here are some steps to follow:
- Test the Fit: Start by ensuring that the grass catcher is properly aligned and securely attached to the mower. Give it a gentle shake to make sure it doesn’t wobble or come loose during operation.
- Adjust the Height: Check the cutting height of your mower and adjust the grass catcher accordingly. You want to make sure that the bottom of the catcher is just above the ground to catch all the clippings.
- Check the Airflow: Look for any obstructions or blockages in the grass catcher or the chute. Clear out any debris that may hinder the airflow, as this can affect the catcher’s performance.
- Empty the Catcher: Before you start mowing, empty any debris or clippings from the grass catcher. This will ensure that it has maximum capacity to collect the grass clippings.
- Monitor the Fill Level: As you mow, keep an eye on the fill level of the grass catcher. If it becomes too full, empty it to prevent clogging and maintain optimal performance.
Frequently Asked Questions [FAQs]
How Often Should I Empty the Grass Catcher Bag or Container?
You should empty the grass catcher bag or container regularly to prevent it from becoming too full. This will ensure that your lawn mower continues to collect grass efficiently without clogging or overflowing.
Can I Attach a Grass Catcher to Any Type of Lawn Mower?
Yes, you can attach a grass catcher to most types of lawn mowers. It’s a convenient way to collect grass clippings while mowing. Just follow the mower’s instructions and secure the catcher properly for best results.
Are There Different Sizes of Grass Catcher Bags or Containers Available?
Yes, there are different sizes of grass catcher bags or containers available. They come in various capacities to suit your needs. Check the specifications or consult a salesperson to find the right size for your lawn mower.
Can I Use the Grass Catcher on Uneven Terrain?
You can use the grass catcher on uneven terrain. It’s designed to collect grass clippings regardless of the ground’s condition. Just make sure it’s properly attached to your lawn mower for optimal performance.
Is It Necessary to Remove the Grass Catcher When Mowing Without the Bag or Container?
No, it is not necessary to remove the grass catcher when mowing without the bag or container. However, make sure to check the manual for your specific lawn mower model for any instructions or recommendations.
Conclusion
Attaching a grass catcher to your lawn mower is a simple process that can greatly improve the cleanliness of your yard. By gathering the necessary tools and materials, preparing your lawn mower, and securely attaching the grass catcher, you can ensure optimal performance.
Remember to test and adjust the grass catcher as needed. With this easy-to-follow guide, you’ll be able to keep your lawn looking neat and tidy with minimal effort.

