If you’re looking to improve your push mower’s performance, changing the blade is a simple and effective way to do it.
In this article, we’ll walk you through the steps to safely and easily swap out the old blade for a new one.
With a few basic tools and some careful attention, you can have your mower running like new in no time.
Safety Precautions
Before beginning the process of changing a push mower blade, ensure you have safety goggles, gloves, and sturdy footwear to protect yourself from any potential injuries.
Safety goggles are crucial to shield your eyes from any debris or metal fragments that may fly up during the blade changing process.
Gloves will safeguard your hands from sharp edges and potential cuts. Sturdy footwear is essential to provide stability and protect your feet from any heavy objects that may fall during the blade replacement.
Additionally, it’s important to ensure that the mower is turned off and the spark plug wire is disconnected to prevent accidental starts while working on the blade. Clear the work area of any obstacles and ensure good lighting for optimal visibility. Always follow the manufacturer’s instructions and recommendations regarding safety procedures.
Gather Necessary Tools
You’ll need a few essential tools for the job, such as a wrench and a socket set.
It’s also important to have the proper safety gear, including gloves and eye protection.
These tools will help you disassemble the mower blade and keep you safe while doing so.
Essential Tools for Disassembly
To change a push mower blade, you’ll need a set of wrenches to complete the disassembly process. The most essential tool for this task is a socket wrench with the correct socket size for the blade bolt.
Additionally, a pair of work gloves is crucial for protecting your hands from sharp edges and potential debris. A sturdy pair of pliers will also come in handy for holding the blade steady while you loosen the bolt.
It’s important to have a blade lock or block to immobilize the blade during the removal process, preventing any accidental movement that could cause injury.
Lastly, a torque wrench is necessary for properly tightening the blade bolt to the manufacturer’s recommended torque specifications during reassembly.
Proper Safety Gear Required
Gather the necessary tools for changing a push mower blade:
- Socket wrench: This tool is used to remove the nut holding the blade in place.
- Work gloves: Protect your hands from sharp edges and debris while working.
- Pliers: These are useful for gripping and holding parts securely.
- Blade lock: Use a blade lock to prevent the blade from rotating while you work.
- Torque wrench: Use this tool to ensure that the blade is properly tightened to prevent accidents during operation.
Prioritize safety by wearing protective gear and using the right tools for the job. Remember, taking these precautions will make the blade-changing process safer and more efficient.
Prepare the Mower
Before starting the blade replacement process, gather the necessary tools and make sure you have a wrench, new blade, and gloves.
Check the fuel and oil levels in your mower to ensure it’s safe to work on, and if needed, fill them up before proceeding.
Clear the work area around the mower to prevent any accidents or obstacles while you work.
Gather Necessary Tools
Get the necessary tools, including a wrench and gloves, to prepare the mower for blade replacement. Once you have gathered everything, follow these steps:
- Wrench: Use the appropriate sized wrench to loosen the bolt holding the mower blade in place.
- Gloves: Put on a pair of protective gloves to avoid any accidental cuts or injuries while handling the sharp blade.
- Safety goggles: Protect your eyes from debris by wearing safety goggles throughout the process.
- Workbench or sturdy surface: Find a stable workbench or surface to elevate the mower for easier access to the blade.
- Cleaning cloth: Have a cleaning cloth handy to wipe down the blade and surrounding area before installing the new one.
With these tools and precautions in place, you’re ready to start preparing the mower for the blade replacement.
Check Fuel and Oil
To prepare the mower for blade replacement, ensure that the fuel and oil levels are at the appropriate capacity for safe operation.
First, check the fuel level by removing the gas cap and visually inspecting the fuel tank. If the fuel is low, fill it up with fresh gasoline, being careful not to overfill.
Next, locate the oil dipstick, remove it, and wipe it clean. Reinsert the dipstick all the way, then remove it again to check the oil level. If it’s low, add the recommended oil for your mower’s engine.
Proper fuel and oil levels are crucial for the mower’s performance and longevity, so taking a few moments to verify them before blade replacement can save you from potential problems later on.
Clear Work Area
Ensure the work area is clear and free of any obstructions before starting the mower preparation process. This step is crucial for your safety and the efficiency of the task. Here are some key points to consider:
- Remove any debris, sticks, or rocks from the mowing path.
- Check for any potential hazards such as children’s toys, hoses, or gardening tools.
- Look out for low-hanging branches or obstacles that could interfere with the mower’s movement.
- Ensure there are no pets or bystanders in the vicinity of the mowing area.
- Double-check that the area is well-lit and that there are no hidden hazards under tall grass or foliage.
Taking these precautions will help you create a safe and efficient work environment for preparing your push mower.
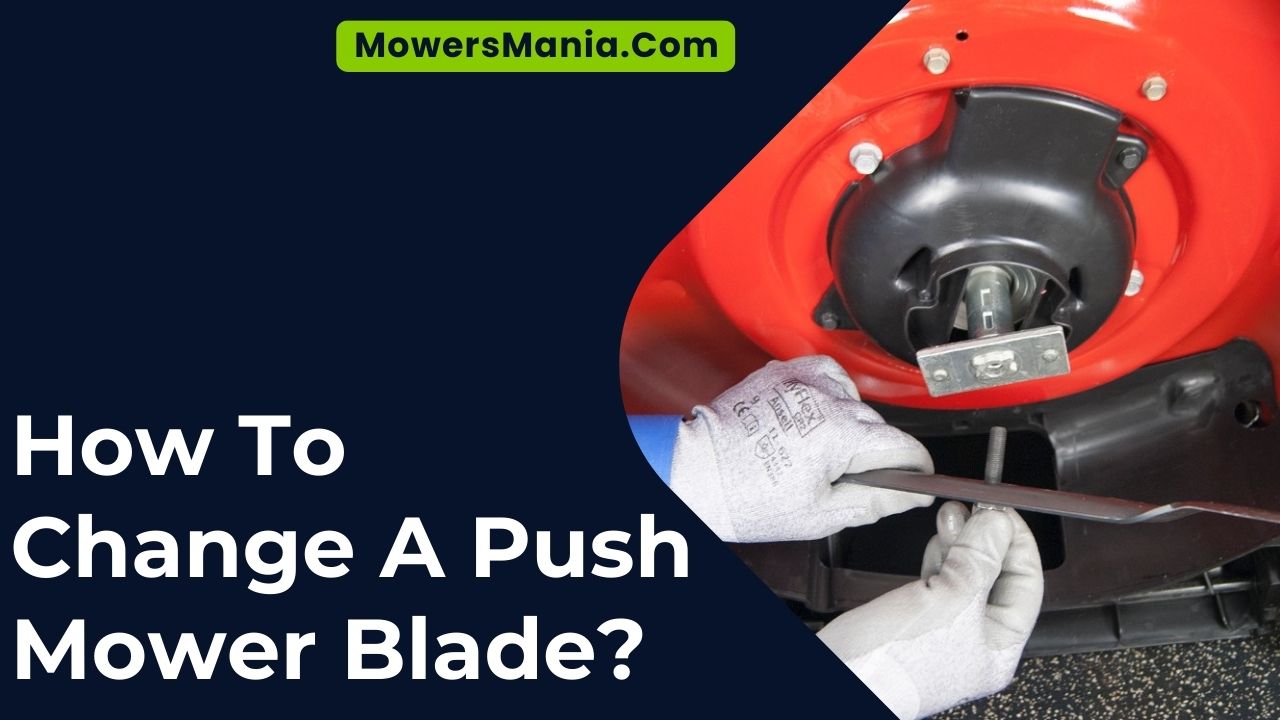
Remove the Old Blade
First, loosen the bolt securing the old blade using a wrench. Turn the wrench counterclockwise to loosen the bolt. Once the bolt is loose, you can use your hand to remove it completely. Be sure to keep track of the bolt and any washers that may be attached.
Next, carefully pull the old blade away from the mower deck. Be mindful of the sharp edges and handle the blade with caution. If the blade is stuck, gently tap it with a rubber mallet to loosen it from the mounting.
Once the blade is free, inspect it for any damage or excessive wear. If the blade is damaged or worn, dispose of it properly. Remember to wear gloves when handling the old blade to protect your hands from any sharp edges.
With the old blade removed, you can now proceed with installing the new blade.
Install the New Blade
Here’s a step-by-step guide to help you install the new blade on your push mower:
- Positioning: Place the new blade onto the mower deck, ensuring that the cutting edge is facing downwards towards the ground.
- Alignment: Make sure the center hole of the blade aligns with the mounting hole on the mower deck. This ensures that the blade is properly centered.
- Securing: Insert the bolt through the center hole of the blade and tighten it securely with a wrench. Ensure that the bolt is fastened according to the manufacturer’s recommended torque specifications.
- Checking: After securing the blade, give it a gentle tug to ensure it’s properly fitted and won’t come loose during operation.
- Testing: Before using the mower, start it up and let it run for a few moments to ensure that the blade is functioning smoothly and without any unusual vibrations.
Following these steps will help you safely and effectively install the new blade on your push mower.
Reassemble the Mower
To reassemble the mower, align the handle with the base and secure it using the provided bolts, ensuring a tight and stable connection. Once the handle is securely attached, reattach the spark plug wire to the spark plug. Next, reposition the grass catcher if your mower has one, ensuring it is properly seated and secured. Then, check the oil level and refill if necessary. Finally, inspect the air filter and clean or replace it as needed. Refer to the mower’s manual for specific instructions regarding the air filter.
| Step | Description |
|---|---|
| 1 | Align and secure the handle with the base using the provided bolts. |
| 2 | Reattach the spark plug wire to the spark plug. |
| 3 | Reposition and secure the grass catcher if applicable. |
| 4 | Check and refill the oil as needed. |
| 5 | Inspect and clean or replace the air filter. |
Following these steps will ensure that your push mower is reassembled correctly and ready for use.
Test the Mower
After reassembling the mower, carefully and thoroughly test its performance by starting the engine and running it for a few minutes to ensure all components are functioning properly. This step is crucial to guarantee that the blade is securely attached and that the mower operates safely and effectively.
Here’s what you should check during the testing phase:
- Blade Rotation: Observe the rotation of the blade to confirm that it’s spinning freely without any unusual noises or vibrations.
- Engine Performance: Check the engine’s performance by listening for any irregular sounds and ensuring it runs smoothly without stalling.
- Height Adjustment: Test the height adjustment to ensure that the mower can be set at different cutting heights without any issues.
- Wheel Functionality: Verify that all the wheels are turning properly and that they’re secure and aligned.
- Safety Features: Test the safety features such as the kill switch and the blade brake to ensure they’re working as intended.
Frequently Asked Questions [FAQs]
Can I Sharpen the Old Blade Instead of Replacing It?
Yes, you can sharpen the old blade instead of replacing it. Use a file or grinder to sharpen the cutting edge at a consistent angle. Make sure to remove any nicks or dents for a clean cut.
How Often Should I Change the Push Mower Blade?
You should change the push mower blade every season or whenever it becomes dull or damaged. Regular maintenance ensures optimal performance and safety. Sharpening the blade is an option, but replacing it is often more effective.
Can I Use Any Type of Blade for My Push Mower or Does It Need to Be Specific to the Make and Model?
You should use a blade specific to your push mower’s make and model because it ensures proper fit and functionality. Using the wrong blade can cause damage and safety hazards. Always consult your mower’s manual for the correct blade type.
What Should I Do if I Notice Other Parts of the Mower Are Damaged While Changing the Blade?
If you notice other parts of the mower are damaged while changing the blade, stop and assess the extent of the damage. It may be necessary to replace or repair those parts before continuing to use the mower.
Is There a Specific Torque Requirement for Tightening the Blade Bolt?
When tightening the blade bolt, make sure to follow the specific torque requirement mentioned in your mower’s manual. Using the correct torque is crucial for securing the blade properly and ensuring safe operation.
Conclusion
Now that you’ve changed the push mower blade, you can enjoy a safer and more efficient mowing experience.
Remember to always prioritize safety by wearing gloves and disconnecting the spark plug before working on the mower.
With the right tools and knowledge, you can easily maintain and care for your push mower for years to come.
Happy mowing!

