
Are you tired of struggling to remove your John Deere mower blades? Look no further!
In this quick and easy guide, we’ll show you the step-by-step process to get those blades off in no time.
With just a few tools and some safety precautions, you’ll be able to remove your mower blades effortlessly.
Say goodbye to the frustration and hello to a smoother mowing experience. Let’s get started!
Tools Needed
To remove the John Deere mower blades, you’ll need a set of essential tools. These tools are necessary to ensure a smooth and efficient blade removal process.
- The first tool you’ll need is a socket wrench. This will allow you to easily loosen and remove the nuts that hold the blades in place. Make sure to choose a socket size that fits snugly on the nut to avoid stripping it.
- Next, you’ll need a sturdy pair of gloves. These will protect your hands from any sharp edges or debris that may be present on the blades.
- Additionally, a blade removal tool or a block of wood will be useful to prevent the blades from spinning while you loosen the nuts.
- Finally, having a jack or a lift can make the blade removal process even easier by allowing you to elevate the mower for better access to the blades.
With these essential tools at your disposal, you’ll be well-equipped to remove the John Deere mower blades efficiently and effectively.
Safety Precautions
Before proceeding with the removal of the John Deere mower blades, it’s important to take proper safety precautions. Safety should always be your top priority to prevent any accidents or injuries.
Here are some essential safety measures to follow:
- Turn off the mower: Before starting any work, make sure the mower is completely turned off and the engine is cool. Remove the key and disconnect the spark plug wire to avoid any accidental startup.
- Wear protective gear: Put on safety goggles to shield your eyes from flying debris and wear sturdy gloves to protect your hands from sharp edges. Additionally, consider wearing ear protection to minimize noise exposure.
- Secure the mower: Park the mower on a flat surface and engage the parking brake. This will prevent any sudden movements or rolling while you work on removing the blades.
- Disconnect the power source: If your mower has an electric start or battery, disconnect it to eliminate the risk of accidental engagement.
- Use proper tools: Ensure you have the correct tools for the job, including the appropriate wrench or socket for removing the blade bolt. Using the right tools will make the process safer and more efficient.
How To Remove A Blade From A John Deere Mowers? Step By Step

Step 1: Positioning the Mower
Now, position the mower on a flat surface to ensure stability during the blade removal process. This step is crucial to ensure your safety and the proper execution of the task. Look for a level area in your yard or garage where you can comfortably work on the mower.
Placing it on a flat surface will prevent any unwanted movement or accidents while removing the blades.
Before positioning the mower, make sure it’s turned off and the engine is cool to the touch. This will prevent any potential injuries or burns. Once the mower is in a suitable location, engage the parking brake to keep it securely in place.
If your mower doesn’t have a parking brake, make sure to block the wheels using wooden blocks or bricks for added stability.
Positioning the mower correctly will provide a solid foundation for the blade removal process. It will also make it easier for you to access the blades and perform the necessary tasks without any hindrance.
By taking a moment to ensure the mower is on a flat surface, you’re setting yourself up for a smooth and successful blade removal experience.
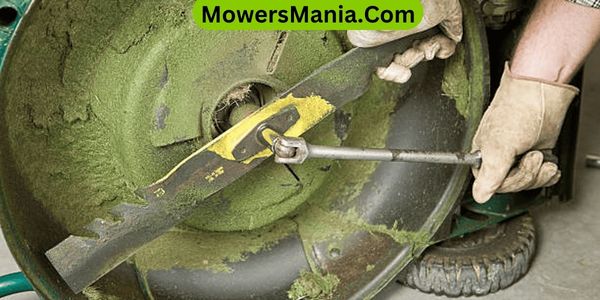
Step 2: Removing the Blade Nut
Once the mower is positioned securely, you can proceed to remove the blade nut. This step is crucial in order to safely detach the mower blades from the John Deere mower.
Here’s a simple guide to help you remove the blade nut:
| Steps | Instructions |
|---|---|
| 1 | Locate the blade nut on the center of the mower deck. |
| 2 | Use a socket wrench that fits the blade nut size. |
| 3 | Place the socket wrench over the blade nut and turn it counterclockwise to loosen the nut. |
| 4 | Continue turning the socket wrench until the blade nut is completely loosened. |
Step 3: Removing the Mower Blade
How do you remove the mower blade? Now that you have successfully removed the blade nut, it’s time to take off the mower blade itself.
Follow these steps to ensure a smooth and safe removal process:
- Secure the mower blade: Before attempting to remove the blade, make sure the mower is turned off and the spark plug wire is disconnected. This will prevent any accidental starts and potential injuries.
- Find the blade mounting bolts: Locate the mounting bolts that hold the mower blade in place. These bolts are typically located near the center of the blade.
- Loosen the mounting bolts: Using a socket wrench, loosen the mounting bolts by turning them counterclockwise. Be cautious not to damage the blade or surrounding parts while doing so.
- Remove the mower blade: Once the mounting bolts are loosened, carefully lift the mower blade off the spindle. Make sure to handle the blade with caution to avoid any injuries.

Frequently Asked Questions [FAQs]
How Often Should John Deere Mower Blades Be Replaced?
You should replace John Deere mower blades regularly to ensure optimal performance. The frequency of replacement depends on factors such as usage, mowing conditions, and blade condition. Follow the manufacturer’s recommendations for the best results.
Can I Sharpen the Blades Instead of Replacing Them?
Yes, you can sharpen the blades instead of replacing them. It’s a cost-effective option that can help maintain the performance of your John Deere mower. Follow these steps to safely sharpen the blades.
Are There Any Special Considerations for Removing Blades on a Self-Propelled John Deere Mower?
When removing the blades on your self-propelled John Deere mower, there are a few special considerations to keep in mind. Ensure the mower is turned off, disconnect the spark plug, and use caution when handling sharp blades.
Will Removing the Blades Void the Warranty on My John Deere Mower?
Removing the blades on your John Deere mower will not void the warranty. However, it is important to follow the manufacturer’s guidelines and use the correct tools to ensure proper removal and installation.
How Do I Properly Dispose of Old John Deere Mower Blades?
To properly dispose of old John Deere mower blades, you can take them to a local recycling center or contact your municipality for guidance. It’s important to handle them safely and follow any regulations in your area.
Conclusion
Removing John Deere mower blades is a simple process that can be done by following a few steps.
By positioning the mower correctly, removing the blade nut, and finally taking off the blade, you can easily replace or sharpen your blades.
Remember to always prioritize safety and use the appropriate tools.
With these instructions, you’ll be able to remove your blades efficiently and maintain your mower’s optimal performance.

