If you’re experiencing trouble with your lawn mower, testing the ignition coil can help pinpoint the issue.
In this guide, you’ll learn how to safely access and test the primary and secondary circuits of the coil using a multimeter.
By following these steps, you can diagnose and troubleshoot potential problems with your lawn mower’s ignition system.
Understanding the Lawn Mower Ignition Coil
To understand the lawn mower ignition coil, you should start by familiarizing yourself with its primary function and components.
The ignition coil is a crucial part of the engine’s ignition system. Its main role is to convert the low voltage from the battery into the high voltage needed to ignite the fuel-air mixture in the engine’s combustion chamber. This high voltage is then sent to the spark plug, which creates the spark to ignite the fuel.
The coil consists of two sets of wires, the primary and secondary winding, as well as an iron core. When the current flows through the primary winding, it creates a magnetic field in the core.
When the current is interrupted, the magnetic field collapses, inducing a high voltage in the secondary winding. This high voltage is then sent to the spark plug.
Understanding how the lawn mower ignition coil functions is essential for diagnosing and fixing any issues it may have. By comprehending its primary function and components, you can effectively troubleshoot and maintain the ignition system of your lawn mower.
Safety Precautions and Equipment Needed
Before testing the lawn mower coil, make sure to wear appropriate safety gear such as gloves and goggles to protect yourself from potential hazards.
You’ll also need the proper equipment for testing, including a multimeter and a spark tester.
Take precautions to prevent accidents by disconnecting the spark plug wire and grounding it to the engine block before beginning the testing process.
Safety Gear for Testing
When testing a lawn mower coil, ensure your safety by wearing appropriate protective gear and using the necessary equipment.
Prioritize safety by donning safety goggles to protect your eyes from any potential sparks or debris. Additionally, wear heavy-duty gloves to shield your hands from accidental burns or cuts, as well as to provide a secure grip when handling tools.
It’s crucial to work in a well-ventilated area to prevent inhaling harmful fumes.
Utilize a multimeter to measure the resistance in the coil and a spark tester to check for a strong spark.
Always disconnect the spark plug wire to avoid accidental engine ignition during testing.
Following these safety precautions and using the right safety gear will help ensure a safe and effective lawn mower coil test.
Proper Equipment for Testing
Prioritize safety by obtaining the necessary equipment and following proper precautions when testing a lawn mower coil.
Ensure you have a multimeter capable of measuring resistance and voltage, as well as a spark tester. These tools will allow you to accurately assess the performance of the lawn mower coil.
Additionally, wear insulated gloves and safety goggles to protect yourself from potential electrical hazards.
Before starting the test, disconnect the spark plug to prevent accidental engine ignition. Always work in a well-ventilated area to avoid exposure to exhaust fumes.
Remember to consult the lawn mower’s manual for specific testing procedures and safety recommendations.
Precautions to Prevent Accidents
To prevent accidents when testing a lawn mower coil, it is important to have the necessary safety equipment and follow proper precautions.
Make sure to wear safety goggles to protect your eyes from any debris that may fly up during testing.
Use insulated gloves to prevent electric shocks while handling the coil. Always work in a well-ventilated area to avoid inhaling exhaust fumes.
It’s important to keep a fire extinguisher nearby in case of any unexpected sparks or combustion. Additionally, never work on a lawn mower while the engine is running to avoid any potential injuries.
Accessing the Lawn Mower Coil
To access the lawn mower coil, start by removing the engine cover. Once the cover is off, locate the ignition coil, which is usually near the engine’s flywheel.
Check the connections to ensure they’re secure and free from any corrosion or damage.
Removing Engine Cover
To remove the engine cover and access the lawn mower coil, unscrew the bolts or screws securing the cover in place using a socket wrench or screwdriver.
Once the bolts or screws are removed, follow these steps to access the lawn mower coil:
- Lift the engine cover off the mower and set it aside in a safe place.
- Locate the ignition coil, which is typically positioned near the flywheel.
- Inspect the coil for any signs of damage, such as cracks or corrosion.
- Ensure that the coil is properly connected to the spark plug and ignition module.
Following these steps will allow you to efficiently access the lawn mower coil for testing and maintenance.
Locating Ignition Coil
You can locate the ignition coil near the flywheel once the engine cover has been removed. The ignition coil is typically situated close to the flywheel, and it’s connected to the spark plug with a spark plug wire.
To access the lawn mower coil, you’ll need to remove the engine cover, which is usually held in place by screws or bolts.
Once the cover is off, you’ll be able to see the ignition coil and its components. Make sure to refer to your lawn mower’s manual for the exact location of the ignition coil, as it can vary depending on the make and model of the mower.
| Ignition Coil Location |
|---|
| Near the Flywheel |
| Connected to Spark Plug |
| Under the Engine Cover |
Checking Coil Connections
After removing the engine cover, the ignition coil, connected to the spark plug with a spark plug wire, can be accessed near the flywheel.
To check the coil connections, follow these steps:
Testing the Primary Circuit of the Coil
When should you use a multimeter to test the primary circuit of the coil in your lawn mower? If your lawn mower is experiencing issues such as difficulty starting, uneven running, or a lack of power, it may indicate a problem with the ignition system, including the coil.
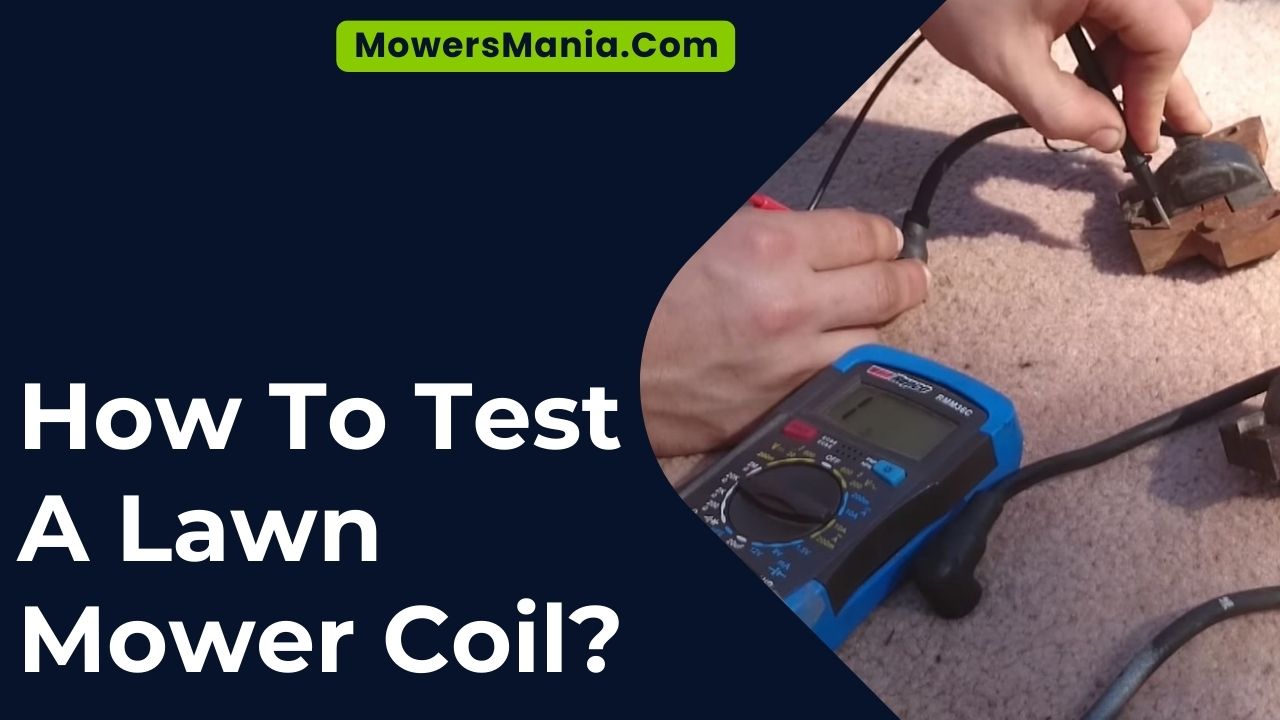
Testing the primary circuit of the coil can help determine if it’s functioning properly. To begin, disconnect the spark plug wire to ensure safety.
Then, set your multimeter to the resistance or ohms setting. Place the multimeter leads on the positive and negative terminals of the coil.
A healthy primary circuit typically shows a resistance reading of around 3-5 ohms. If the reading is significantly higher or lower, it may indicate a problem with the primary winding.
Additionally, check for any signs of physical damage, such as cracks or corrosion, which could also affect the coil’s performance.
By testing the primary circuit of the coil, you can effectively diagnose potential issues and ensure that your lawn mower’s ignition system is in good working condition.
Testing the Secondary Circuit of the Coil
To continue testing the lawn mower coil, measure the resistance in the secondary circuit using a multimeter set to the ohms setting. This will help you determine if the secondary circuit is functioning properly.
Follow these steps to test the secondary circuit:
- Disconnect the spark plug wire: Ensure that the spark plug wire is disconnected from the spark plug to prevent the engine from starting during the test.
- Set the multimeter: Set the multimeter to the ohms setting. This will allow you to measure the resistance in the secondary circuit of the coil.
- Measure the resistance: Place the multimeter probes on the coil’s secondary terminals. Note the resistance reading on the multimeter. Compare this reading to the manufacturer’s specifications to determine if the secondary circuit is within the acceptable range.
- Interpret the results: If the resistance reading is significantly higher or lower than the manufacturer’s specifications, it may indicate a problem with the secondary circuit of the coil.
Following these steps will help you effectively test the secondary circuit of the lawn mower coil.
Interpreting the Multimeter Readings
Once you have measured the resistance in the secondary circuit of the lawn mower coil, interpreting the multimeter readings is essential for determining the functionality of the coil.
When using a multimeter to measure resistance, a healthy coil typically displays a resistance reading within a specific range, often indicated in the manufacturer’s specifications.
If the resistance reading is significantly higher or lower than the specified range, it could indicate a problem with the coil. A lower than expected resistance reading may suggest a short circuit within the coil, while a higher than expected reading could indicate an open circuit.
Additionally, if the multimeter shows no resistance (overload), it may indicate a break in the coil windings.
Understanding these readings is crucial, as it allows you to assess the condition of the coil and decide whether it needs to be repaired or replaced.
Remember to compare the readings with the manufacturer’s specifications to accurately interpret the multimeter readings and make an informed decision about the coil’s functionality.
Troubleshooting and Next Steps
You can troubleshoot the lawn mower coil by checking for loose connections and inspecting the coil for physical damage. Start by ensuring that all the connections to the coil are secure. Loose or corroded connections can cause the coil to malfunction.
Next, visually inspect the coil for any signs of physical damage such as cracks, burns, or other irregularities. If the coil appears damaged, it may need to be replaced.
Additionally, consider the following steps to further troubleshoot the lawn mower coil:
- Check the spark plug: A faulty spark plug can mimic symptoms of a bad ignition coil. Inspect the spark plug for signs of wear or damage and replace if necessary.
- Test the kill switch: A malfunctioning kill switch can disrupt the ignition system. Test the kill switch to ensure it’s functioning properly.
- Inspect the flywheel: A damaged or misaligned flywheel can affect the coil’s performance. Inspect the flywheel for any damage or misalignment.
- Consult a professional: If troubleshooting steps don’t resolve the issue, seek assistance from a qualified technician to diagnose and repair the problem.
Frequently Asked Questions (FAQs)
Can I Use a Regular Household Multimeter to Test the Lawn Mower Coil?
Yes, you can use a regular household multimeter to test the lawn mower coil. Set the multimeter to the ohms setting, and then place the meter’s leads on the coil’s terminals to measure the resistance.
What Are the Signs That Indicate a Faulty Lawn Mower Coil?
If your lawn mower struggles to start, misfires, or has weak spark, it could indicate a faulty coil. Check for visible damage or use a multimeter to test for proper resistance.
Can a Faulty Spark Plug Be Mistaken for a Faulty Lawn Mower Coil?
Yes, a faulty spark plug can be mistaken for a faulty lawn mower coil. When spark plug issues occur, it can produce similar symptoms as a bad coil. It’s important to check both components to diagnose the problem accurately.
How Often Should I Test My Lawn Mower Coil for Maintenance Purposes?
For maintenance, you should test your lawn mower coil at least once a year. Regular testing helps ensure that your mower runs smoothly. If you notice any issues, like difficulty starting the engine, test the coil sooner.
Are There Any Specific Cleaning or Maintenance Procedures for the Lawn Mower Coil That Can Prevent Future Issues?
To prevent future issues, make sure to clean your lawn mower coil regularly. Check for any debris or dirt buildup, and ensure the connections are secure. Regular maintenance can help prevent potential problems down the line.
Conclusion
Now that you’ve tested your lawn mower coil, you can troubleshoot any issues and make necessary repairs.
Remember to always prioritize safety and use the proper equipment when working on your lawn mower.
If you’re still experiencing problems, it’s best to consult a professional for further assistance.
Keep your lawn mower in top condition for a well-maintained lawn.

