If you’re struggling to control your Troy Bilt lawn mower, it might be time to replace the control cable.
This simple guide will walk you through the process, from gathering the necessary tools and materials to adjusting the new cable’s tension.

By following these steps, you’ll have your lawn mower back in top working condition in no time.
Tools and Materials Needed
You will need a set of wrenches and a new control cable for this repair. The wrenches will be used to remove the old control cable and install the new one. Make sure to have the correct size wrench for the nuts and bolts on your specific Troy Bilt lawn mower model.
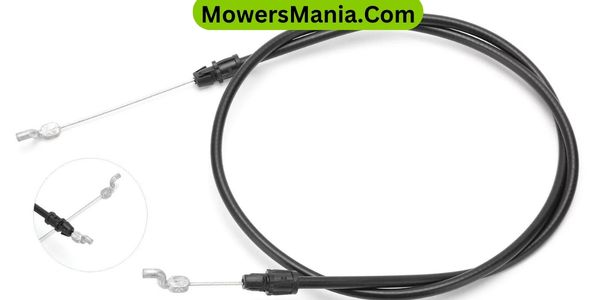
The new control cable should be compatible with your mower’s make and model to ensure a proper fit and functionality.
In addition to the wrenches and control cable, you may also need a pair of pliers to help with any tight or stubborn connections. It’s always a good idea to have a pair of safety goggles to protect your eyes from any debris that may come loose during the repair process.
If your lawn mower has an engine that requires oil, have some fresh oil on hand as well, as you may need to top off the oil level after completing the control cable replacement.
Having all the necessary tools and materials ready before starting the repair will help streamline the process and ensure a successful outcome.
Preparation and Safety Measures
Before starting the control cable replacement on your Troy Bilt lawn mower, ensure that you have thoroughly read and understood the manufacturer’s safety guidelines. Safety should always be a top priority when working with power equipment.
Start by turning off the mower and allowing the engine to cool before beginning any maintenance. It’s also essential to disconnect the spark plug to prevent accidental starting.
Wear appropriate protective gear, including gloves and safety goggles, to shield yourself from any potential debris or sharp edges. Make sure the mower is on a flat, stable surface to prevent it from shifting during the cable replacement process.
Keep the work area well-lit and free from clutter to minimize accidents. Double-check that you have all the necessary tools and replacement parts before starting, as interruptions can lead to mistakes.
Removing the Old Control Cable

Now it’s time to remove the old control cable from your Troy Bilt lawn mower.
Start by disconnecting the cable from the control handle. Then, move on to removing any retaining clips or screws.
You’ll need a pair of pliers and a screwdriver for this part of the process.
Cable Removal Steps
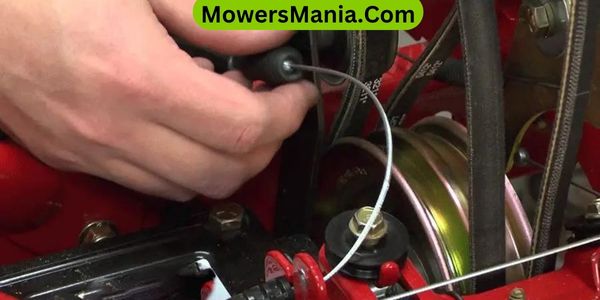
To begin the process of removing the old control cable from your Troy Bilt lawn mower, first locate the cable attachment points on the mower deck and the control handle. Use a pair of pliers to disconnect the cable from the attachment points on the mower deck.
Then, follow the cable up to the control handle and disconnect it from there as well. Once the cable is disconnected from both ends, carefully remove it from the mower, making sure to note its routing and any clips or guides it passes through. Take care to avoid damaging any other components during this process.
With the old control cable removed, you can proceed with installing the new cable following the reverse of these steps.
Tools Needed for Removal
You will need a pair of pliers to disconnect the old control cable from the attachment points on the mower deck and the control handle.
Here are the tools you’ll need for removing the old control cable:
- Socket wrench
- Screwdriver
- Wire cutters
- Work gloves
- Safety goggles
Using a socket wrench will help you loosen any bolts or nuts holding the cable in place.
A screwdriver can be handy for removing any covers or panels that may be blocking access to the control cable.
Wire cutters will allow you to trim any zip ties or clips securing the cable.
Don’t forget to wear work gloves to protect your hands and safety goggles to shield your eyes from any debris while working on the mower.
Installing the New Control Cable
With the old control cable removed, begin installing the new control cable by threading it through the designated path on the lawn mower.
Start by locating the entry point for the control cable on the mower deck. Feed the top end of the new control cable through this entry point and work it through the same path the old cable followed.
Ensure that the cable follows the original route, avoiding any obstructions and moving it along the same lines and guides as the previous cable.
Once the cable is threaded through the designated path, carefully attach it to the control lever. Make sure it’s securely fastened and properly aligned with the lever to ensure smooth operation.
After securing the top end, move to the lower end of the cable and connect it to the designated attachment point on the engine or transmission. Ensure that it’s properly seated and tightened to prevent any slippage during operation.
Finally, test the new control cable by operating the control lever. Ensure that the cable moves freely and that the mower responds appropriately to the control inputs. Adjust the cable tension if necessary to achieve the desired responsiveness.
Once everything is in place and functioning as intended, your new control cable installation is complete.
Adjusting the Control Cable Tension
After installing the new control cable, carefully adjust the tension to ensure optimal performance and responsiveness of the lawn mower. Proper tension adjustment is crucial for the control cable to function effectively.
Follow these steps to adjust the control cable tension:
- Locate the Adjustment Nut: Identify the adjustment nut on the control cable. It’s usually located near the attachment point on the mower.
- Loosen the Nut: Use a wrench to loosen the adjustment nut. This will allow you to make the necessary adjustments to the tension of the control cable.
- Adjust the Tension: Carefully adjust the tension of the control cable by either tightening or loosening the adjustment nut. Ensure that the tension is just right for smooth operation.
- Check for Smooth Movement: After making adjustments, test the control cable to ensure that it moves smoothly without any resistance or slack.
- Secure the Nut: Once you’re satisfied with the tension, securely tighten the adjustment nut to lock the cable in place.
Testing the Control Cable

To test the control cable, start by checking the function of the cable – ensure it moves smoothly and without any resistance.
Next, evaluate the throttle response to see if it’s in sync with the movement of the control lever.
Lastly, make sure the cable is securely attached at both ends to prevent any slippage or disconnection.
Cable Function Check
To check the function of the control cable on your Troy Bilt lawn mower, carefully inspect the cable and its connections for any signs of wear or damage.
Here are some key steps to test the control cable:
- Visual Inspection: Look for any fraying, kinking, or corrosion along the length of the cable.
- Connection Examination: Check that the control cable is securely connected at both ends, ensuring there are no loose or damaged fittings.
- Operational Testing: Engage the control lever to observe if the cable moves smoothly and without resistance.
- Functionality Assessment: Verify that the cable effectively engages the mower’s brake or drive system as intended.
- Replacement Consideration: If any issues are found, it may be necessary to replace the control cable to ensure proper mower functionality.
Throttle Response Evaluation
Evaluate the throttle response by gradually increasing and decreasing the engine speed, ensuring that the control cable operates smoothly and promptly.
Start the mower and let it run at a low speed. Then, gradually increase the throttle while observing how the engine responds. Next, slowly decrease the throttle and again observe the engine’s response. Use the table below to record your observations.
| Throttle Action | Engine Response |
|---|---|
| Increase gradually | Smooth acceleration |
| Decrease gradually | Prompt deceleration |
Maintenance Tips
After you have replaced the control cable on your Troy Bilt lawn mower, it’s important to regularly lubricate the control mechanisms to ensure smooth operation. This will help prevent rust and corrosion, which can cause stiffness or failure in the controls.
Additionally, keeping your mower clean and free of debris will contribute to its overall performance and longevity.
Here are some maintenance tips to keep your Troy Bilt lawn mower in top condition:
- Regularly check and replace worn-out or damaged parts to prevent further issues.
- Clean the air filter and replace it if it’s clogged to maintain proper airflow.
- Inspect the spark plug for wear and replace it if necessary to ensure efficient starting and running of the engine.
- Keep the blade sharp and balanced to promote a clean cut and prevent strain on the engine.
- Check the oil level and change it according to the manufacturer’s recommendations to maintain proper lubrication and engine health.
Frequently Asked Questions (FAQs)
How Often Should I Replace the Control Cable on My Troy Bilt Lawn Mower?
You should replace the control cable on your Troy Bilt lawn mower every 1-2 years, or sooner if it’s showing signs of wear. Regularly inspecting and maintaining the control cable can help ensure smooth operation of your mower.
Can I Use Any Control Cable for My Troy Bilt Lawn Mower, or Does It Need to Be a Specific Type?
You should always use a specific control cable designed for your Troy Bilt lawn mower. Using an incompatible cable could cause operational issues and potential safety hazards. Make sure to get the correct one.
What Are Common Signs That Indicate the Control Cable on My Lawn Mower Needs to Be Replaced?
If your lawn mower’s control cable is frayed, sticking, or not responding properly, it may need replacing. Look for signs like difficulty in engaging the drive system or a loose or damaged cable.
Are There Any Special Considerations for Replacing the Control Cable on a Self-Propelled Troy Bilt Lawn Mower?
When replacing the control cable on your self-propelled Troy Bilt lawn mower, ensure the engine is off and the mower is on a flat surface. Follow the manufacturer’s instructions carefully, and use the appropriate tools.
Is It Necessary to Lubricate the Control Cable After Installation, and if So, What Type of Lubricant Should Be Used?
After installation, it’s necessary to lubricate the control cable on your Troy Bilt lawn mower. Use a silicone-based lubricant for smooth operation. Regular maintenance will ensure optimal performance and extend the life of your mower.
Conclusion
Now that you’ve replaced the control cable on your Troy-Bilt lawn mower, your machine should be running smoothly again.
Remember to regularly check and maintain the control cable to ensure optimal performance and safety.
With the right tools and a little know-how, you can keep your lawn mower in top shape for years to come.
Happy mowing!


