Wondering how to keep your riding lawn mower running smoothly? One important component to check and replace regularly is the fuel filter.
By maintaining a clean fuel filter, you can ensure that your mower’s engine receives clean fuel, which can significantly extend its lifespan.
In this guide, you’ll learn the simple steps to replace the fuel filter on your riding lawn mower. With just a few tools and a little bit of time, you’ll have your mower running like new again in no time.
Let’s get started!
Tools and Materials Needed
You’ll need gathering the tools and materials for replacing a riding lawn mower fuel filter. First, make sure you have a pair of safety gloves and safety goggles to protect yourself from any fuel spills.
You’ll also need a socket wrench set, a flathead screwdriver, and a new fuel filter that’s compatible with your specific riding lawn mower model.
It’s essential to have a clean rag or paper towels on hand to wipe away any dirt or debris from the fuel filter area.
In addition to these tools, having a small container or a piece of cloth to catch any fuel that may leak out during the replacement process is crucial.
It’s also a good idea to have some penetrating oil to loosen any stubborn bolts or connections. Finally, make sure you have the owner’s manual for your riding lawn mower, as it may contain specific instructions or diagrams related to the fuel filter replacement process.
Locating the Fuel Filter
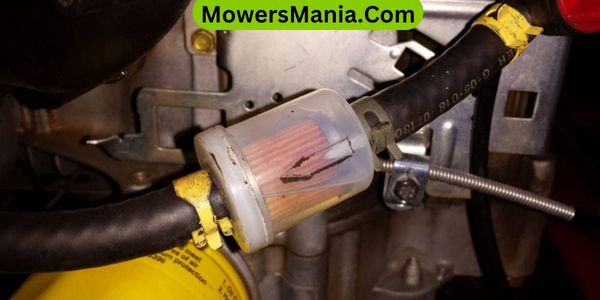
To locate the fuel filter on your riding lawn mower, first, position yourself directly under the fuel tank. The fuel filter is typically attached to the fuel line, which runs from the fuel tank to the engine. It’s often located between the fuel tank and the carburetor.
Look for a cylindrical or rectangular component in the fuel line with two connection points. The filter itself may be enclosed in a clear or opaque casing, allowing you to see the condition of the filter element inside. If you’re having trouble locating the fuel filter, consult your mower’s manual for specific guidance.
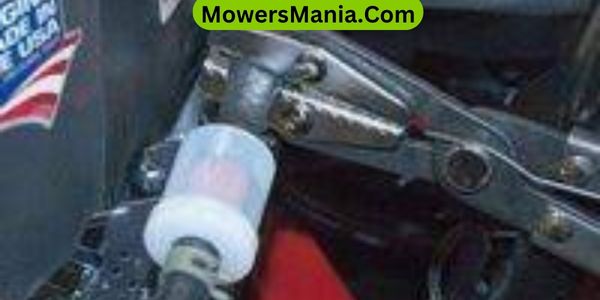
In some models, the fuel filter may be positioned near the engine, so check both locations if you’re unable to find it initially.
Once you’ve located the filter, take note of its position and the direction of fuel flow indicated by the arrows on the filter casing. This information will be important when you replace the filter to ensure it’s installed correctly.
Removing the Old Fuel Filter
First, disconnect the fuel line from both ends of the filter using a pair of pliers to loosen the hose clamps. Once the fuel line is detached, you can proceed with removing the old fuel filter.
Here are the steps you need to follow:
| Steps to Remove Old Fuel Filter | |
|---|---|
| Step 1 | Locate the old fuel filter on your riding lawn mower. It is usually situated between the fuel tank and the carburetor. |
| Step 2 | Place a small container underneath the fuel filter to catch any fuel that may spill out during the removal process. |
| Step 3 | Use a wrench to carefully loosen the fittings that secure the fuel filter in place. Be cautious as some fuel may still be present in the filter. |
| Step 4 | Once the fittings are loosened, carefully remove the old fuel filter from the mower. |
| Step 5 | Dispose of the old fuel filter properly and ensure that no fuel is left behind in the area. |
Following these steps will allow you to safely and effectively remove the old fuel filter from your riding lawn mower.
Installing the New Fuel Filter
When installing a new fuel filter on your riding lawn mower, ensure that it’s compatible with your mower’s make and model.
Once you have the correct fuel filter, follow these steps to install it:
- Locate the Fuel Filter: Find the fuel filter on your riding lawn mower. It’s typically located between the fuel tank and the carburetor.
- Install the New Filter: Remove the old fuel filter and install the new one in the same position. Ensure that the arrow on the filter is pointing towards the carburetor to indicate the direction of fuel flow.
- Secure the Connections: Once the new fuel filter is in place, secure the connections by tightening any clamps or fittings. Make sure the filter is snug and properly positioned to prevent any leaks.
Testing and Final Checks

After installing the new fuel filter, periodically check for any fuel leaks or irregular engine performance during operation.
Start the engine and let it run for a few minutes while observing for any signs of leaks around the fuel filter.
Additionally, pay attention to the engine’s performance. If you notice any sputtering, stalling, or lack of power, it could indicate a problem with the fuel filter installation. In such cases, turn off the engine immediately and inspect the filter and connections for any issues.
To ensure a thorough check, refer to the following table for a step-by-step guide on testing and final checks after replacing the riding lawn mower fuel filter:
| Testing and Final Checks |
|---|
| 1. Start the engine and observe for fuel leaks around the filter. |
| 2. Watch for irregular engine performance such as sputtering or stalling. |
| 3. Turn off the engine and inspect the filter and connections if any issues are detected. |
| 4. If necessary, re-tighten connections or replace the filter. |
| 5. Repeat the checks periodically to ensure the continued proper functioning of the fuel system. |
Frequently Asked Questions [FAQs]
Can I Use a Universal Fuel Filter or Do I Need to Find One Specifically Made for My Riding Lawn Mower?
You should use a fuel filter specifically made for your riding lawn mower. Universal filters may not fit properly or have the correct flow rate, leading to potential engine issues. It’s best to find one designed for your mower model.
How Often Should I Replace the Fuel Filter on My Riding Lawn Mower?
You should replace the fuel filter on your riding lawn mower every 100 hours of use or at least once a year. Regular replacement helps maintain optimal engine performance and prevents clogs that can lead to fuel flow issues.
What Are the Signs That My Riding Lawn Mower Fuel Filter Needs to Be Replaced?
If your riding lawn mower is struggling to start, sputtering during operation, or losing power, these are signs that your fuel filter might need replacing. Regular maintenance ensures optimal performance and prevents costly repairs.
Are There Any Special Precautions I Need to Take When Working With the Fuel System on My Riding Lawn Mower?
When working with the fuel system on your riding lawn mower, always ensure the engine is cool and disconnect the spark plug wire to prevent accidental starts. Use caution and follow the manufacturer’s safety recommendations.
Can I Clean the Old Fuel Filter Instead of Replacing It?
No, you can’t clean the old fuel filter. It’s designed to trap debris and should be replaced to maintain proper fuel flow. Cleaning it might not remove all the contaminants, risking damage to the engine.
Conclusion
Now that you’ve replaced your riding lawn mower fuel filter, your mower should run smoothly and efficiently.
Remember to perform regular maintenance to keep your lawn mower in top condition.
Happy mowing!

