Wondering if your lawn mower’s ignition coil is causing problems? Testing it for defects can help you diagnose the issue.
This guide will show you how to effectively test the ignition coil to determine if it’s the culprit behind your mower’s troubles.
By following these steps, you’ll be able to identify any faults and decide on the best course of action to get your lawn mower back in working order.
So, let’s roll up our sleeves and get started!
Understanding the Ignition Coil Function
When you understand how the ignition coil functions, you can easily diagnose potential defects. The ignition coil is a crucial component in the lawn mower’s ignition system.
Its primary function is to convert the low voltage from the battery into the high voltage needed to ignite the fuel in the engine.
This process begins when the ignition switch is turned on, sending an electrical current to the ignition coil.
The coil then builds up energy and, when the spark plug is triggered by the engine’s timing mechanism, releases this energy as a high-voltage pulse, which travels to the spark plug, igniting the fuel-air mixture in the engine’s cylinder.
Understanding this process is key to diagnosing potential defects. If there are issues with the ignition coil, it can lead to problems with starting the lawn mower, poor engine performance, or even engine misfires.
By comprehending the ignition coil’s function, you can effectively test it for defects and determine whether it needs to be repaired or replaced.
This understanding empowers you to maintain your lawn mower’s ignition system in top condition, ensuring smooth and efficient operation.
Identifying Symptoms of a Faulty Ignition Coil
If your lawn mower engine misfires or sputters during operation, it could indicate a faulty ignition coil. Difficulty starting the mower or experiencing intermittent power loss are also common symptoms of a defective ignition coil.
These signs can point to the need for testing and potentially replacing the ignition coil to ensure your lawn mower runs smoothly.
Engine Misfires and Sputters
Experiencing frequent engine misfires or sputters while mowing your lawn could indicate a faulty ignition coil.
When the ignition coil fails to deliver a strong spark to the spark plug, the engine may misfire or sputter, leading to uneven performance.
To help you identify these symptoms, here’s a quick reference table to compare the signs of a faulty ignition coil with your mower’s performance:
| Symptom | Description |
|---|---|
| Engine misfires | Intermittent or continuous jerking or hesitation while running |
| Sputtering or stalling | Engine stutters or stops abruptly during operation |
| Loss of power | Reduced engine performance, especially under load |
If you notice any of these issues, it’s important to test the ignition coil and address any potential defects promptly to ensure your lawn mower operates smoothly.
Difficulty Starting the Mower
You may frequently encounter difficulty starting your mower if the ignition coil is faulty. When the ignition coil is defective, it may result in weak or inconsistent sparks, causing the engine to struggle to start.
You might notice that the mower takes multiple attempts to start, or it may not start at all. Additionally, the engine may sound weak or hesitant during startup, indicating a potential issue with the ignition coil.
If you experience these symptoms, it’s crucial to inspect the ignition coil for any defects and consider testing it for proper functionality. Ignoring these signs could lead to further damage to the mower’s engine and electrical system.
Therefore, it’s essential to address any starting difficulties promptly to ensure the proper functioning of your lawn mower.
Gathering Necessary Tools for Testing
You’ll need to gather the required testing tools, like a multimeter, spark tester, and screwdriver.
Additionally, make sure you have essential diagnostic equipment such as a service manual or wiring diagram to aid in the testing process.
Don’t forget to gather safety gear like gloves and eye protection to ensure you can work safely while testing the ignition coil.
Required Testing Tools
To test the lawn mower ignition coil for defects, start by gathering the necessary testing tools.
You’ll need the following items:
-
Multimeter: This tool will help you measure the resistance and continuity of the ignition coil.
-
Spark plug tester: It allows you to check if the ignition coil is producing a spark by simulating the spark plug load.
-
Safety equipment: Ensure you have safety goggles and gloves to protect yourself from any potential electrical hazards.
With these tools in hand, you’ll be equipped to effectively test the lawn mower ignition coil for any defects. Always prioritize safety when working with electrical components and follow the manufacturer’s guidelines for testing procedures.
Essential Diagnostic Equipment
Gather the essential diagnostic equipment, including the multimeter, spark plug tester, and safety gear, to effectively test the lawn mower ignition coil for defects.
The multimeter is essential for measuring electrical resistance and voltage, while the spark plug tester helps to determine if the ignition coil is producing adequate spark.
Additionally, ensure you have safety gear such as gloves and safety goggles to protect yourself from any potential hazards during the testing process.
Having these tools ready will enable you to accurately diagnose any issues with the ignition coil and proceed with the necessary repairs.
| Diagnostic Equipment | Description |
|---|---|
| Multimeter | Measures electrical resistance and voltage |
| Spark Plug Tester | Determines spark production from the ignition coil |
| Safety Gear | Gloves and safety goggles for protection during testing |
Gathering Safety Gear
To ensure safety during the testing process, it is important to acquire the necessary safety gear. This gear includes gloves and safety goggles, as discussed in the previous subtopic on essential diagnostic equipment.
These items are crucial for protecting yourself from potential hazards while working with the lawn mower’s ignition coil.
Safety Gear Checklist:
- Gloves: Wear insulated gloves to protect your hands from electrical shocks and burns.
- Safety Goggles: Use safety goggles to shield your eyes from any debris or sparks that may occur during the testing process.
- Protective Clothing: Consider wearing long-sleeved shirts and long pants to provide an extra layer of protection against any accidental contact with hot engine components.
Testing the Primary Circuit of the Ignition Coil
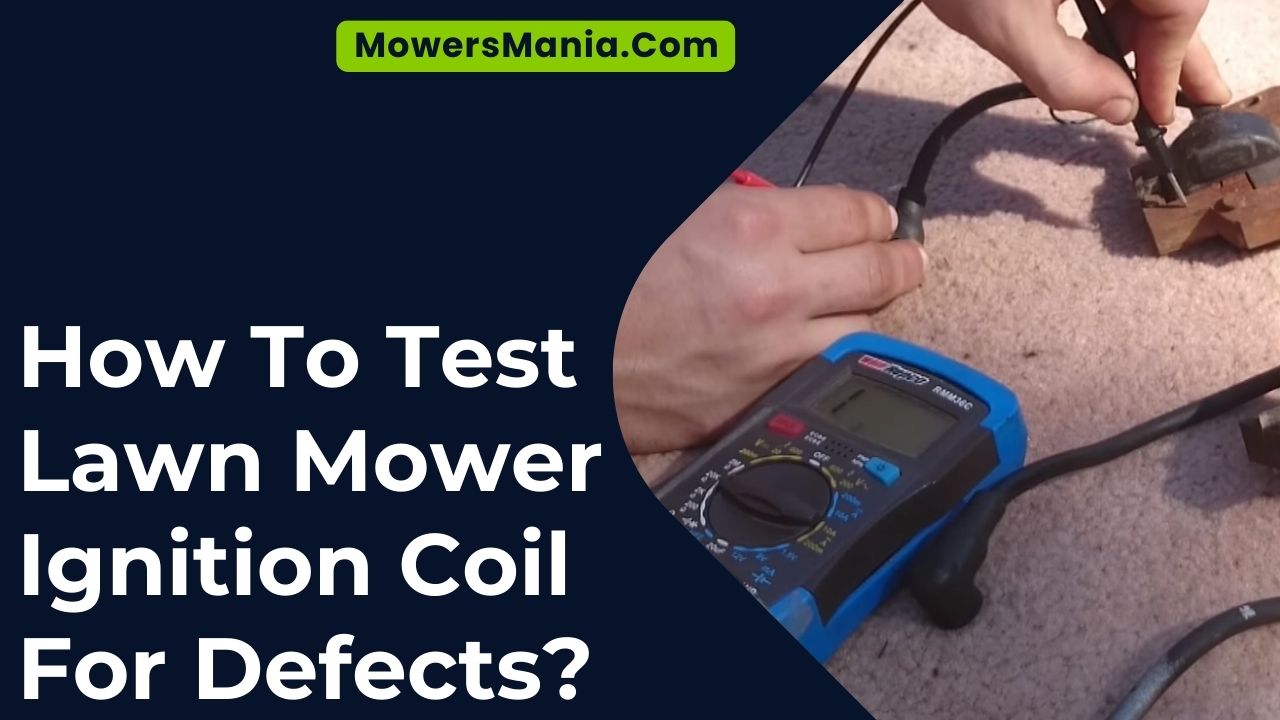
You can test the primary circuit of the ignition coil using a digital multimeter. To begin, set your multimeter to the resistance or ohms setting.
Locate the positive and negative terminals on the ignition coil. Place the multimeter’s positive lead on the positive terminal and the negative lead on the negative terminal.
The resistance reading should typically be around 0.5 to 5 ohms, but refer to your mower’s manual for the specific resistance range.
If the reading is significantly higher or lower than the specified range, it indicates a problem with the primary circuit.
Next, you can also perform a continuity test on the primary circuit. Set the multimeter to the continuity or beep setting. Place the positive lead on the positive terminal and the negative lead on the negative terminal.
If the multimeter beeps or shows continuity, it means the primary circuit is intact. If there’s no beep or continuity, it suggests a break in the primary circuit.
Testing the Secondary Circuit of the Ignition Coil
To test the secondary circuit of the ignition coil, first ensure that the ignition switch is in the ‘off’ position to prevent any accidents or injuries.
Once the ignition switch is off, follow these steps:
-
Locate the spark plug wire connected to the ignition coil. Carefully detach the spark plug wire from the coil by firmly gripping the boot (the thick rubber part) and pulling it straight off the terminal. Ensure that you don’t pull the wire itself, as this could damage it.
-
Connect a spark tester to the spark plug wire. A spark tester is a handy tool that allows you to test for the presence of spark without having to remove the spark plug. It’s connected between the spark plug and the spark plug wire.
-
With the spark tester connected, position it so that the metal portion is grounded to the engine block or any unpainted metal surface. Once in position, turn the ignition switch to the ‘on’ position and pull the starter rope. Observe the spark tester for a visible spark. If there’s no spark, the secondary circuit of the ignition coil may be defective.
Interpreting Test Results and Next Steps
After testing the secondary circuit of the ignition coil, interpreting the test results is crucial for determining the next steps.
If the resistance measurement between the spark plug wire and the laminations of the coil is within the specified range provided by the manufacturer, typically around 6,000 to 15,000 ohms, the coil is functioning properly.
However, if the resistance measurement is significantly higher or lower than the specified range, it indicates a defective coil.
Additionally, if there’s no continuity in the secondary circuit, it suggests a break in the coil windings, signaling a faulty ignition coil.
If the test results indicate a defective ignition coil, the next step is to replace it with a new one. It’s important to ensure that the replacement coil is compatible with your lawn mower model. Once replaced, retest the ignition coil to verify that the new component resolves the issue.
If the test results are within the specified range, then your lawn mower should start and run smoothly. However, if the problem persists, further diagnostics may be necessary to identify any underlying issues with the ignition system.
Frequently Asked Questions [FAQs]
Can a Faulty Ignition Coil Cause the Lawn Mower to Start but Then Immediately Stall Out?
If your lawn mower starts but then immediately stalls out, a faulty ignition coil could be the culprit. Testing the ignition coil for defects involves using a multimeter to check for proper resistance.
Is It Possible for an Ignition Coil to Show Signs of Failure Even if the Lawn Mower Is Still Running?
Yes, it’s possible for an ignition coil to exhibit signs of failure even if the lawn mower is still running. Look for symptoms like rough idling, misfiring, or difficulty starting, as these could indicate a defective coil.
What Are Some Common Mistakes People Make When Testing the Primary Circuit of the Ignition Coil?
When testing the primary circuit of the ignition coil, common mistakes include overlooking loose connections, forgetting to check for corrosion, and neglecting to inspect the spark plug. Ensure thorough examination to accurately diagnose issues.
Are There Any Specific Safety Precautions to Keep in Mind When Testing the Secondary Circuit of the Ignition Coil?
When testing the secondary circuit of the ignition coil, always wear insulated gloves and keep a safe distance from moving parts. Make sure the mower is turned off and the spark plug wire is disconnected.
What Should I Do if the Test Results for the Ignition Coil Are Inconclusive or Unclear?
If the test results for the ignition coil are inconclusive or unclear, you should double-check all connections and settings, then retest. If issues persist, consider seeking professional help to accurately diagnose and address the problem.
Conclusion
So, now that you’ve tested the lawn mower ignition coil for defects, you can confidently diagnose any issues and take the necessary steps to repair or replace it.
Remember to always prioritize safety and follow the manufacturer’s guidelines when working with ignition coils.
With the right tools and knowledge, you can keep your lawn mower running smoothly for years to come.

