If your lawn mower is having trouble starting, you can easily replace the starter solenoid yourself. In this guide, you’ll learn how to do it safely and efficiently.
Just gather your tools, follow the steps, and soon you’ll have your mower up and running again.
Safety Precautions
Before you begin replacing the starter solenoid on your lawn mower, it’s essential to ensure your safety by following these precautions.
Firstly, make sure the lawn mower is turned off and remove the key to prevent any accidental start-up.
Wear protective gloves and safety goggles to shield your hands and eyes from any potential debris or oil.
It’s crucial to work in a well-ventilated area to avoid inhaling exhaust fumes or other harmful emissions.
Never conduct any maintenance or repairs while the engine is still hot to prevent burns.
Additionally, before starting any work, disconnect the spark plug wire to prevent the engine from accidentally starting.
Be cautious when handling any electrical connections and ensure that the battery is disconnected to avoid any electrical mishaps.
Lastly, read and understand the manufacturer’s manual for your specific lawn mower model to ensure you’re following the recommended safety guidelines.
Gather Necessary Tools
You’ll need to gather the necessary tools before replacing the starter solenoid on your lawn mower. Start by making sure you have a pair of safety gloves to protect your hands from any sharp edges or hot surfaces.
You’ll also need a wrench set with the right sizes for the bolts on the starter solenoid and other components. A screwdriver set, including both flathead and Phillips head screwdrivers, will be essential for removing any screws or fasteners.
Additionally, a multimeter can help you test the electrical connections and diagnose any issues with the starter solenoid.
It’s important to have a clean work area, so grab a shop rag or some paper towels to wipe down any dirty or greasy parts you may encounter. A small wire brush can also come in handy for cleaning off any corrosion from the electrical connections.
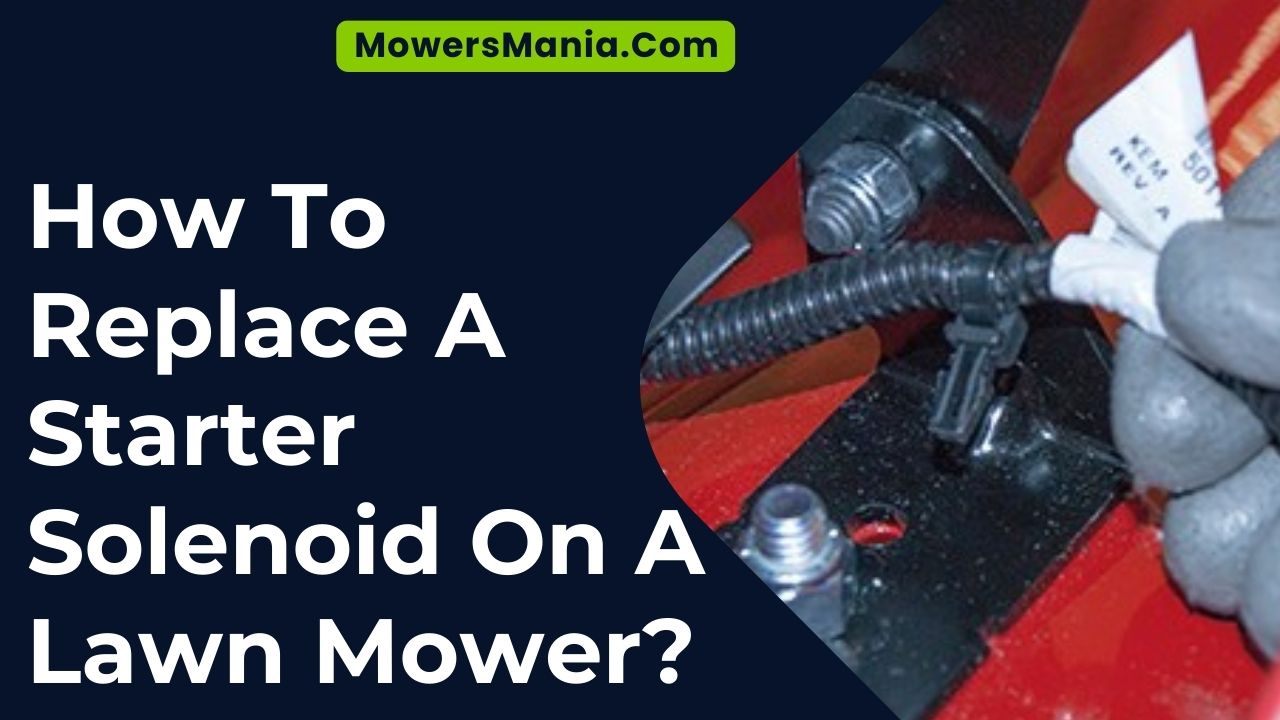
Locate the Starter Solenoid
Now it’s time to locate the starter solenoid on your lawn mower. Look for the small cylindrical component connected to the battery and starter motor.
Once you’ve found it, take note of how the wires are connected and prepare to remove the old solenoid.
Identify Solenoid’s Location
To locate the starter solenoid on your lawn mower, start by identifying the small cylindrical component attached to the side of the engine near the battery or ignition switch.
The solenoid is typically located close to the engine’s flywheel and is connected to the battery and starter motor. It’s often secured to the mower’s frame or engine with bolts or screws.
If you’re having trouble finding it, consult your lawn mower’s manual for a diagram or specific location. In some models, the solenoid may be concealed under a protective cover or housing, so you might need to remove some parts for access.
Once you’ve located the solenoid, you can proceed with the replacement following the manufacturer’s instructions.
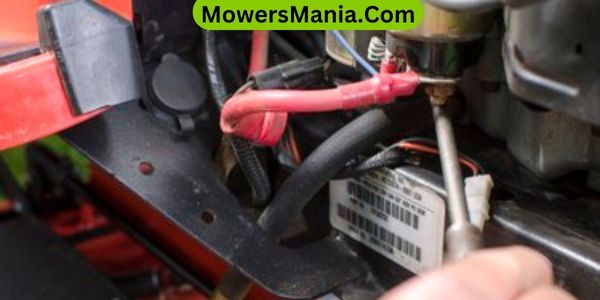
Understand Solenoid’s Wiring
Start by examining the wiring connected to the starter solenoid to understand its configuration and connections. Look for the wires leading to the solenoid, which are usually connected to small terminals on the solenoid body.
Next, identify the main power cable that comes from the lawnmower’s battery and connects to the solenoid’s large terminal.
Then, locate the small terminal wire which is often connected to the ignition switch. Understanding the wiring will help you grasp how the solenoid functions and how it interacts with the lawnmower’s electrical system.
This knowledge will be crucial when it comes time to replace the solenoid, as it ensures that you’ll be able to reconnect the new solenoid correctly.
Remove Old Solenoid
To remove the old solenoid from your lawn mower, begin by locating the starter solenoid under the hood or near the engine. The starter solenoid is typically a small cylindrical component with a wire or cable attached to it.
It’s often found near the battery or ignition system. Look for a part with a couple of large terminals and a smaller control wire.
Once you’ve identified the solenoid, use a wrench or socket set to loosen and remove the nuts or bolts securing the wires to the terminals. Take note of the wire locations to ensure correct reattachment later.
After disconnecting the wires, you can then proceed to remove the mounting bolts or screws that hold the solenoid in place.
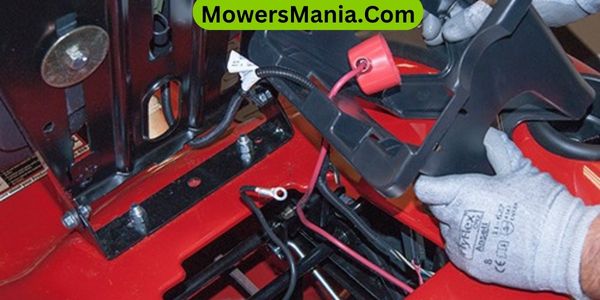
Disconnect Battery and Wires
Before disconnecting the battery and wires, always ensure that the engine is off and the key is removed from the ignition to prevent any accidental start-ups. Safety should always be a priority when working on any machinery.
Follow these steps to safely disconnect the battery and wires:
- Disconnect the Negative Terminal:
Use a wrench to loosen the nut on the negative terminal of the battery. Once the nut is loose, carefully lift the negative cable off the terminal and set it aside, ensuring it doesn’t come into contact with the battery terminal again.
- Remove the Wires from the Solenoid:
Take a picture of the current arrangement of wires connected to the solenoid to reference during reinstallation. Carefully disconnect the wires from the solenoid, making sure to keep track of which wire connects to which terminal.
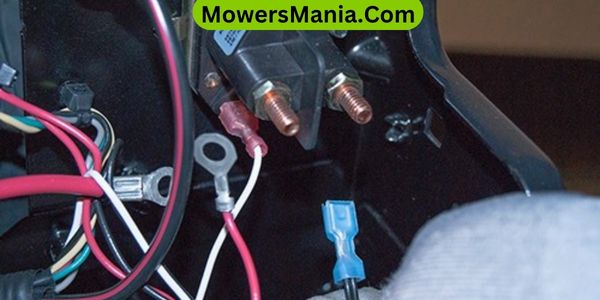
Remove and Replace Solenoid
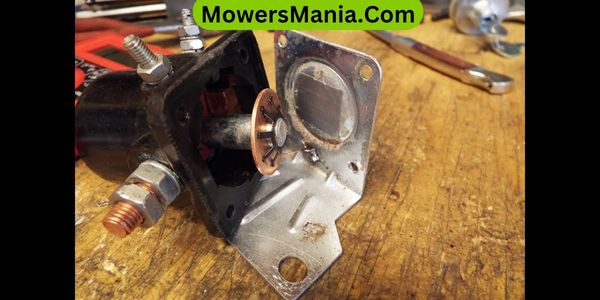
After carefully removing the wires and battery, you’ll frequently encounter the next step of removing and replacing the solenoid on your lawn mower.
The solenoid is usually located near the battery and is attached to the mower’s frame with screws or bolts. Using a wrench or socket set, unscrew the fasteners that secure the solenoid in place.
Once the fasteners are removed, gently disconnect the wires attached to the solenoid. Take note of which wire connects to each terminal as you’ll need to reconnect them correctly.
With the old solenoid detached, it’s time to replace it with a new one. Align the new solenoid in the same position as the old one and secure it with the fasteners.
Reconnect the wires to the appropriate terminals, ensuring a snug fit. Double-check all connections to guarantee everything is properly secured.
After the new solenoid is in place and all the wires are connected, you can proceed to reattach the battery and wires that were disconnected earlier.
This marks the completion of the process, and you can now test the mower to ensure the new solenoid is functioning as it should.
Reconnect Wires and Battery
Now it’s time to reconnect the wires and battery. Check the wire connections carefully to ensure everything is secure.
Make sure the battery polarity matches the connections on the solenoid.
Check Wire Connections Carefully
Carefully reconnect the wires and battery to the starter solenoid using the appropriate tools and following the manufacturer’s guidelines.
When reconnecting the wires and battery, pay attention to the following:
- Wire Connections:
- Ensure that the wires are securely attached to the correct terminals on the starter solenoid.
- Double-check that there are no loose or frayed wires that could cause a short circuit.
- Battery Connection:
- Reattach the positive and negative terminals of the battery to the corresponding connectors on the starter solenoid.
- Tighten the connections to prevent any accidental disconnection while the lawn mower is in use.
Ensure Battery Polarity Matches
Double-check that the positive and negative terminals of the battery are correctly matched to their corresponding connectors on the starter solenoid, ensuring proper battery polarity for effective operation.
Start by reconnecting the wires to the solenoid, making sure they’re securely attached. Connect the positive wire to the terminal marked ‘S’ or ‘ST’ and the negative wire to the terminal marked ‘GND’ or ‘-‘, ensuring a snug fit.
Then, reconnect the battery, attaching the positive terminal to the corresponding positive connector on the solenoid and the negative terminal to the negative connector.
Ensure the connections are tight to prevent any loose connections that could affect the performance of the starter solenoid.
Confirm that the battery is securely fastened in place to prevent any movement during operation.
Test the Replacement
Before testing the replacement starter solenoid, ensure that the lawn mower is on a flat and stable surface with the parking brake engaged.
Once you have the mower in the correct position, follow these steps to test the replacement solenoid:
- Check Wiring Connections:
Inspect all the wiring connections to ensure they’re secure and free of corrosion. Loose or corroded connections can cause the starter solenoid to malfunction, so it’s crucial to double-check all the connections before testing.
- Test for Voltage:
Use a multimeter to test for voltage at the solenoid terminals while turning the ignition key. Connect the multimeter probes to the solenoid terminals and have someone turn the ignition key. If there’s no voltage when the key is turned, there may be an issue with the wiring or ignition switch.
Frequently Asked Questions (FAQs)
Can a Damaged Starter Solenoid Cause Damage to Other Parts of the Lawn Mower?
Yes, a damaged starter solenoid can cause damage to other parts of the lawn mower. When the solenoid fails, it can send excessive current through the system, potentially harming other components. It’s important to address this issue promptly.
Is It Necessary to Replace the Entire Starter Motor if the Solenoid Is Faulty?
If the solenoid is faulty, you don’t always need to replace the entire starter motor. Sometimes, replacing just the solenoid can fix the issue. It’s a good idea to test both components to determine the best course of action.
What Are Some Signs That Indicate a Faulty Starter Solenoid?
If your mower’s starter solenoid is faulty, signs may include a clicking noise when you turn the key, the engine not cranking, or lights dimming when you attempt to start. It’s important to address these issues promptly.
Are There Any Specific Maintenance Tips to Prevent Starter Solenoid Issues in the Future?
To prevent starter solenoid issues, regularly check and clean the connections, and ensure the battery is in good condition. Also, avoid over-cranking the engine and make sure the wiring is secure. These steps can help prevent future problems.
Can I Test the Starter Solenoid Before Replacing It to Confirm That It Is the Issue?
Yes, you can test the starter solenoid before replacing it. Use a multimeter to check for continuity between the solenoid terminals. If there’s no continuity, the solenoid is likely the issue.
Conclusion
Now that you have replaced the starter solenoid on your lawn mower, you can rest assured that your mower will start reliably.
Remember to always prioritize safety when working on your equipment and double check all connections before testing the replacement.
With the right tools and a little know-how, you can keep your lawn mower in top condition for years to come.

